Half-Life 2 VR Mod Review And Setup Guide
Half-Life 2 is one of the most well known and respected video games of all time. Just like the original Half Life it is widely considered to be a classic that not only showcased some impressive technology for the time in the Source Engine, but also was another tightly designed and extremely well thought out experience that is full of memorable moments and superb gameplay.
Most players that have tried it can come to the conclusion that Half-Life 2 is a fun and good game. We already know that, so that’s not what I'm here to talk to you about. The question here is: As much as we've all loved Half-Life 2 on the flat screen, does that mean it is also fun in Virtual Reality?
The Gravity Gun is even better in Half-Life 2 VR
Half-Life 2 Is Amazing In Virtual Reality
Yes... yes it is. Seriously this game is somehow even better in Virtual Reality, and you can play it for free in SteamVR as long as you own a copy of the original Half-Life 2. This is crazy. I'd like to thank everyone who put time in to work on this. It is absolutely amazing and I've never loved a flatscreen to VR mod more in my entire life.
Though you, the reader, might want a little more detail than just my word that Half Life 2 VR is absolutely awesome and amazing and you should try it right now. So let's talk specifics. How does the addition of VR make Half-Life 2 better?
In any discussion of a flatscreen game being ported into Virtual Reality there are very obvious aspects that differ immediately between Virtual Reality and flatscreen gaming.
The most immediately apparent of these is the switch from a desktop monitor to two very little monitors shoved right in front of both of your eyes and cast slightly askew so that you have the illusion of being inside of a completely 3D space with the illusion of depth. Basically the magic that makes VR gaming so much more immersive than flatscreen gaming.
Aiming in Half-Life 2 VR feels so much less constrained when using your physical hands in Virtual Reality
Now you might think that this is where the Half Life 2 VR mod wouldn't be very impressive. Sure the mod makes it so that your head is exactly where Gordon Freeman's head is, basically putting you immediately into his shoes and making you feel like you really are present inside the whirlwind of combine gunfighting, headcrab zombie chopping, and antlion wrangling chaos around you.
Still, Half-Life 2 is about two decades old now, and concerning how far computer graphics have come, two decades is quite a long time. The source engine was impressive for its time, but does it really hold up twenty years later?
While you'd think that taking such a up close look at textures and technology that is so old would make it feel like you're living inside an eyesore, the look of the game still holds up very well. If you look really closely at the textures that make up your environment or other NPCs, then yea you can see that they are lower resolution than you're used to.
Oh, and being able to look so closely at those NPCs talk is sometimes a little uncanny, but Half Life 2 still looks better in Virtual Reality than a lot of modern games made for VR platforms.
The Half Life 2 VR Mod looks excellent as well. Even better than the original Half-Life 2 because of the more personal point of view
At the end of the day this comes down to good environmental design. While the technology is older, good design is timeless.
The various aesthetics of the maps that you explore and fight through in the Half-Life 2 VR mod still hold up as well as they did all those years ago, and taking a closer and more personal look at things just makes them even better to look at and experience. Though while I mentioned the NPCs can be uncanny to look at when they're talking, boy are they great when you're fighting.
Strapping a device to your head that displays the action directly into your eyes and tracks your head like you really are there standing exactly where your Gordan Freeman in the game is makes the combat feel so much more immersive. You really do feel like you're standing in a hallway in Nova Prospekt gunning down incoming combine prison guards almost as quickly as they can spawn in.
The Half-Life 2 VR Mod Feels As Good As It Looks
Even the scope on the crossbow functions excellently in the Half Life 2 VR Mod
Combined with the excellent hand controls that the Half Life 2 VR mod brings to the table, the full force of the VR effect comes crashing in on you in Half-Life 2 VR. You feel like you're really there, like you really can reach out and touch that soldier standing just feet away from you. Well, actually you can reach out and touch them.
That's the second half of the puzzle that makes Half Life 2 such an enjoyable Virtual Reality experience, the hand controls. They are absolutely superb. I've played plenty of recently released titles that were made for VR which had worse hand controls than those in this free Half-Life 2 VR mod.
Though while the hands generally track really well and are responsive, they're not perfect. There are instances where your hands might get caught on the walls or floor around you, mostly I noticed this when physically crouching. The system that detects what object your hand is close enough to to grab was also a little finicky sometimes, but the fact that it works at all is still amazing. You can just reach an empty hand out to an object and hold down the grip to grab it, and the physics fun only gets better when the Gravity Gun comes into play.
With the VR mod you're also much freer when playing with the physics and just in general since you can use your physical hands in any way you'd like. You're not constrained to grabbing or aiming directly in front of you like you were in the original game.
There’s a fully functional hand grabbing system as well. It works amazingly well in Half-Life 2 VR
So now you can shoot from different angles, shoot from cover, or even blind fire around corners or above obstacles if you want to. While you don't have to play the mod like a more cover based shooter than Half Life 2 was intended to be, you certainly can if you like. Your weapons point where your hands point, and that not only feels amazing, but even expands the game and gives you as a player more options in how you want to play it.
Speaking of those weapons, they all feel fantastic. The entire arsenal of Half-Life 2 looks and feels amazing in this game. From the humble pistol to the combine assault rifle, each weapon has unique reloading actions that you can do with your actual, real hands. This isn't one of those flatscreen to VR ports where you just hit a button to reload your primary weapon. Nope, in the Half Life 2 VR mod you have to eject the old mag, grab another one from behind your back, and slam it home.
Weapons like the SMG or Pistol even have to chamber another round if you fire it completely dry before reloading. All of the weapons really come to life in the Half-Life 2 VR mod.
Even throwable weapons like the grenade feel great, and throwing that feels natural has been hard for many VR games to pull off. Basically you start your throw, and just pull the trigger when you would release, and a grenade is spawned from your hand going on the trajectory of the throwing motion you were just making. It feels so natural once you get the hang of it.
Tossing a grenade is easy in Half Life 2 VR
You even reload the RPG by putting another rocket in the tube. The shotgun is actually even a little overpowered because now you can pump it as quickly as your hand can move, meaning you can fire it a lot faster than you ever could as flatscreen Gordon. Now your reloading speed is dependent on how fast you, the player, can reload.
Oh, and since there aren't a bunch of number keys to use anymore, you now select weapons by just pushing in the stick on your dominant hand and then moving your hand over the weapon you want on the selection menu. It did take a little getting used to, but with some practice I could pull out a new weapon extremely quickly.
Eventually knowing where the weapon I wanted was on the selection wheel was just muscle memory. There are a ton of weapons, and so accidentally equipping one that you didn't want to occasionally does happen (mostly when panicking and getting shot a lot), but this beats hitting a button to cycle through every weapon in your arsenal any day.
Selecting weapons is fast and straightforward with this weapon selection wheel. Just move your hand over the weapon you want and let go
As for negative things, there are a few bugs, mostly I noticed some objects popping in and out of existence when you look at them from certain angles. The only bugs that were really annoying were the few times my hands were caught behind walls or objects, and for the record that was very rare and only happened once or twice.
The only part of the gameplay itself that is annoying is that when you dump a magazine you don't get the leftover ammunition in it back automatically, you have to pick it up manually instead. Now this isn't the worst thing ever, and is realistic if nothing else. I just would have liked an option to make it so that dumped magazine ammunition is automatically collected from the ground.
That's really about it. There are a ton of comfort and other settings that you can change in the game as you like, like adding a laser pointer to your guns if you aren't the best at aiming, or making it so that you actually have to physically grab and climb up ladders to use them. There are really a ton of comfort and utility options you can set in the game.
The Half Life 2 VR Mod Is Free And Runs Directly Through SteamVR
This mod is fantastic, and if all of this hasn't convinced you to try it, maybe the fact that it is free will.
The Half-Life 2 VR Mod is totally free! You just have to own Half-Life 2
If you own a copy of Half Life 2 just download the mod for free on Steam and run it, you don't even need to have the original Half Life 2 installed. There's no setup process, just play it like any other Steam VR game. If you are on a standalone device like a Meta Quest 3 or 2 then you can still play the Half Life 2 VR mod if you stream it from your PC to your headset.
So thanks to Valve for making a fantastic game two decades ago, and most of all thanks to the dedicated modders who created this absolutely fantastic VR mod. I have absolutely no idea how they pulled it off but if I didn't know better I would have thought that Half-Life 2 was actually made as a Virtual Reality game first and not the other way around.
So yea, give this mod a try and thank me later.
New Planes for FREE In VTOL VR By Easily Installing VTOL VR Mods
Welcome to this step by step guide on how to install VTOL VR Mods! VTOL VR is an extremely fun VR combat flight simulator game, and it’s even better with mods. So keep reading to find out how to install VTOL VR mods as easily as possible to make your game even better. In this example we will be installing a brand new modded plane! The Mirage 2000CX. Keep reading to find out how to get a free new plane in VTOL VR!
Welcome to this step by step guide on how to install VTOL VR Mods! VTOL VR is an extremely fun VR combat flight simulator game, and it’s even better with mods. So keep reading to find out how to install VTOL VR mods as easily as possible to make your game even better. In this example we will be installing a brand new modded plane! The Mirage 2000CX. Keep reading to find out how to get a free new plane in VTOL VR!
Mod Loader for Installing VTOL VR Mods
The first step in installing PCVR VTOL VR mods is downloading and installing the VTOL VR Mod Loader. This is a useful program that you can use on your PC to install and manage VTOL VR mods. Go to the vtolvr-mods.com homepage and download the latest version of the VTOL VR Mod Loader by clicking the “Download Mod Loader” button.
After the VTOL VR Mod Loader is downloaded, run it as an administrator. You can choose not to, but not all features may be available if you do not. You may see a popup like this one.
If you do and want to keep following this guide, then press Yes. Do note that the VTOL VR Mod Loader is third party software and not supported or created directly by the VTOL VR developers.
Anyway, once the Mod Loader is run with the correct permissions you will see the “First Time” Setup menu.
Press the “Auto Detect” button on the right side of the screen. If, for some reason, the VTOL VR Path field does not fill after you press this button, then press “Browse” and navigate to your computer’s VTOL VR folder. If your VTOL VR installation is through Steam then this folder should be located at:
C:\Program Files\Steam\steamapps\common\VTOL VR\
If you installed Steam somewhere other than the default location, then go to your “Steam” folder wherever you installed it before following the rest of the filepath above.
Once the VTOL VR Path field is filled correctly, press the “Install” button.
You may see a popup like the one above, asking you to update files. If you see this press Yes. Afterwards you may have to wait shortly for the updates to download and install. You can see the progress of this at the bottom of the VTOL VR Mod Loader application. When everything is set up the Mod Loader should look like this.
Downloading VTOL VR Mods
From the main menu of the VTOL VR Mod Loader you can press the “Open https://vtolvr-mods.com” button to go to the website where you can download mods, or just go to vtolvr-mods.com. Once you’re there press the “Mods” or “Skins” icons in the top left corner of the page, depending on what you want to download and install. Here we will be downloading the Mirage 2000CX aircraft to use in our modded VTOL VR game. So let’s go to “Mods.”
On the left hand side of the “Mods” page you can filter for the type of mod you are looking for, or do a string search if you have a type of mod in mind. Luckily for the Mirage 2000CX mod, it’s right here on the first page. When you find the mod you want, click on the name or picture of the mod to open its page.
Once you’re on the Mod page make sure to read the description for any potentially required mods to run it, how the mod works, and any potential bugs that the mod may cause.
When you’re ready to download the mod, just click the “Download” button in the top right. The mod will download to your Downloads folder, or wherever you have configured your PC to send downloaded files.
Installing VTOL VR Mods
Head back over to the VTOL VR Mod Loader, and on the bottom left side of the application hit the “Open Folder” button.
This will open the “VTOLVR_ModLoader” folder within your VTOL VR installation folder that you selected when setting up the VTOL VR Mod Loader. Enter the “mods” folder within this new File Explorer window. Take the mod file you downloaded, unzip it, and move the unzipped folder into this “mods” folder.
Back in the VTOL VR Mod Loader, select the “Mods” button in the top left corner of the screen. Your freshly added mod should be visible in the Mod Loader. Selecting the “Auto Update” checkbox can also help to keep mods up to date, but if you notice a difference in the “Current Version” and “Website Version” numbers you may need to manually update the mod by deleting it from the “mods” folder and repeating this by redownloading it from the vtolvr-mods.com website.
Running VTOL VR With Mods
Now that your VTOL VR mods are installed it’s time to try them out! Press the “Play” button in the bottom right hand corner of the Mod Loader. You should always launch your modded VTOL VR game using this button. Otherwise your mods may not work and problems may occur even when using unmodded content. If you want to play VTOL VR unmodded again, you can just press the red “Disable” button in the top right corner of the VTOL VR Mod Loader.
Once the game is launched and you’ve hit the “Start Game” button in the initial menu. When you’re in the pilot selection menu, don’t select your pilot just yet, instead go to the “Mods” menu here.
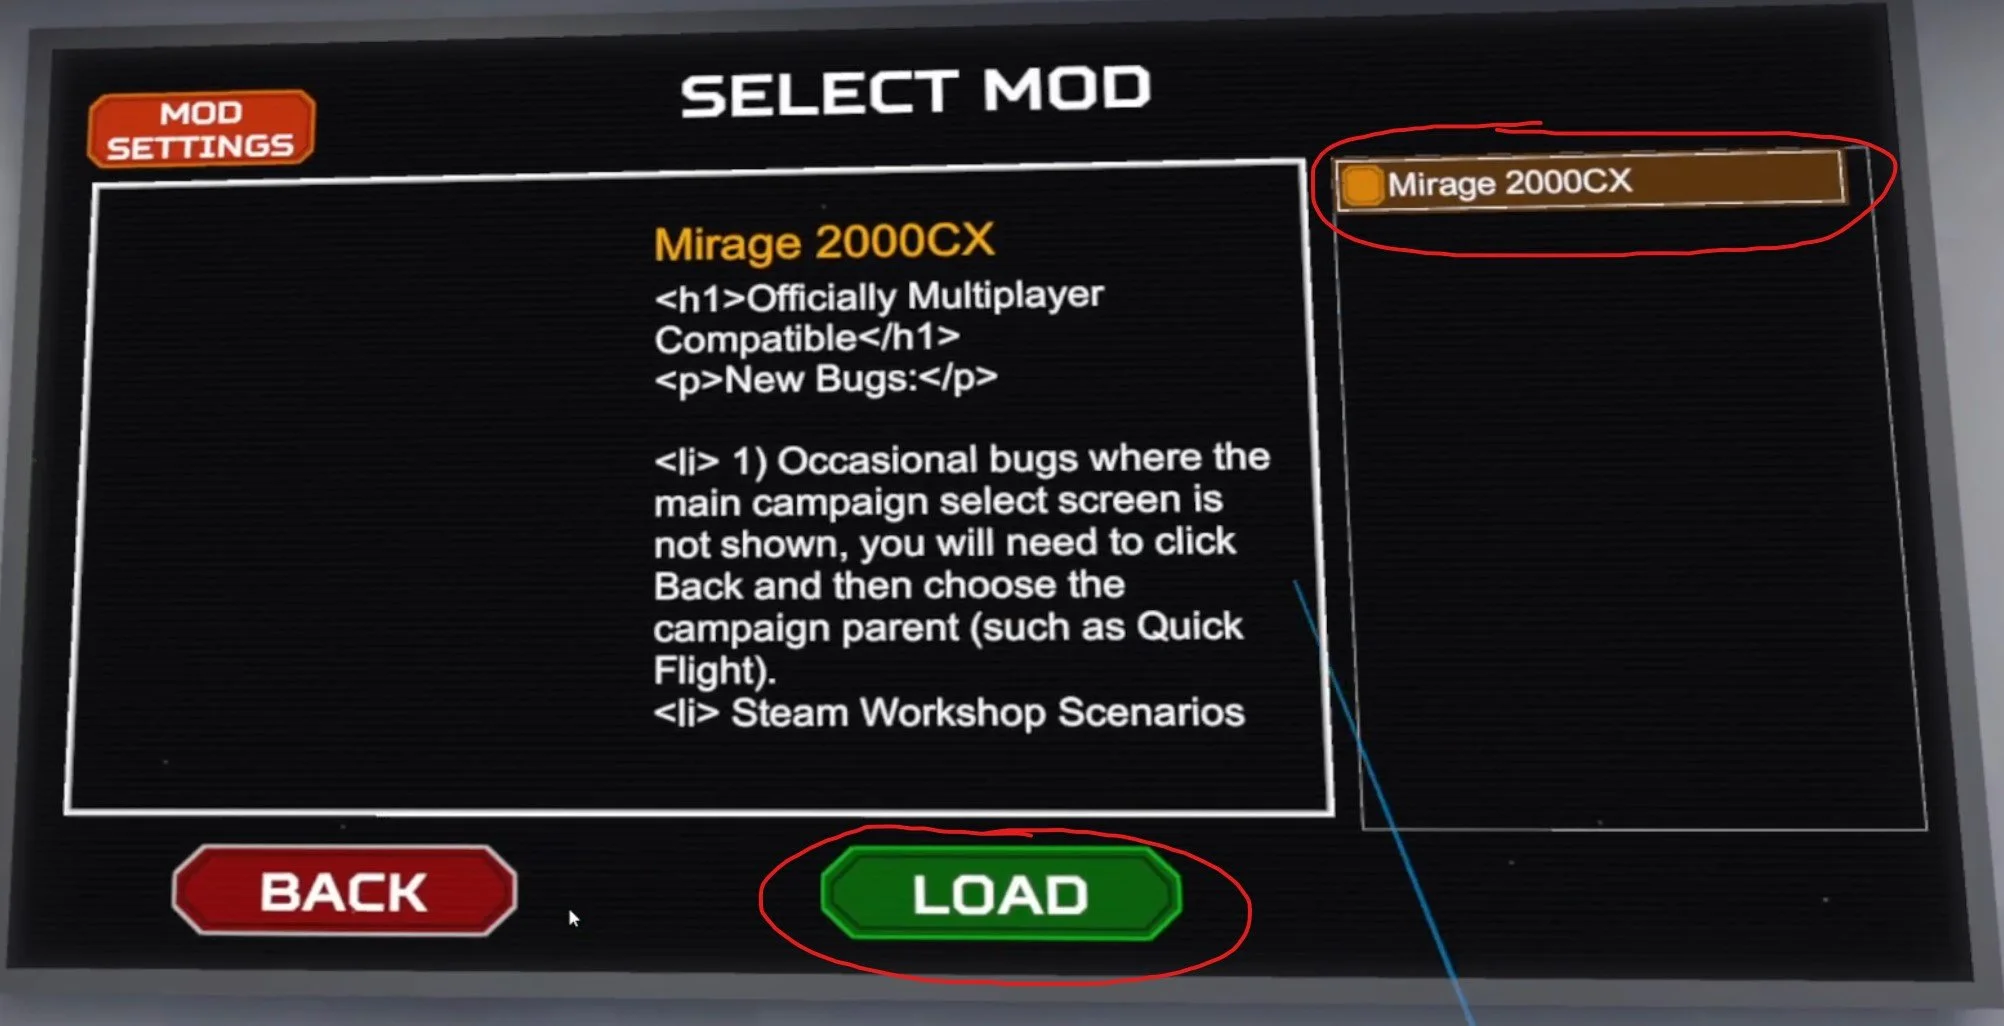
Once you’re in the Mods menu in VTOL VR select the mod you just installed and press the “Load” button at the bottom. There will be a brief delay, and then the button will say “Loaded!"
Once the mod is loaded go back and select your pilot as usual. Since this example added a new modded plane to VTOL VR, the Mirage 2000CX is now available to be selected as an aircraft. Other mods may be visible elsewhere, for instance skins should be available when customizing the aircraft that the skin is meant for.
Keep in mind that the mod might not show up immediately after pressing the “Load” button in the mod menu. If you don’t see the mod ingame at first try starting a Quick Flight as another aircraft, or exit and restart the game from the Mod Loader.
Congratulations, you now know how to easily install VTOL VR mods! More mods are coming out all of the time to make VTOL VR even more fun. Thanks to all of the VTOL VR modders out there for their contributions to making this game even better. Enjoy!
How To Install An Awesome Gorilla Tag Mod Menu
Welcome to this step by step guide on how to install a Gorilla Tag Mod Menu and use it! Gorilla Tag is an extremely fun VR game, and it’s even better with mods. A Gorilla Tag mod menu is great because it lets you easily active and deactivate mods without having to go back to the Gorilla Tag in game PC in your tree house. So keep reading to find out how to install a Gorilla Tag mod menu as easily as possible.
Welcome to this step by step guide on how to install a Gorilla Tag Mod Menu and use it! Gorilla Tag is an extremely fun VR game, and it’s even better with mods. A Gorilla Tag mod menu is great because it lets you easily active and deactivate mods without having to go back to the Gorilla Tag in game PC in your tree house. So keep reading to find out how to install a Gorilla Tag mod menu as easily as possible.
Installing the Gorilla Tag Mod Menu on the Oculus Quest 2
A quick note for all Oculus Quest 2 lovers that are wondering how to get mods directly on your Quest 2. Unfortunately Gorilla Tag mods and Gorilla Tag mod menus can no longer be installed on the Quest 2. There are also currently no plans to bring Quest 2 modding back to Gorilla Tag. Sorry, but if you want to install a Gorilla Tag mod menu then you’ll have to do it on PCVR. Look at this screenshot from the Gorilla Tag modding discord.
You can’t install a Gorilla Tag Mod Menu on an Oculus Quest 2 or 3
If you see a guide that says you can install mods, probably using the QuestPatcher tool, then they won’t tell you that you won’t be able to play Gorilla Tag on your Meta Quest 2 after using QuestPatcher. It just won’t work, and will constantly tell you that you have an outdated version of the game that has to be restored to the newest version.
If you have a Quest 2 and want to play Gorilla Tag on PCVR then you could set up and use Oculus Airlink. The thing about Airlink is that it can drop a ton of frames and be very choppy and look horrible if your internet setup to your PC isn’t very good. If you want to use Oculus Airlink, then make sure your PC is connected to your Router or Modem with an ethernet cable.
If you can’t or don’t want to use Airlink then you’ll need to be able to connect your headset to your PC directly. This is possible with an Oculus Quest 2 using an Oculus Link Cable or comparable USB 3 cable. If you don’t have one there are plenty online that are not as expensive as the official Link Cable, but are possibly not as good.
Monke Mod Manager for PCVR Gorilla Tag Mod Menu
The first step in installing PCVR Gorilla Tag mods is downloading and installing the Monke Mod Manager. It’s a sweet program that you can use on your PC to install Gorilla tag mods. Go to the Monke Mod Manager github page that you can find at this link. Click on the MonkeModManager.exe link under “Assets” to download the installer.
Downloading the Monke Mod Manager to install Gorilla Tag mods
After Monke Mod Manager is downloaded, launch it to start the installer. You might get a prompt like the one you see here if the installer can’t find where your Gorilla Tag launcher is, especially if you’re running it through Oculus.
If you see this error don’t worry
That’s alright. If you run Gorilla Tag through Steam click OK and then find and select GorillaTag.exe at C:\Program Files (x86)\Steam\steamapps\common\Gorilla Tag. If you run Gorilla Tag through the Oculus app then you can find and select GorillaTag.exe at C:\Program Files (x86)\Oculus\Software\Software\another-axiom-gorilla-tag (your filepath might be a little different depending on where you have Steam or Oculus installed, just find the “Steam” or “Oculus” folder and follow the rest of the path from there).
Whether Monke Mod Manager found the path automatically or you had to find it yourself, it will start up and you’ll see a menu with a bunch of check boxes. The box that we’re looking for is the mod menu we’re installing that comes with the Monke Mod Manager, the Haunted Mod Menu. This Gorilla Tag mod menu is great and easy to use. For more information on it you can also check out the Haunted Mod Menu github page.
Installing a Gorilla Tag Mod Menu using the Monke Mod Manager
Scroll up and down the mods available and check whichever other mods you want to install. This Gorilla Tag mod menu is only useful if you have some mods to turn on and off. Then hit “Install/Update” in the bottom right corner, and in a couple of seconds the mods will be installed.
Now installing a ton of Gorilla Tag mods to use with the mod menu
Using Your New Gorilla Tag Mod Menu
So you’ve got some mods installed for Gorilla Tag and the Haunted Mod Menu to activate or deactivate them with. Time to run Gorilla Tag and check them out. Once you start the game you’ll see that the Gorilla Tag mod menu can’t be accessed at first, and if you enter a lobby you’ll find that all of your activated mods won’t be working!
Don’t panic, that’s just because Gorilla Tag will turn off any installed mods by default when entering a standard lobby. If you are joining a normal lobby then you won’t be able to run mods, because if you have a mod like Power Arms then nobody will be able to catch you, and it will basically be like you’re cheating.
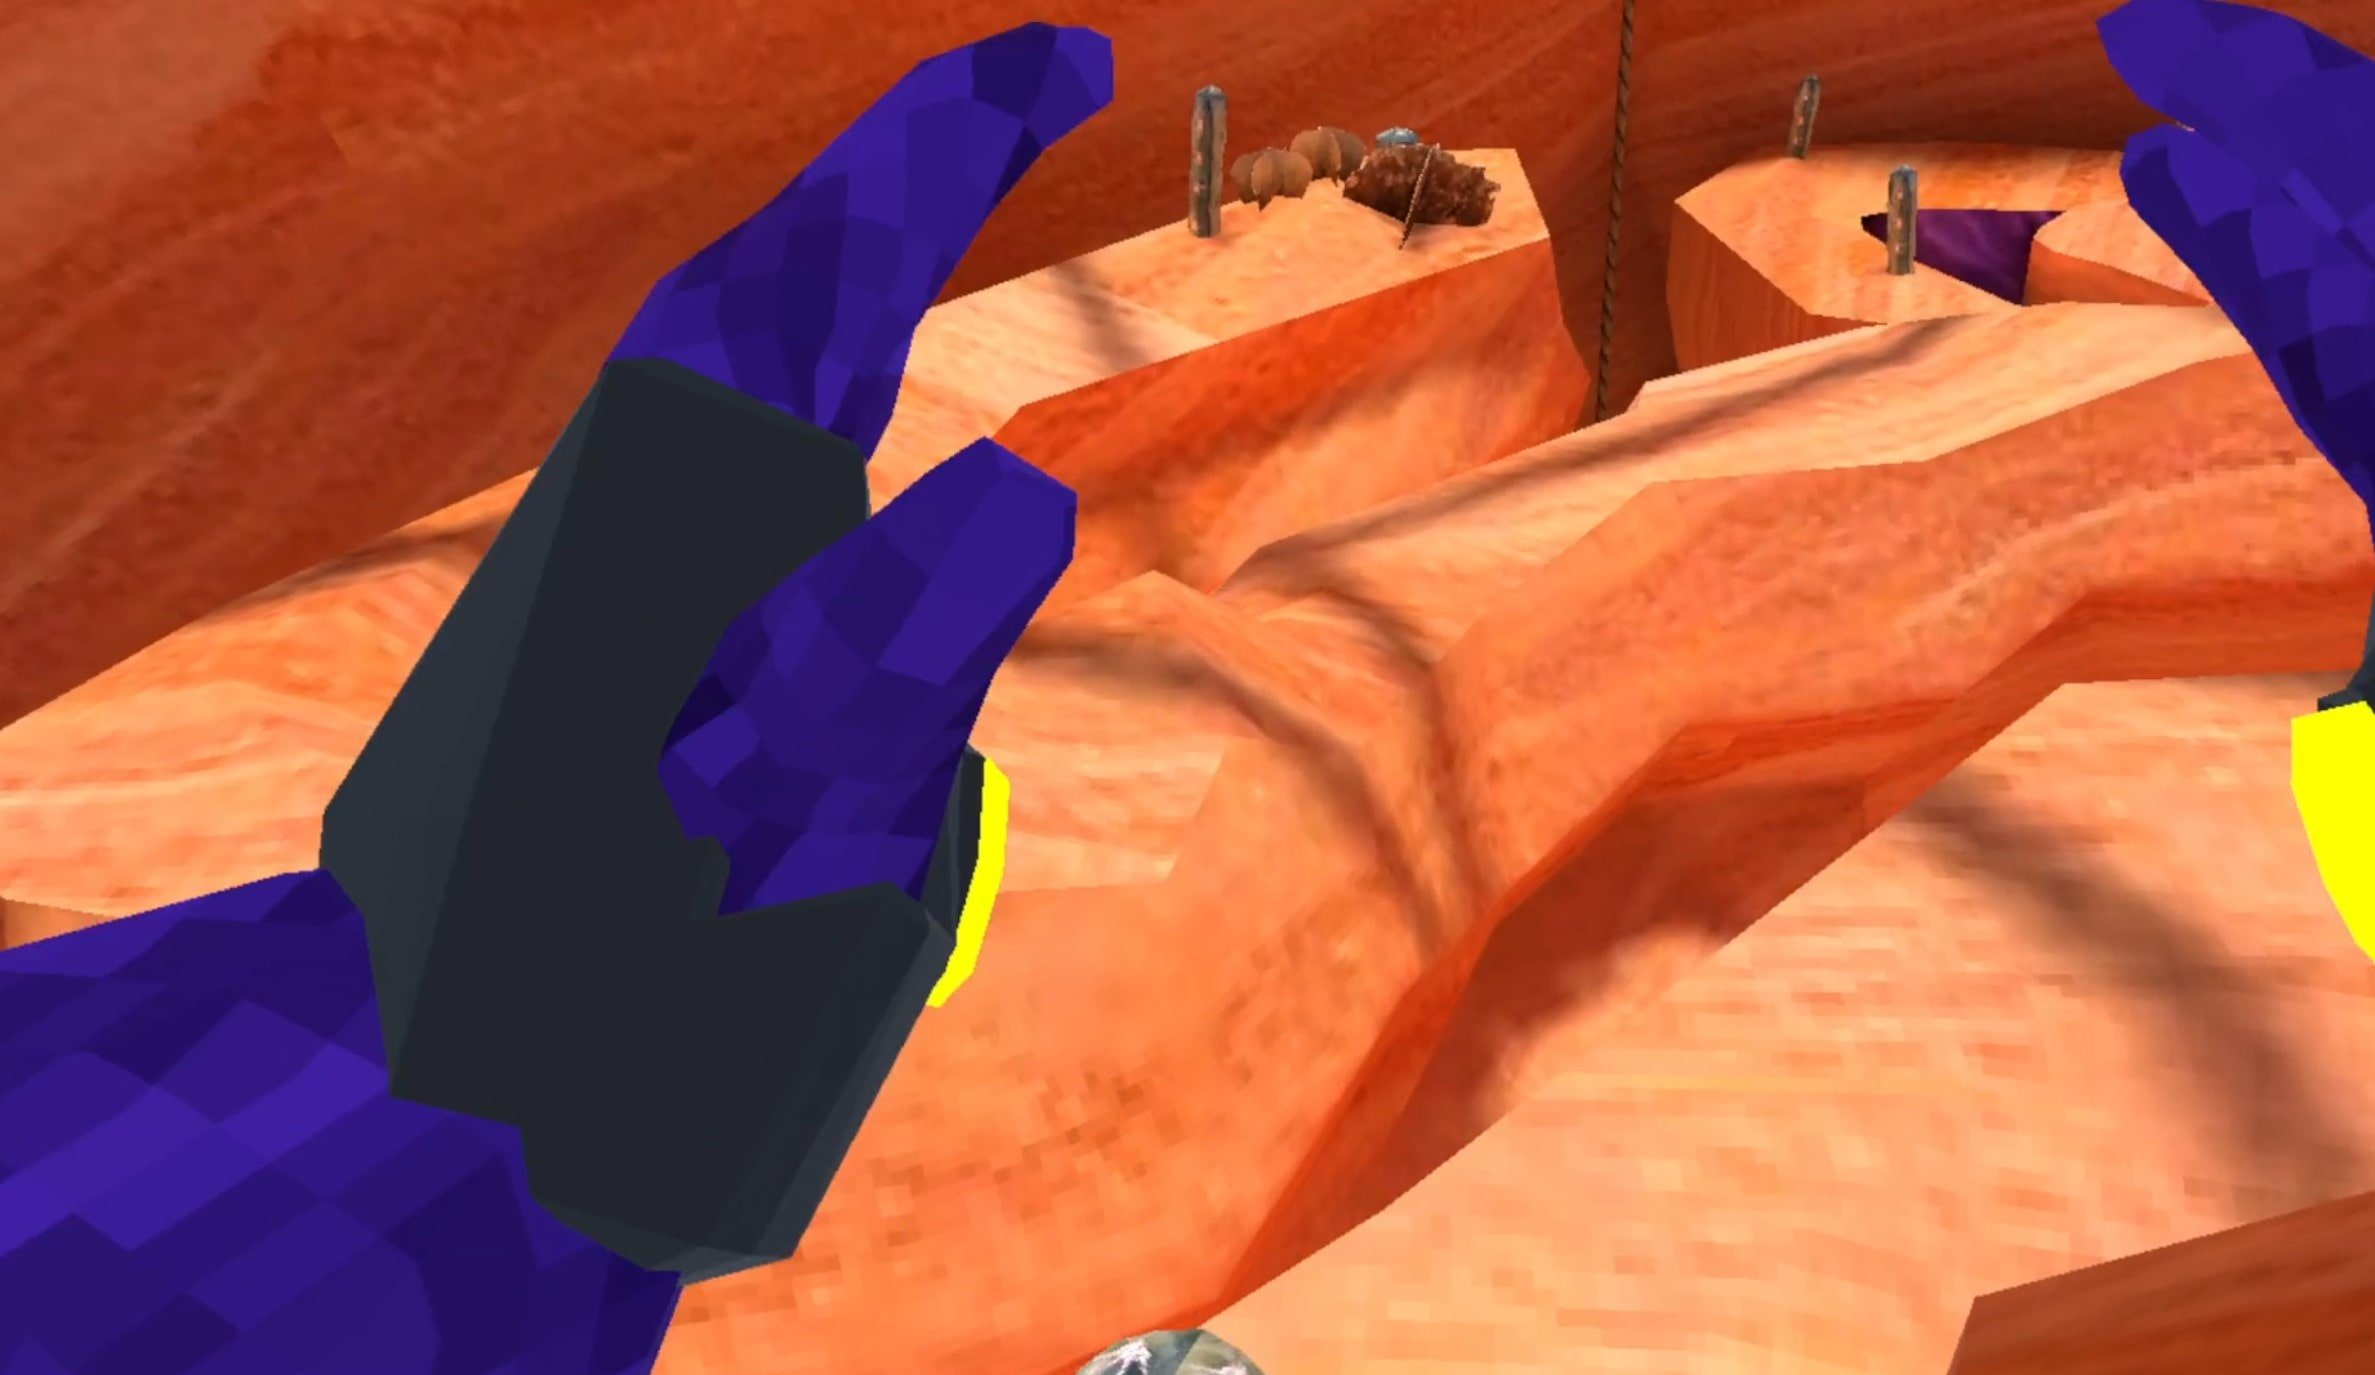
Flying with Gorilla Tag mods
To actually use your new mods you’ll either have to find a custom room that somebody else made, and join it by entering the room ID in the “Room” menu on the Monke Computer in your treehouse, or go over to the “Game Modes” menu in your tree house. When you’re there hit the arrow button on the right and you’ll see that you can select a ton of Modded game modes to find public lobbies that are modded. Select one and then enter a lobby by exiting your treehouse as usual.
Stick to the modded game modes when using Gorilla Tag mods
When you enter the Modded lobby you’ll notice that there’s a yellow button on the inside of your left Monke paw. Press it with your other hand.
Press this button on your palm to open the Gorilla Tag mod menu
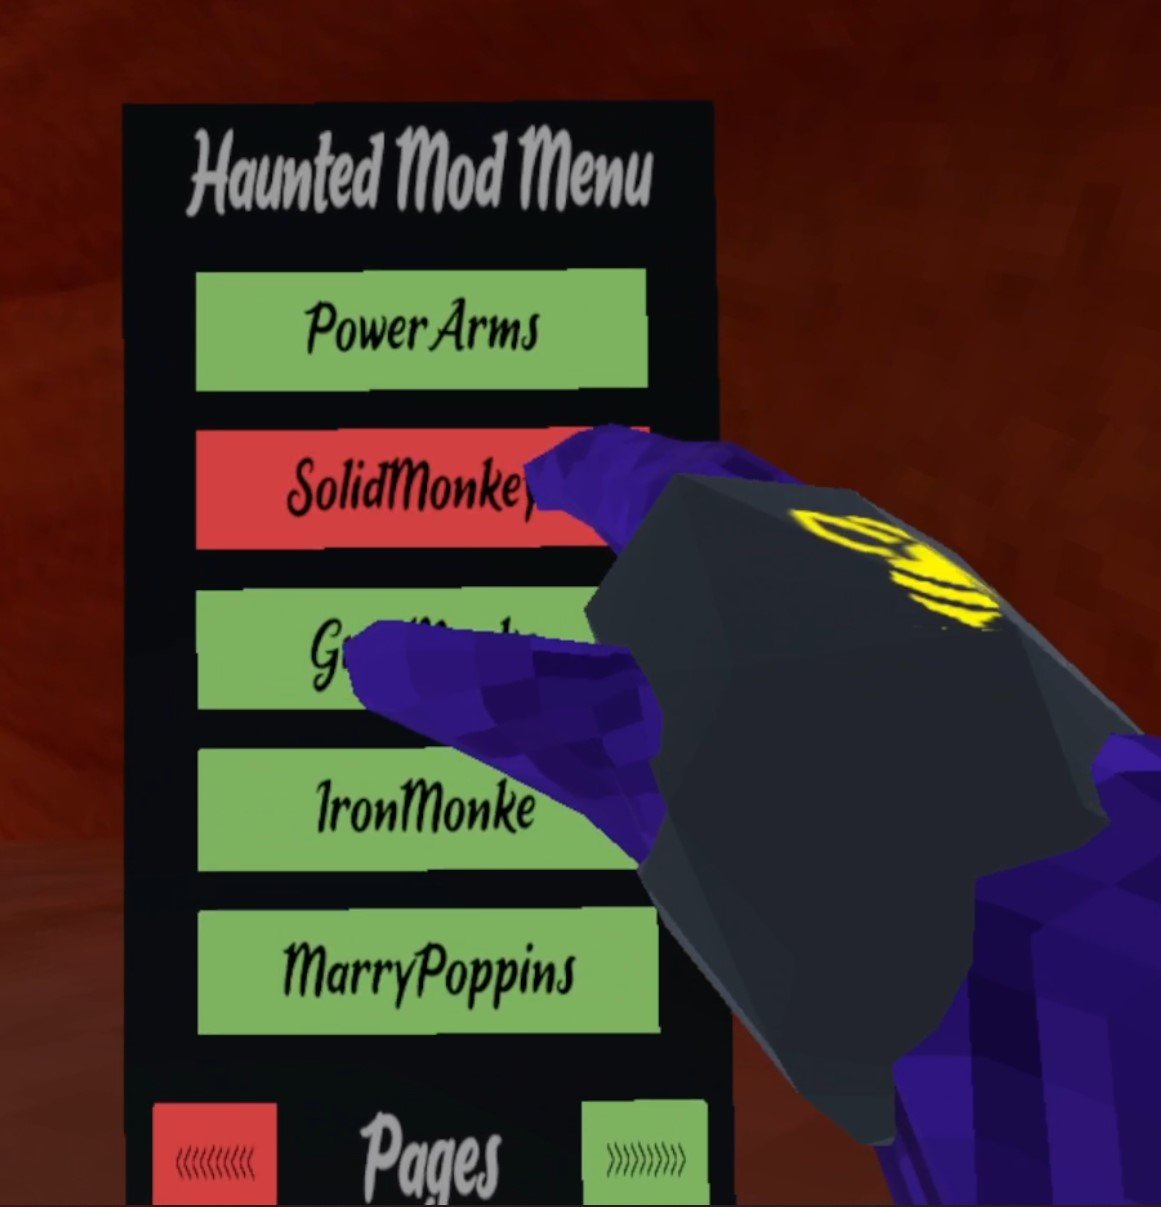
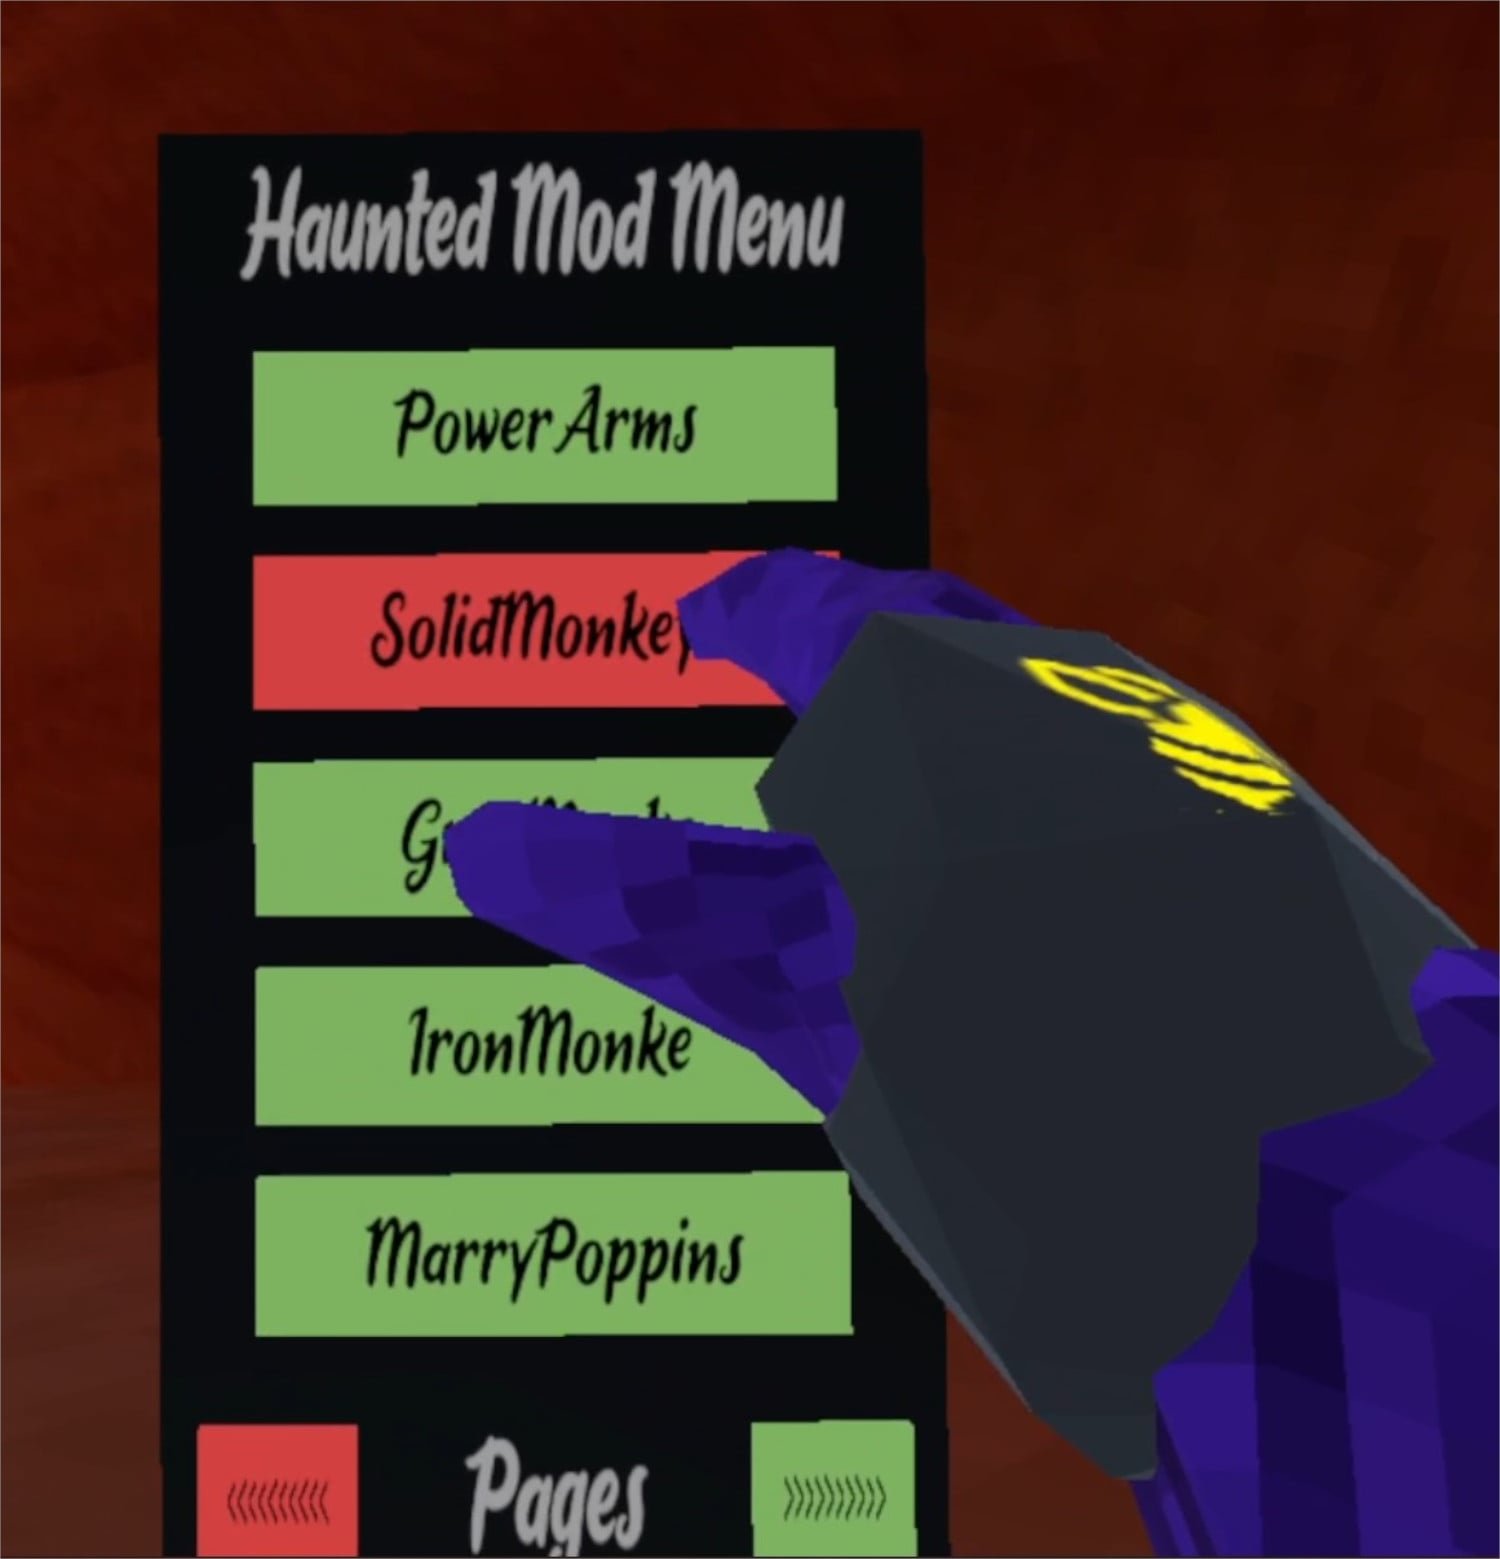
Now your Gorilla Tag Mod Menu will appear out of the back of your left hand! All of the mods you installed will be on the mod menu. You can scroll through all of your mods with the arrows on the bottom. To activate a mod press the mod name in the mod menu with your right hand and the button will turn red. That means that the mod is activated.
Activating a mod using the mod menu
Now you can easily enjoy all of your Gorilla Tag mods with your new Gorilla Tag mod menu! Activate and Deactivate your mods at will. Enjoy!
Easily Get and Install Into the Radius Mods
Welcome to this step by step guide on how to download and install Into the Radius Mods! Into the Radius is an extremely fun VR game. Even after you’ve played it through a bunch of times, or haven’t even finished it and want a different experience, mods can make this VR Survival Game even better. So keep reading to find out how to install Into the Radius mods as easily as possible.
Welcome to this step by step guide on how to download and install Into the Radius Mods! Into the Radius is an extremely fun VR game. Even after you’ve played it through a bunch of times, or haven’t even finished it and want a different experience, mods can make this VR Survival Game even better. So keep reading to find out how to install Into the Radius mods as easily as possible.
Into the Radius Mods on the Oculus Quest 2
You might be here to find out how to install Into the Radius mods on the Oculus Quest 2, or if you can install mods on the Quest 2. Well I’m afraid to tell you that currently Into the Radius mods are not supported on the Meta Quest 2. Hopefully at some point in the future they will be, but for now there’s no way to install Into the Radius mods on your Quest 2. To play modded Into the Radius you’ll need to play it via PCVR via Steam or the Oculus App on your PC.
If you have a Quest 2 and want to play Into the Radius on PCVR then you could set up and use Oculus Airlink. The thing about Airlink is that it can drop a ton of frames and be very choppy and look horrible if your internet setup to your PC isn’t very good. If you want to use Oculus Airlink, then make sure your PC is connected to your Router or Modem with an ethernet cable.
If you can’t or don’t want to use Airlink then you’ll need to be able to connect your headset to your PC directly. This is possible with an Oculus Quest 2 using an Oculus Link Cable or comparable USB 3 cable. If you don’t have one there are plenty online that are not as expensive as the official Link Cable, but are possibly not as good.
How to Get Into the Radius Mods
To mod Into the Radius on PCVR let’s start with getting the mods that you’ll want to install. In this example we will be downloading the Scavenger Mod. This mod is a great new way to play the game. Make sure you start a new save file after installing this mod, and always be wary of cross compatibility issues when you have multiple mods installed.
To get the scavenger mod get on your PC and go to nexusmods.com and search by game for “Into the Radius” or follow this link to take you straight to the Into the Radius mod page.
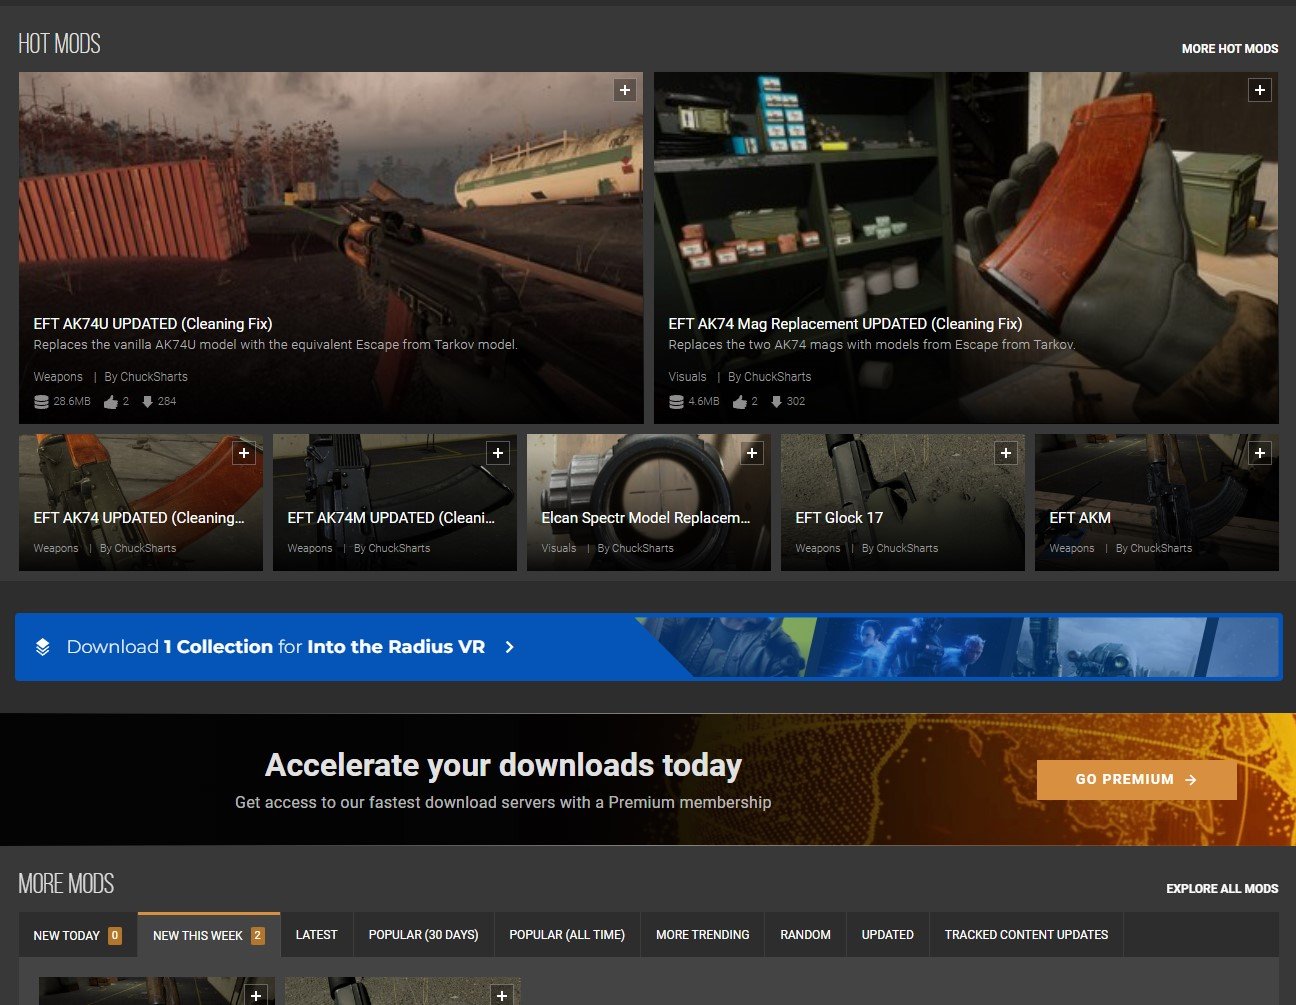
Once you’re here feel free to browse the mods listed on the front page and search through some categories. There’s a bunch of great cosmetic mods that replace objects in the game with different models. There are even other gameplay mods like the STALKER mod that you can install. To find the Scavenger mod search for “Scavenger Mod” in the search bar at the top of the screen, or go to any mod page that you want. When you’re there click on the “Files” tab.
Oh, and make sure that you’re logged into a Nexus Mods account, otherwise you won’t be able to download anything. Don’t worry, you can easily sign up for a free Nexus Mods account. Also you’ll notice that some mods, like the Scavenger Mod, can be installed using Nexus Mod’s Vortex mod manager.
Since not all mods are supported by Vortex, here we’ll be going over how to install these mods manually. Don’t worry, it’s not very hard and takes about just as long as using Vortex anyway.
Now click the “Manual Download” button underneath the latest mod file and you’ll be taken to a downloads page. Select the “Slow Download” button if you’re using a free Nexus Mods account and the file will download to your Downloads folder (or whatever folder you’ve designated files to download to, but Downloads is the default).
Congratulations on your shiny new mod! Time to install it.
How To Install Into the Radius Mods
Head to your PC’s Downloads folder. You can find it in the “Quick Access” panel of the file explorer, or go to C:\Users\<Your PC Username>\Downloads. If the downloaded mod file is a .zip file right click on it and select “Extract All” to get the unzipped contents.
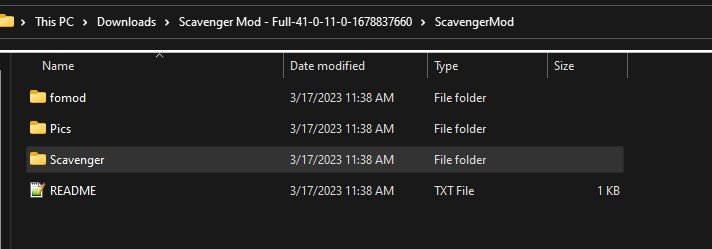
Whichever mod you’ve downloaded should come with one or multiple .pak files. Those .pak files contain the actual mod information and all you need to do is move them to the right folder to install the mod. The Scavenger mod comes with a lot of .pak files in the ScavengerMod/Scavenger/ folder. For this example we’ll be installing the .pak file in the “Abundant” folder for as much loot as possible, and also disabling the shop with the .pak in “Optionnal_files”.
Now that we know what .pak files we want to move, let’s open another File Explorer window to where we want to move them. If you run Into the Radius VR through Steam, then go to where you installed Steam and then \steamapps\common\IntoTheRadius\IntoTheRadius\Content\Paks. The default Steam installation path is: C:\Program FIles\Steam\steamapps\common\IntoTheRadius\IntoTheRadius\Content\Paks.
Oculus App users can find the Into the Radius folder in C:\Program Files\Oculus\Software\Software by default. Then go to \IntoTheRadius\Content\Paks.
This “Paks” folder is where you need to move all of the installed .pak files. Just drag the .paks for the mods you want to install into the “Paks” folder and that’s it! You’ve installed Into the Radius mods. When you start the game next they’ll be installed and ready to go.
Well that’s how you install mods in Into the Radius VR. Make sure to be careful that the mods you install don’t overlap and conflict. Be sure to read the README if one comes with a mod you want to install, or at least read the mod’s page to check if the mod developer shows any conflicts. Most should be obvious, for instance don’t install two mods that reskin the same weapon. It’s also best to start a new game after installing mods, as the mods might mess with a differently modded or vanilla game. Especially overhaul mods like the Scavenger or STALKER mods.,
Oh, and make sure to leave pakchunk0-WindowsNoEditor.pak in the “Paks” folder. This .pak is needed to run Into the Radius properly and is part of a vanilla installation of the game. Moving or deleting it will probably break your game.
Have fun out there in a whole new Zone!
Easily Install Blade and Sorcery: Nomad Mods WITHOUT A PC | How to Install Blade & Sorcery Mods Directly On Quest 2
Want to install mods for Blade and Sorcery: Nomad but don’t have a PC, or don’t want to go through all of the hassle to plug your headset into your computer every time you want to install new mods for Blade & Sorcery: Nomad? Well good thing you don’t have to, because you can download and install Blade and Sorcery Mods directly on to your Quest 2 without needing a PC at all! Here’s a guide on how.
Want to install mods for Blade and Sorcery: Nomad but don’t have a PC, or don’t want to go through all of the hassle to plug your headset into your computer every time you want to install new mods for Blade & Sorcery: Nomad? Well good thing you don’t have to, because you can download and install Blade and Sorcery Mods directly on to your Quest 2 without needing a PC at all! Here’s a guide on how.
The Blade and Sorcery U12 Mod Menu
With the release of U12, Blade & Sorcery: Nomad and Blade & Sorcery for PCVR both have an integrated mod manager that can be used on either platform to install mods directly from mod.io. If you still want to install a mod manually then go to the “How To Download Blade and Sorcery Mods Manually” section below and read on from there. For the most straightforward method, you’re in the right place.
First off you’ll need to have a mod.io account. So go to mod.io on your phone, or directly through your Quest 2 if you like, and sign up for an account with an email address. No password is needed, just make sure you can access the email so that you can provide the security code that mod.io will send to that email. Once you’ve made an account and entered the code, start up Blade and Sorcery: Nomad on your headset.
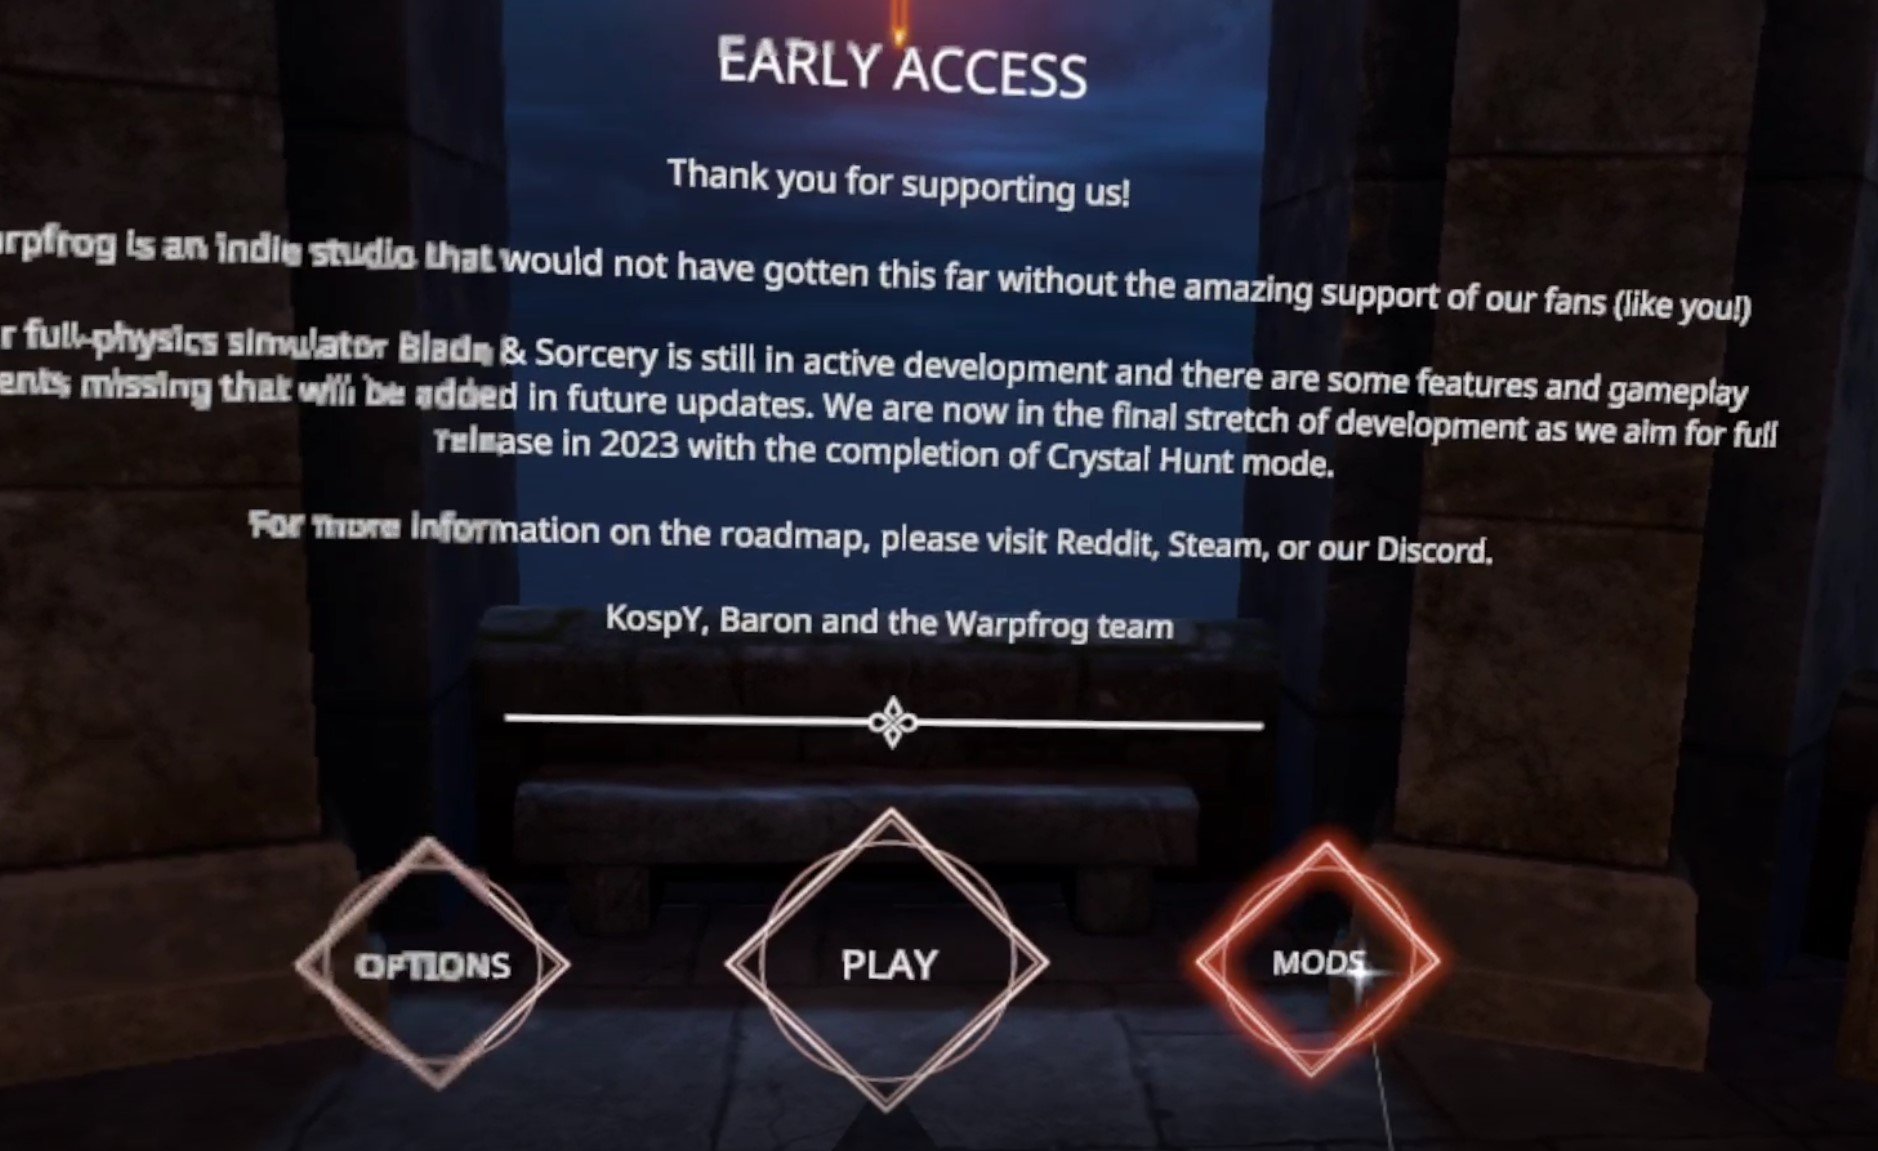
Next to the usual “Play” button on the first screen after the Warp Frog logo, you’ll see a new “Mods” button on the right, hit that, before being presented with a prompt to enter your mod.io email address. This will link your mod.io account to the Blade and Sorcery: Nomad game on your headset to manage mods. Enter the email you used to create your account. You may get an email with another activation code to enter into the game, and once all of that is done you’re presented with the new U12 Blade and Sorcery Mod Manager.
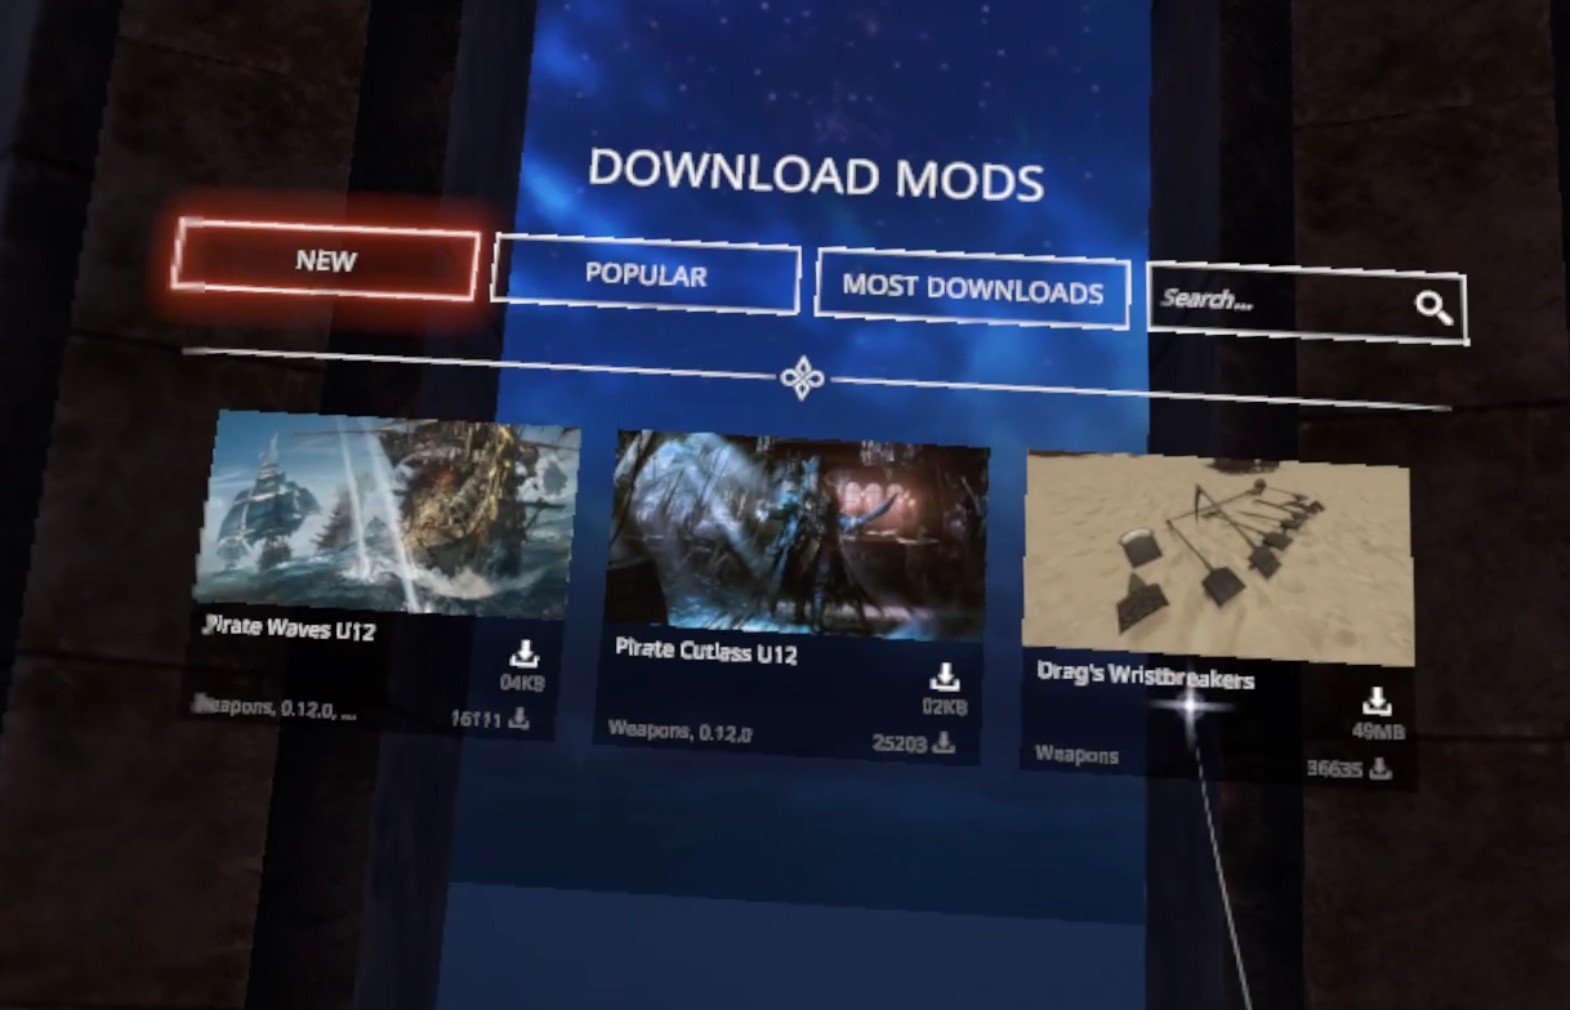
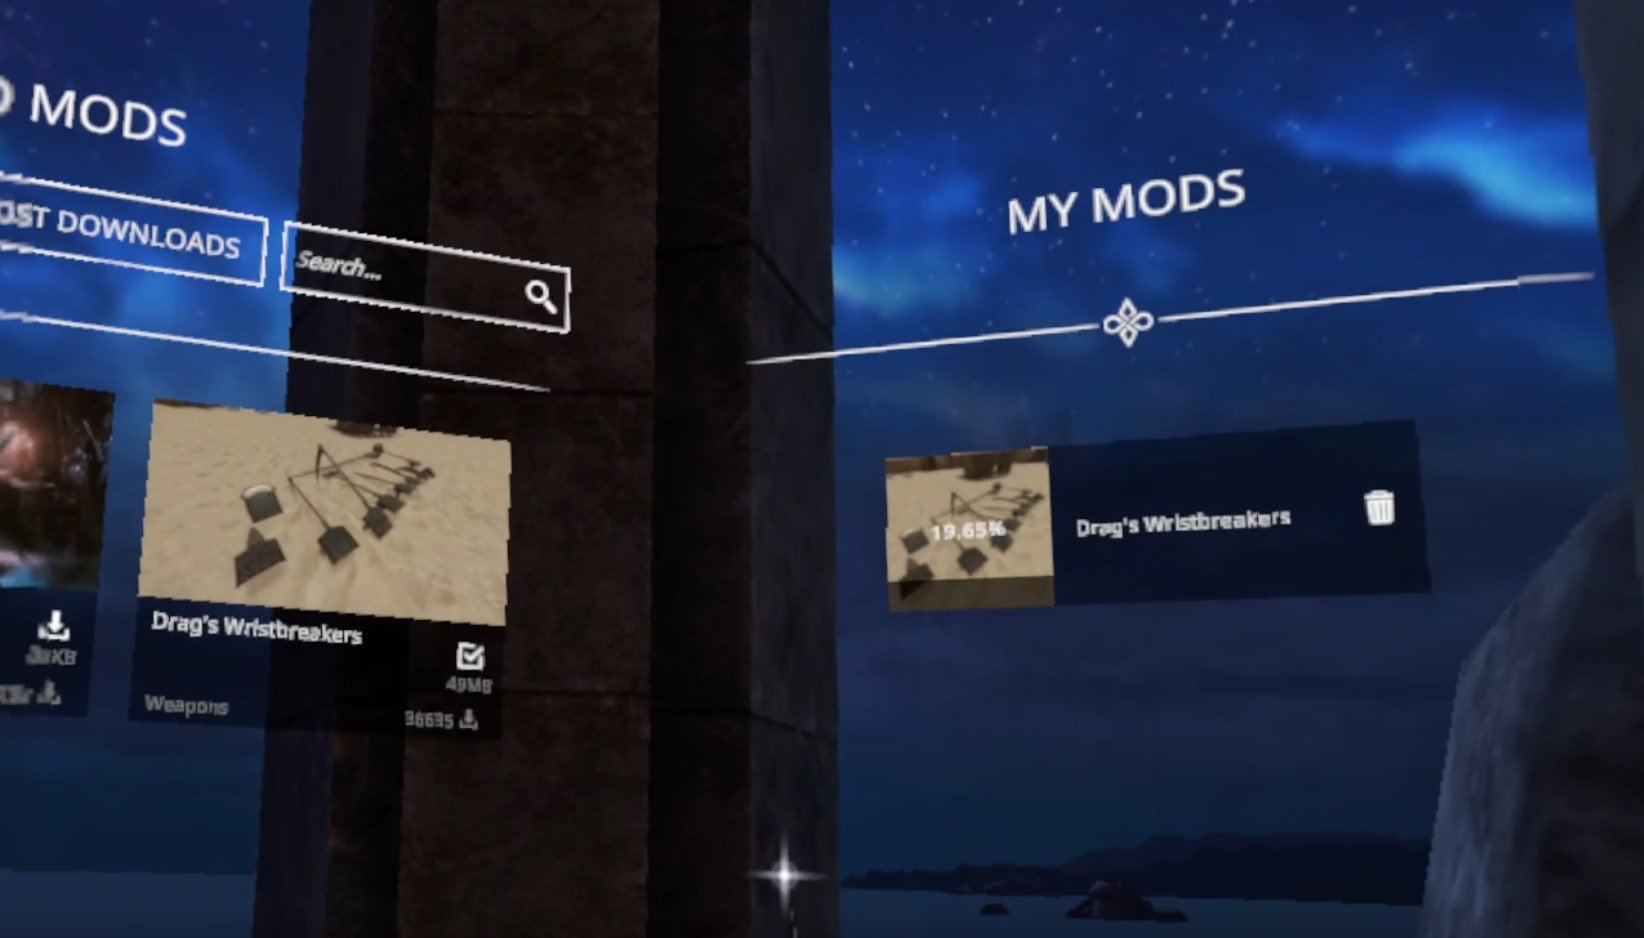
Here in the Mod Manager you can view and download mods as you like. There is a panel on the right to show already installed mods, even those you might have installed manually. You can search for a specific mod in the search bar at the top, or filter with the filter options on the left. Note that any nexusmods.com mods aren’t present here, only those on mod.io.
For this example we’ll be installing Drag’s Wristbreakers, a collection of weapons. Download and installation is easy, just hit the little arrow icon to the right of the name of the mod, and you’ll see the download and installation progress in the “My Mods” panel on the right.
Once you’ve installed all the mods you like, just click the “Back” button on the bottom of the center of the Mod Manager to go back to the first screen, and then hit “Play” like always, and select your character. Once you’re back in the game, you can see what mods are installed through the In Game Menu, which you can open by pressing the menu button on your left controller, and clicking on the “Mods” button.
Though you should know that even if the mod shows up in the menus it may not appear ingame. If this happens to you try restarting Blade and Sorcery: Nomad and if the mods still are not appearing, restart your entire headset.
For our example, Drag’s Wristbreakers appears as a “Grippables” menu in the weapon spawner book. Make sure to check mod descriptions for where they should appear, some might appear in already existing menus like the “Swords” category.
Now we can spawn any of our new modded weapons as we like! Enjoy downloading and installing all the Blade & Sorcery: Nomad mods you like super easily!
How To Download Blade and Sorcery Mods Manually
If you want to install Blade & Sorcery: Nomad mods the old fashioned way without using the built in Mod Manager, then here’s how. Let’s start with the fun part, finding all of the Blade & Sorcery mods that you can download! In your Quest 2 go to the “Meta Quest Browser” app (the one you can use to browse the internet on your headset) and go to the website nexusmods.com.
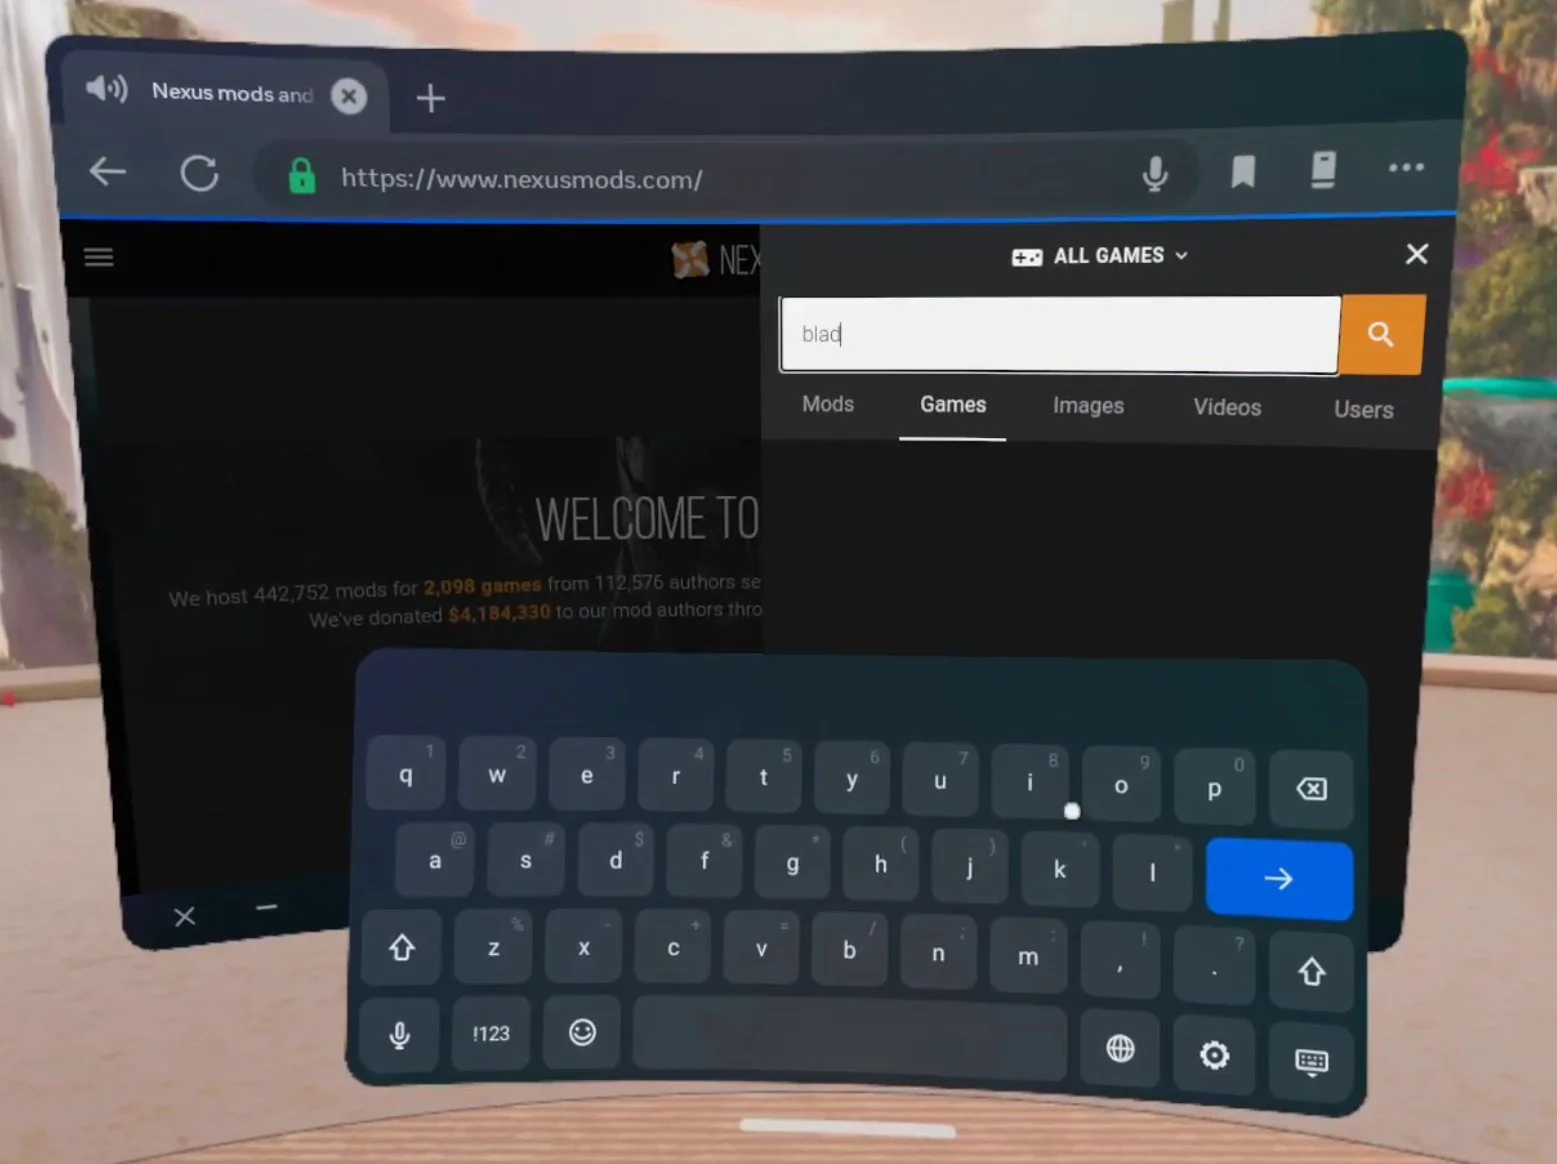
Hit the little search spyglass in the top right and then select “Games” to search by game. Then type in “Blade & Sorcery” to search for Blade & Sorcery: Nomad. Make sure to use “&” instead of “and” as searching “Blade and Sorcery” will give you no results.
After you search for Blade & Sorcery, make sure you select Blade & Sorcery: Nomad and not regular Blade & Sorcery, because mods downloaded for PCVR Blade and Sorcery will not work on your Quest 2. Once you’re on the Blade and Sorcery: Nomad page it will look something like this.
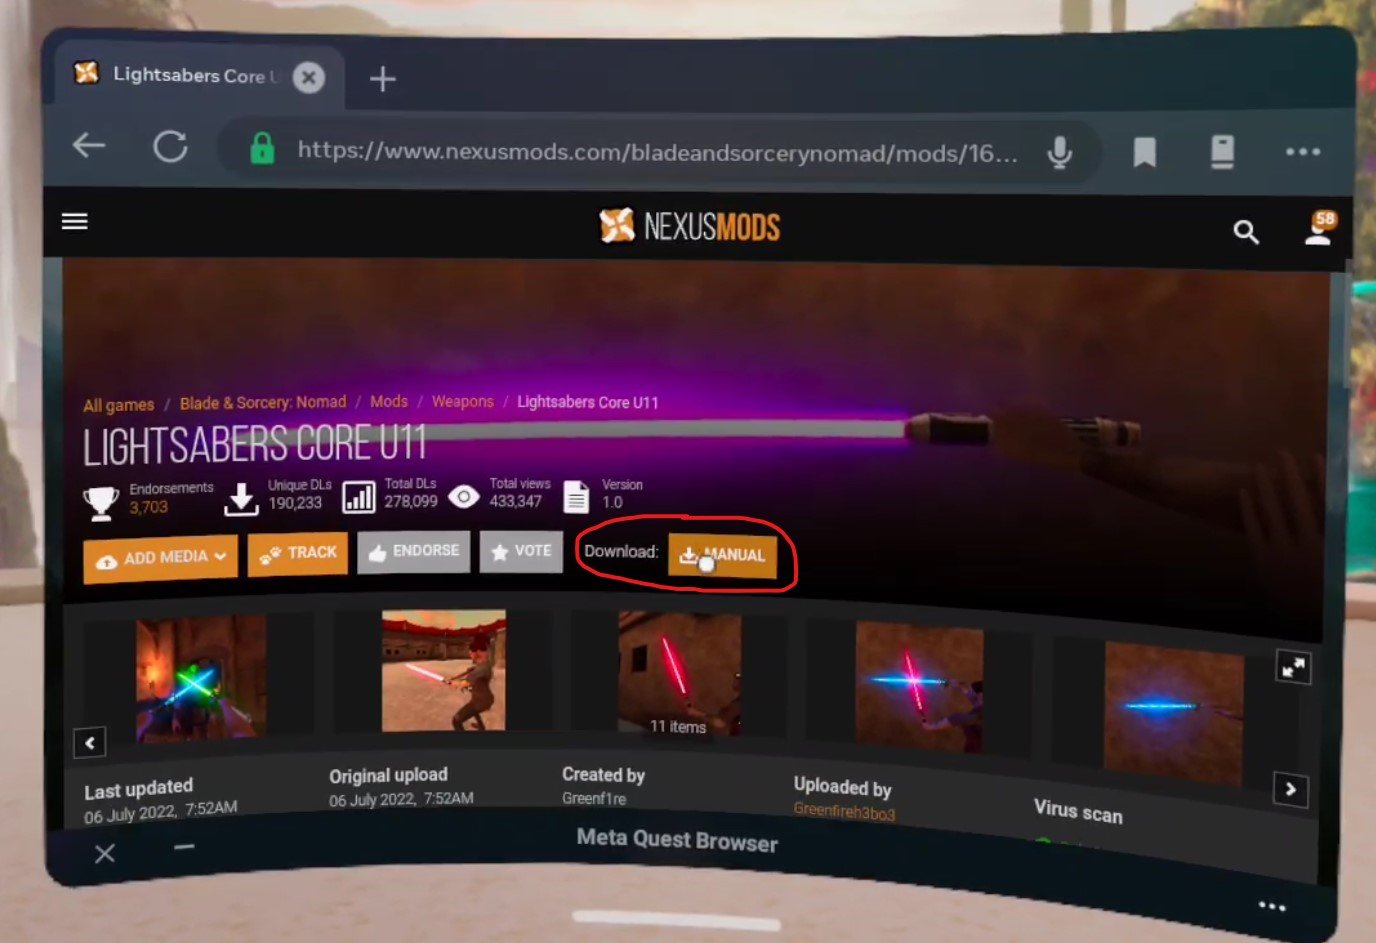
The most popular and trending mods are displayed here at the front page, but you can also use the search spyglass in the top right corner again to search for whatever you want. In this example we’ll be installing a lightsaber mod, and found one by searching for “lightsaber”. Selecting a mod here displays the mod page.
When you’re on the mod page select the “Download: MANUAL” button or go to the Files tab and download from there. One unfortunate thing here is that even on a Quest 2, Nexus Mods will force you to log into an account in order to download a file. Luckily the accounts are free, though putting your login information into a Quest 2 can be a little annoying. Either way once you select the Download button and are logged in, select the “Slow Download” button if you’re using a free account.
The page will change and you’ll have to wait about 5 seconds for the download to begin, but once it does you’ll see a little popup on your screen that will tell you how it’s going and when it is done. Once you’ve downloaded whatever Blade and Sorcery mods you want it’s time to install them!
How To Install Blade & Sorcery: Nomad Mods Manually
So now you’ve got your .zip files downloaded and you’re ready to install your shiny new mods directly on to your Quest 2 without a PC. To help you with this you’ll need a new App on your Quest. Don’t worry, it doesn’t cost any money and is completely free. It’s called Mobile VR Station and you can install it through the Quest store when using your headset, or through the Quest mobile app, just like you would any other Quest app on the App Lab.
Keep in mind that Mobile VR Station is on the App Lab, so it may be a little harder to find than most Quest applications in the store. Make sure to type in the entire name of the app letter for letter or it may not appear. Anyway, once you’ve got Mobile VR Station downloaded and installed (it shouldn’t take long, it’s not a very big app) go ahead and launch it.
Now that you’re in go to Local Files, and then Downloads. So the File Path at the top of the screen will show Available Content / Local Folders at the top, with the name of the Folder you are in “Download” in big letters below it. This is where the mod you downloaded before ended up.
Now that you can access the .zip folder for your mod, click the blue View/Edit Toggle in the top left corner. Once you hit it you’re given new options to affect the files in the folder you are in. Click the .zip file for your mod. When you do that it will have a green check mark over its file icon. Then hit the copy button in the top left corner (it looks like two sheets of paper). Then click the View/Edit Toggle again, it will be red now.
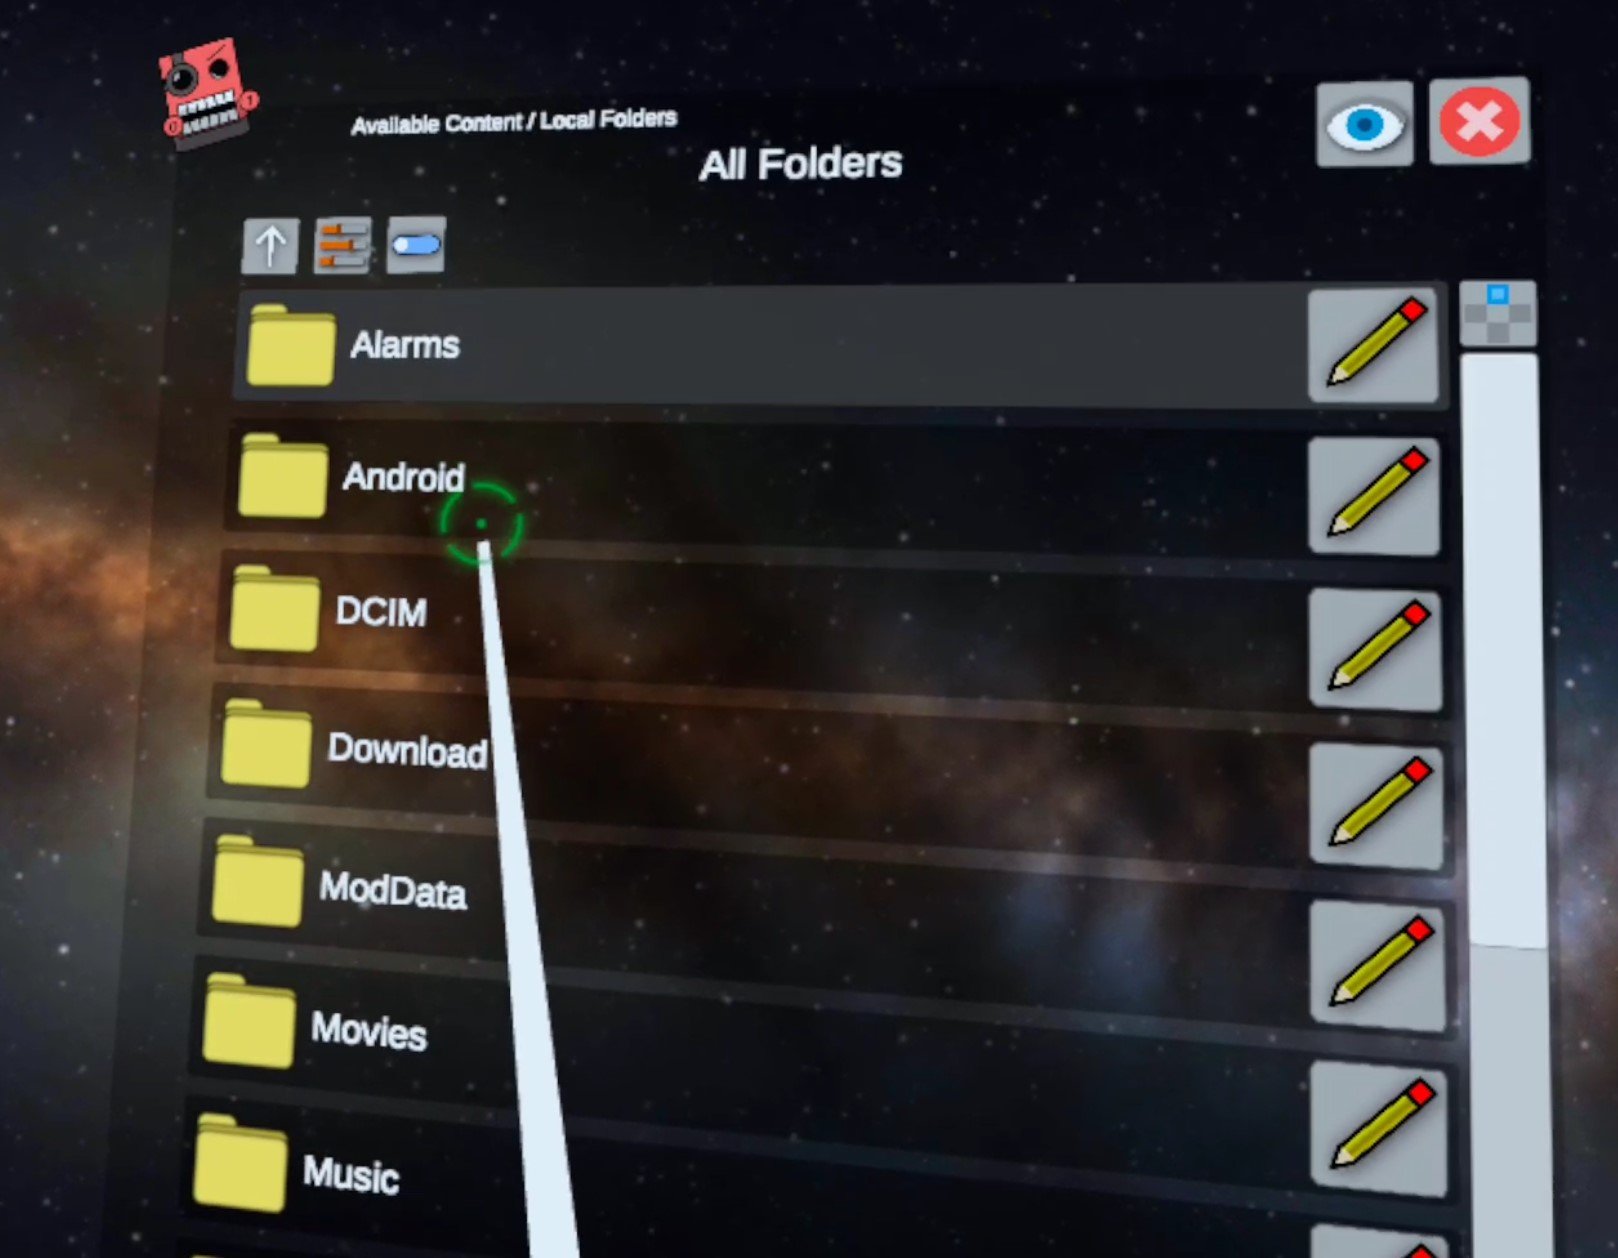
Now that you’ve copied the mod file and exited View/Edit mode, hit the Arrow pointing upwards in the top left corner, you’ll see text saying “Previous Folder” when your pointer is over it. Do this twice, so you’re back in “Local Folders” where you started. Now go to “All Folders” at the top, and you’ll be shown all of the Folders of files in your Oculus device.
Luckily what we’re looking for will be at the top again, go to “Android” then “data” and you’ll now have a list of every installed application on your Meta Quest 2. Scroll around until you find the “com.Warpfrog.BladeAndSorcery” folder and select it.
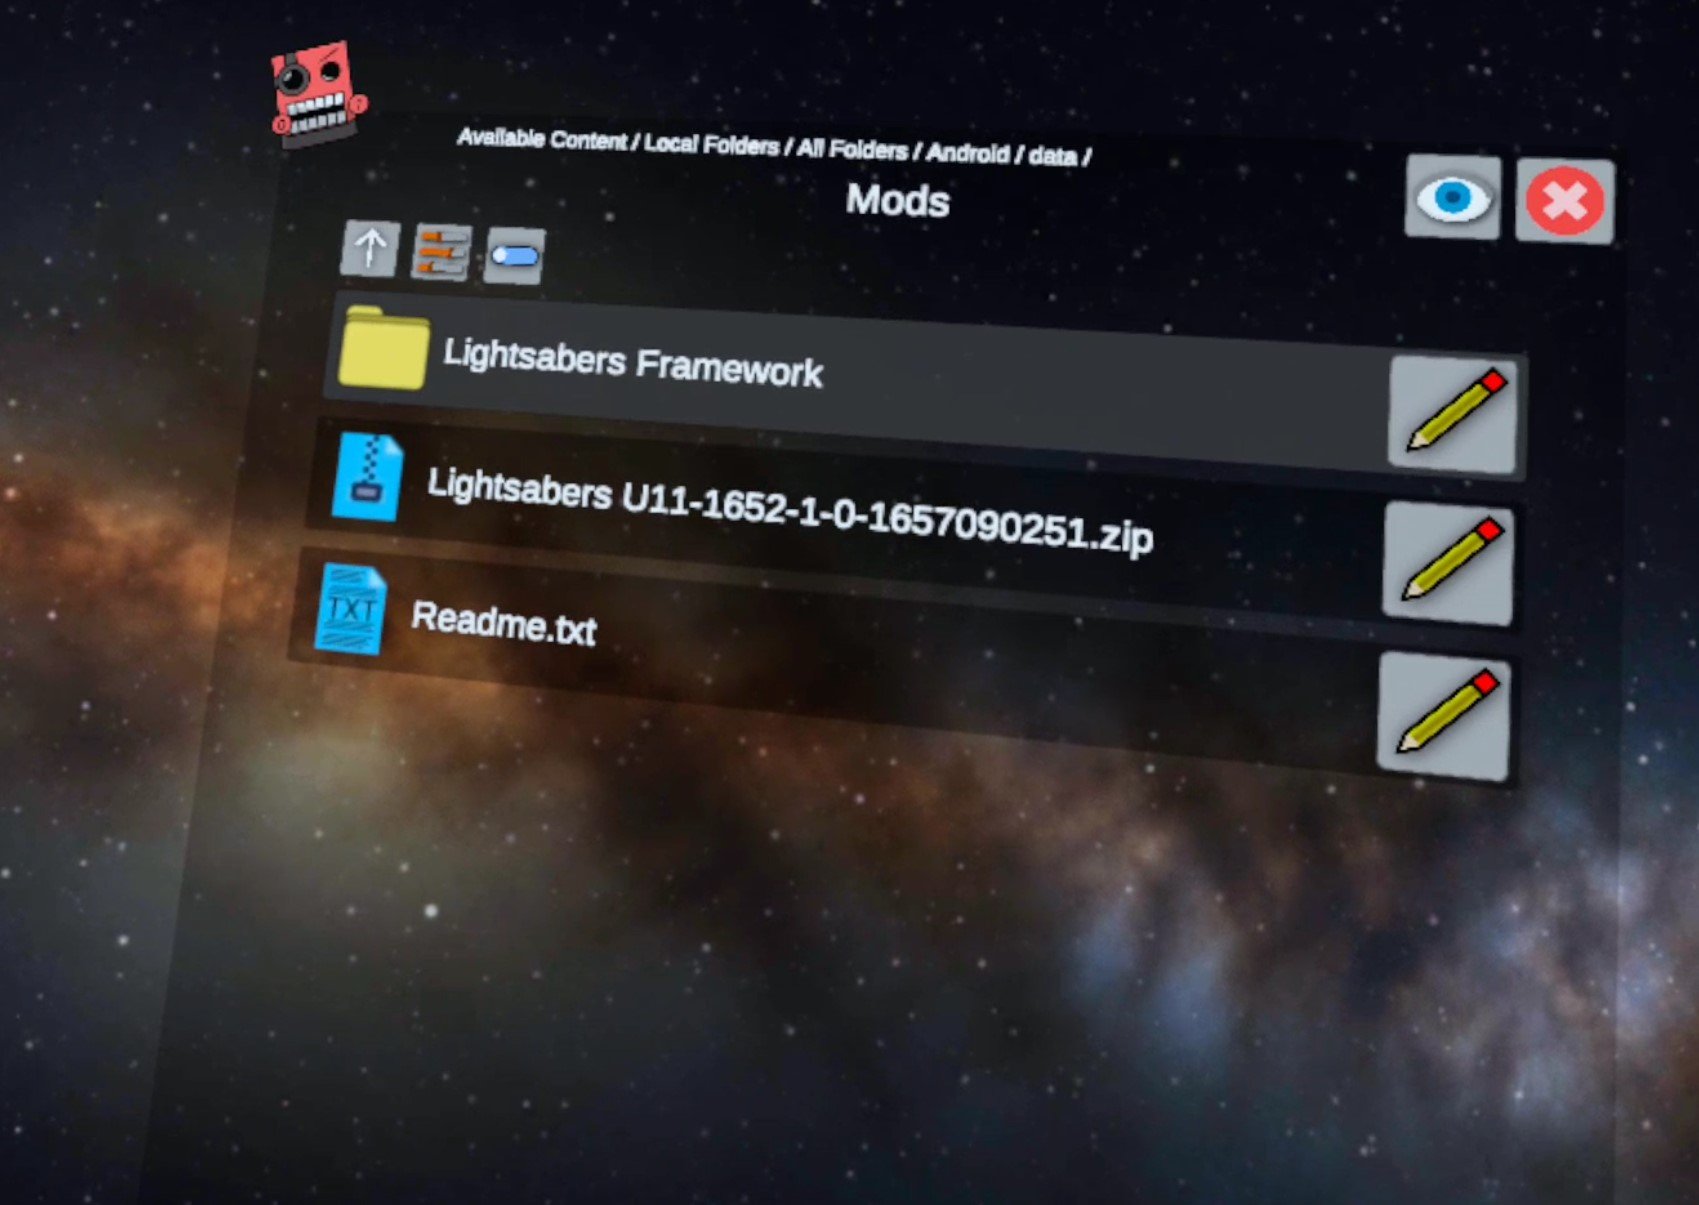
When you’re in the Blade And Sorcery folder, finally go to “files” and then “Mods” which will bring you to your destination, the folder we’ll need to extract our Blade and Sorcery: Nomad Mods to. If you’ve never installed a mod before it will only have a Readme.txt file in it.
All that’s left to do is paste your copied mod folder here and unzip it. So hit the blue View/Edit Toggle in the top left again and select the Paste (Move) button that looks like a clipboard with a piece of paper that has a pair of scissors drawn on it. A green checkmark button with “Finished” beside it will appear, press that too. Hit the View/Edit Toggle to exit View/Edit mode. Now you’ve moved your .zip Blade & Sorcery: Nomad Mod into the Blade & Sorcery: Nomad mod folder!
Now that the .zip is where you want it to be, just click on it’s file icon (no need to hit the View/Edit Toggle) then select the new “Extract Files” button that shows up. After a brief wait it will say “Files Extracted” then click the Okay button that appears beneath it. You should now see a regular folder for your mod in this folder.
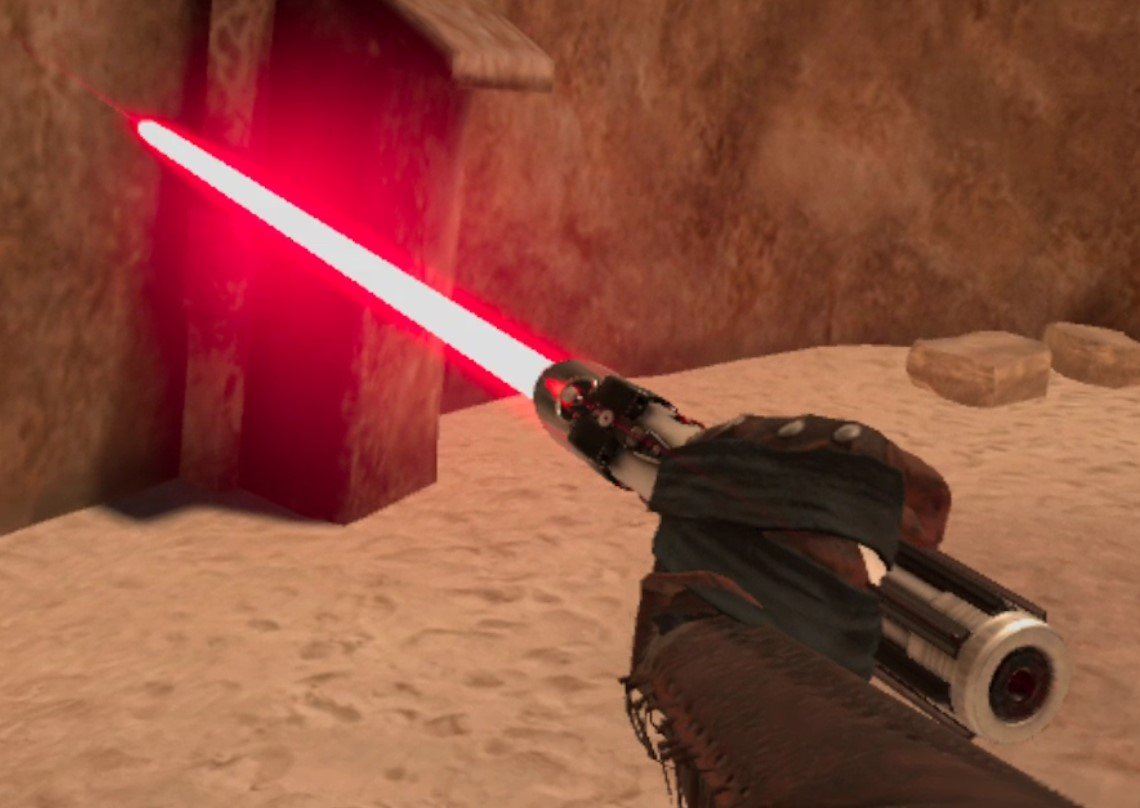
Congratulations! Your mod is now successfully installed. Exit out of Mobile VR Station and go to Blade and Sorcery: Nomad to check it out. In the game we can confirm that the lightsaber mod is installed successfully by starting a Sandbox game and checking the book that you spawn weapons from for a new category.
From here we can spawn our new Lightsabers and go to town with them. Of course other types of mods may appear elsewhere, like the Enemy spawning book or the Map Menu, depending on what type of mod it is.
Hopefully this helps you enjoy Blade and Sorcery: Nomad Mods more conveniently since you won’t need to chain your Quest 2 to a PC to download and install them. Have fun out there!


