


The Ultimate VR Cat Game That Lets You Become A Cat - I Am Cat VR Review
I Am Cat does exactly what it says in the title. It takes you, a human wearing a Virtual Reality headset, and turns you into a cat.
Well, it doesn’t make you a cat exactly, you’ll still be you, but I Am Cat does an absolutely incredible job of putting you into the furry paws of a feline and making you feel like a cat n Virtual Reality.
This is the very definition of a VR Cat Game. The game doesn’t involve cats, or happen to show cats, or let you look at cats. I Am Cat makes you the cat, and it does so in very novel and fun ways that make full use of Virtual Reality hand controls and immersion.
I Am Cat does exactly what it says in the title. It takes you, a human wearing a Virtual Reality headset, and turns you into a cat.
Well, it doesn’t make you a cat exactly, you’ll still be you, but I Am Cat does an absolutely incredible job of putting you into the furry paws of a feline and making you feel like a cat n Virtual Reality.

You can be a good kitty or literally the worst cat imaginable in I Am Cat, and that’s what makes it such a fun VR Cat Game.
This is the very definition of a VR Cat Game. The game doesn’t involve cats, or happen to show cats, or let you look at cats. I Am Cat makes you the cat, and it does so in very novel and fun ways that make full use of Virtual Reality hand controls and immersion.
Take your view of the world for an example. In most VR games your head is usually situated a few feet above the floor of the virtual world, at about your height or an average human height.
Instead in I Am Cat your head is very close to the ground. Your eyes are just above the floor, a lot like a cat’s. When you move your view of the world feels a lot like watching one of those cat collar camera videos, except with much smoother and less shaky vision.

You can use a lot of things around the house. Like the faucet.
Speaking of movement, the movement in this game is amazingly innovative and designed to make you imitate a cat to move.
You’ve got these long, straight arms, and the paw at the end of them follows your touch controller for each hand. There are no almost no physical buttons to press, no slide movement, all of the movement and interactions in this VR Cat Game are done with your paws. I mean your hands.

There are a tun of little games and cat toys to play with as a VR Cat.
The first thing that the game teaches you to do is walk. It can be tricky to get the hang of, especially if you’re used to other VR games that have you use the motion of your hands to move around the world, like Gorilla Tag.
While Gorilla Tag is a Gorilla VR Game that has you slapping the ground and other surfaces to move yourself around, I Am Cat feels much different. You have to move your arms kind of like you are imitating a cat. You have to quickly swipe at the ground with one paw and then the other in quick succession, just like a cat would.
It does take a little getting used to. I found myself trying to glide my paws across the ground like you would in Gorilla Tag, purely out of habit, and found that the game would frustratingly move me forward and then slingshot me back to where I started. This feedback wasn’t very pleasant, I’d rather just not have moved at all, but I did eventually learn to imitate a cat’s front paws with my hands to move quickly and comfortably.
The movement is so immersive because of this, and you can even pounce by smashing both paws against the ground, or climb by pawing at a vertical surface. You can even pick up objects with the grab button, which releases your claws, and hold items in your mouth. The movement is a lot of what makes this game so fun, and combined with how small you are in the world makes you really feel like a tiny cat scurrying and jumping around a house.

The tutorial in I Am Cat is great at showing you how to walk and move around. It does still take some getting used to though.
That’s where I Am Cat takes place, at least at the time of writing, entirely within a house with a ton of household items, toys, and your owner, an old woman.
She looks absolutely MASSIVE to you in the game. You are a cat after all, she’s so tall compared to you.

Your owner. She looks absolutely massive ingame and towers over you.
The scale of the house around you continues to reinforce that while you are playing this VR Cat Game you are a small cat instead of a human standing in a room with a VR headset on their face.
You can easily run and jump around furniture, mess with the many household items like the very intelligent feline that you are, eat your food, drink water. If you’ve ever seen a cat do something hilarious and silly then you can do it in I Am Cat.
There are a lot of things to explore and do, and interactions to discover, in the house the game takes place in. Despite being a two story and fairly average sized place, the house is a massive playground for you since well, you’re a tiny cat.

Climbing and jumping around is so much fun in this Cat VR Game.
You can turn on the TV, change the channel on the radio. Break into your owner’s computer, or even cook. There are an absolutely insane amount of things you can do.
Oh, and if you’re a bad cat and break some glasses, vases, or fine china, then your owner won’t be too happy with you either.
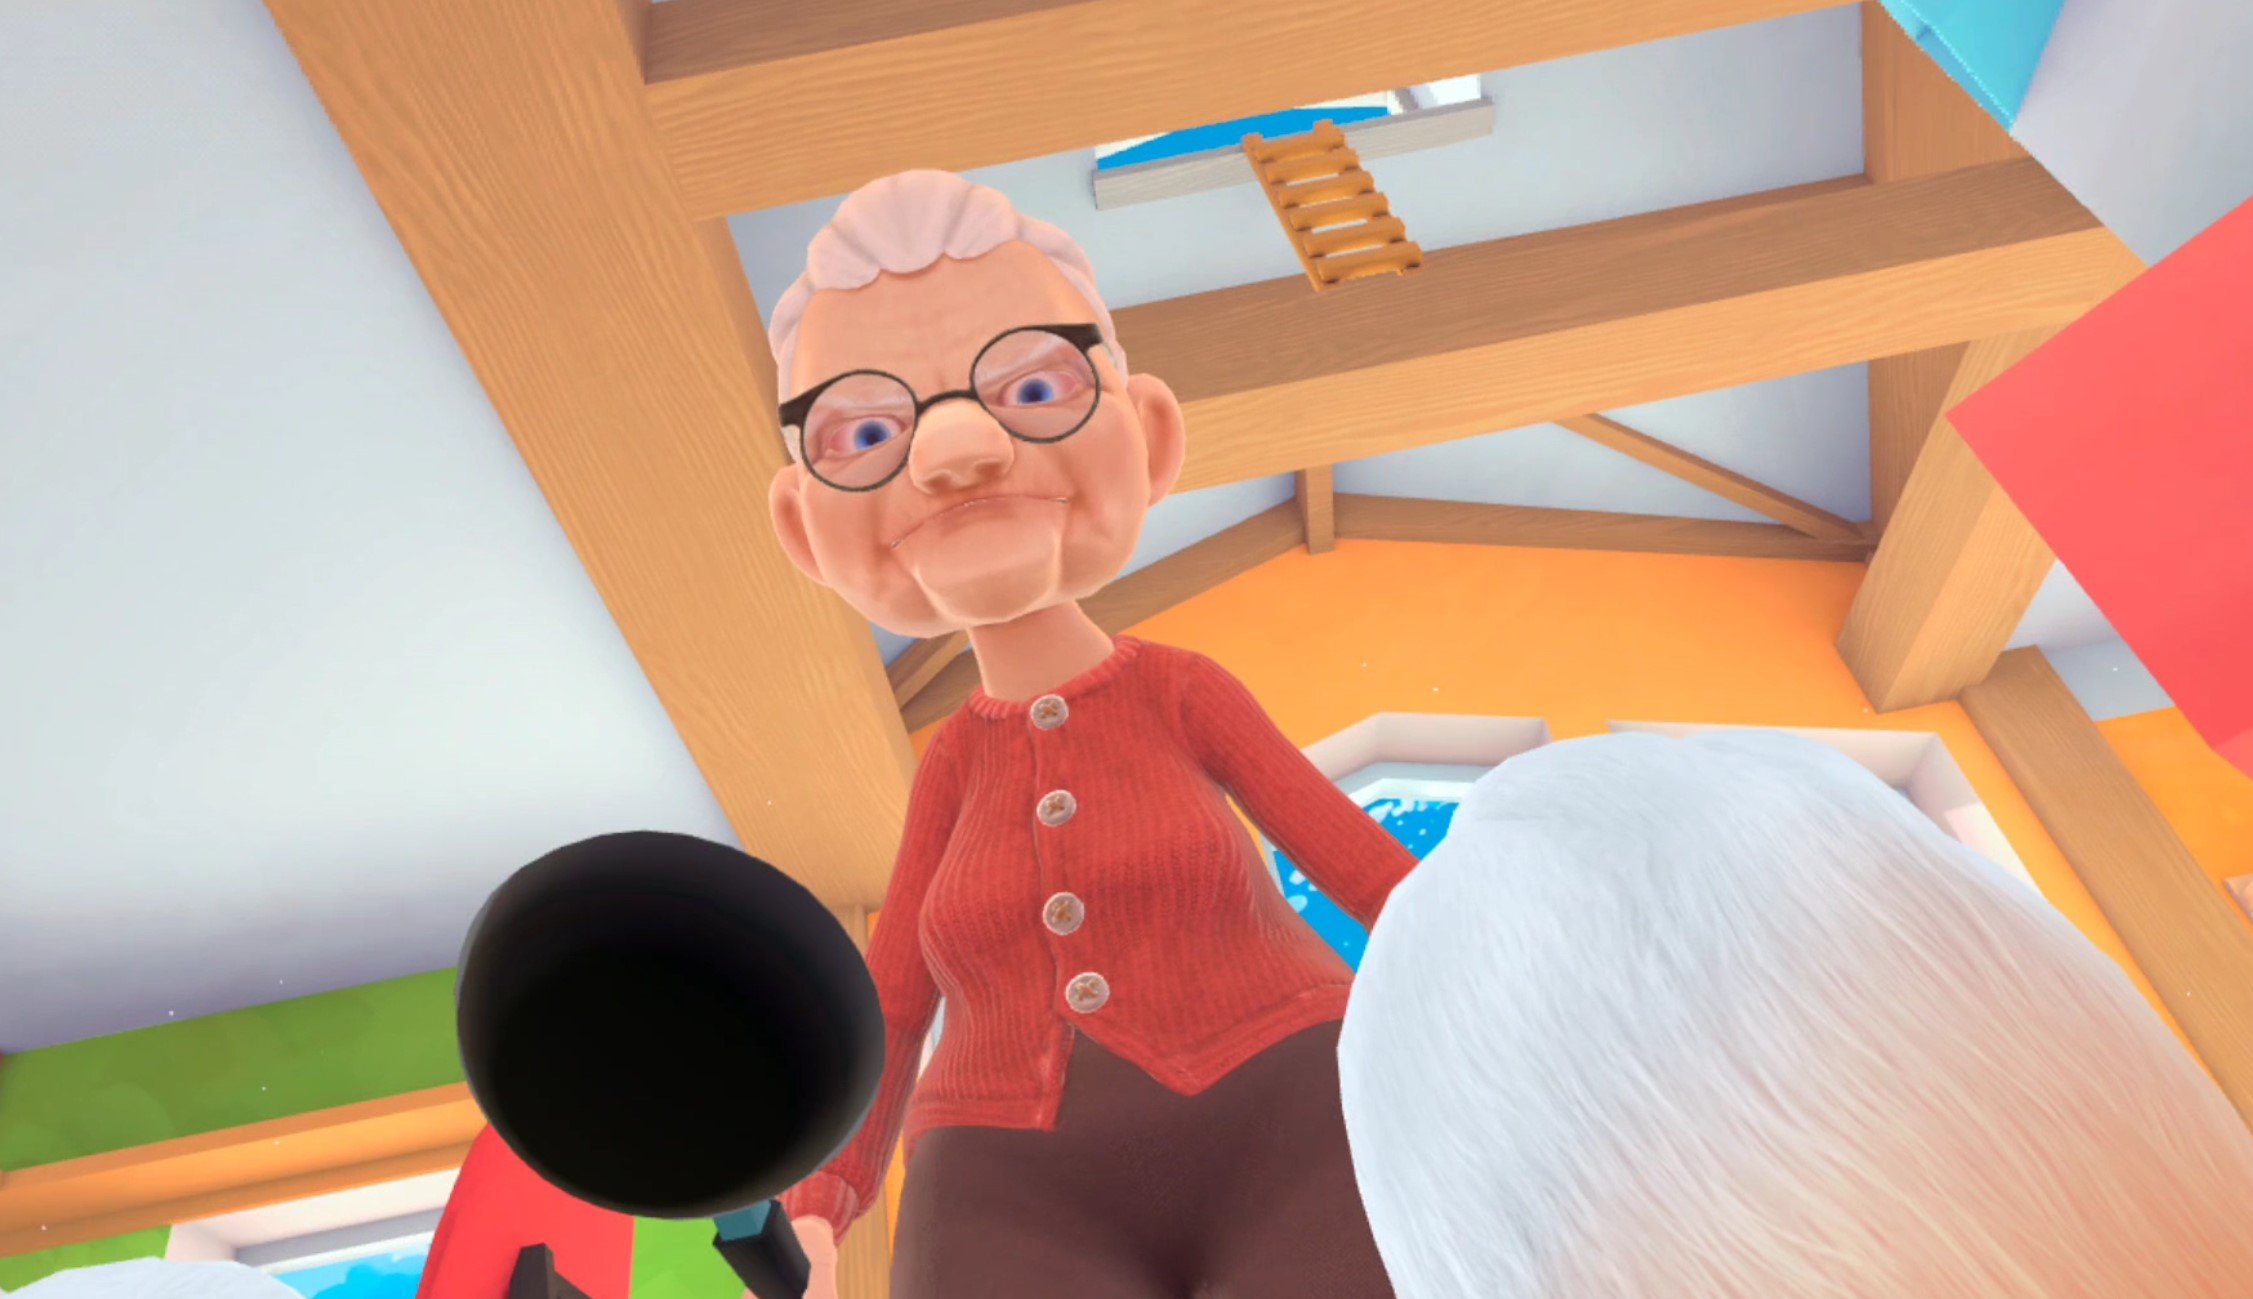
Make your owner mad in I Am Cat and she’ll whack you with a frying pan. No cats were hurt in the creation of this VR Cat Game.
There’s even a progression system with experience and levels. On your handy cat smartwatch on your left paw you can look at various tasks that you can do around the house.
These are all fun little cat activities like playing the piano, breaking stuff, exploring the top of the refrigerator. You know, Virtual Reality Cat Game things.
Each task gives you experience, and you gain levels over time. They’re an interesting way to introduce you to new wacky things that you can try around the house.

You’re given some direction in your Cat VR Game adventure through these missions, which are a ton of fun to complete.
I Am Cat is exactly what you’d want from a VR Cat Game. It turns you into a cat in VR, and wow does it do a good job at that.
Even if you aren’t a cat lover the unique movement system and perspective are fun an unique on their own, and completely worth checking out. You can play I Am Cat on the Meta Quest, and on Steam using PCVR. Enjoy!

The Walking Dead Saints and Sinners Aftershocks Walkthrough and Guide - Part 3 - The Ward
Stuck in The Walking Dead Saints and Sinners: Aftershocks? Wondering where to go next? Maybe you just like to see what is in store for you before you get there, or want to look back and see if you missed anything in The Walking Dead: Saints & Sinners: Aftershocks.
Don’t worry, I’ve got you covered with this complete walkthrough. These articles will detail how to progress through the main story missions as quickly as possible, with a couple of guiding tips thrown in here and there to make your adventure smoother.
Last time we went to Rampart to get another National Guard cache. Today we’ll be recovering the third national guard cache, which has been found by the Reclaimed in the Nile shipping and logistics office in The Ward.
This guide assumes that you are starting Aftershocks with the "Aftershocks Quickstart” option in the main menu. If you’re playing Aftershocks after completing the main campaign then some details might be slightly different, but the challenges you face in the missions will be the same.
If you are missing some of the recipes then you can still pick them up while doing the missions in this walkthrough, though they won’t be explicitly pointed out here. For a full list of all recipes in The Walking Dead: Saints & Sinners, check out our recipe guide article.
Spoilers will be as light as possible, but there will be story spoilers by necessity in this walkthrough. There won’t be any explanation of what is going on in the story beyond what is necessary to make the walkthrough make sense.
The Resting Place
Once again it’s time to get ready for the mission ahead. Tune your radio to channel 47 to listen to the Tower talk about the latest cache in The Ward and also get the usual intel about random events scattered around the maps.

The Reserve - Ghost Town mission is what we will be tackling today.
By now you should have a pretty good idea of what to bring and what not to bring, given that you’ve retrieved a couple of caches by now.
This mission won’t take very long, and at first you’ll just be fighting roaming walkers, but you will have to fight heavily armed Reclaimed soldiers at the end. Plan accordingly. You have access to plenty of powerful firearms. Bring some. Bring a bandage just in case you need it as well.
You’ll be fighting your way through at least a couple of squads of human opponents. Firearms and explosives are as useful as ever against them.
You won’t be able to rely on stealth in this mission if that is your usual playstyle. Once you’re ready, head out to The Ward.
Traveling to The Ward.
The Ward National Guard Cache
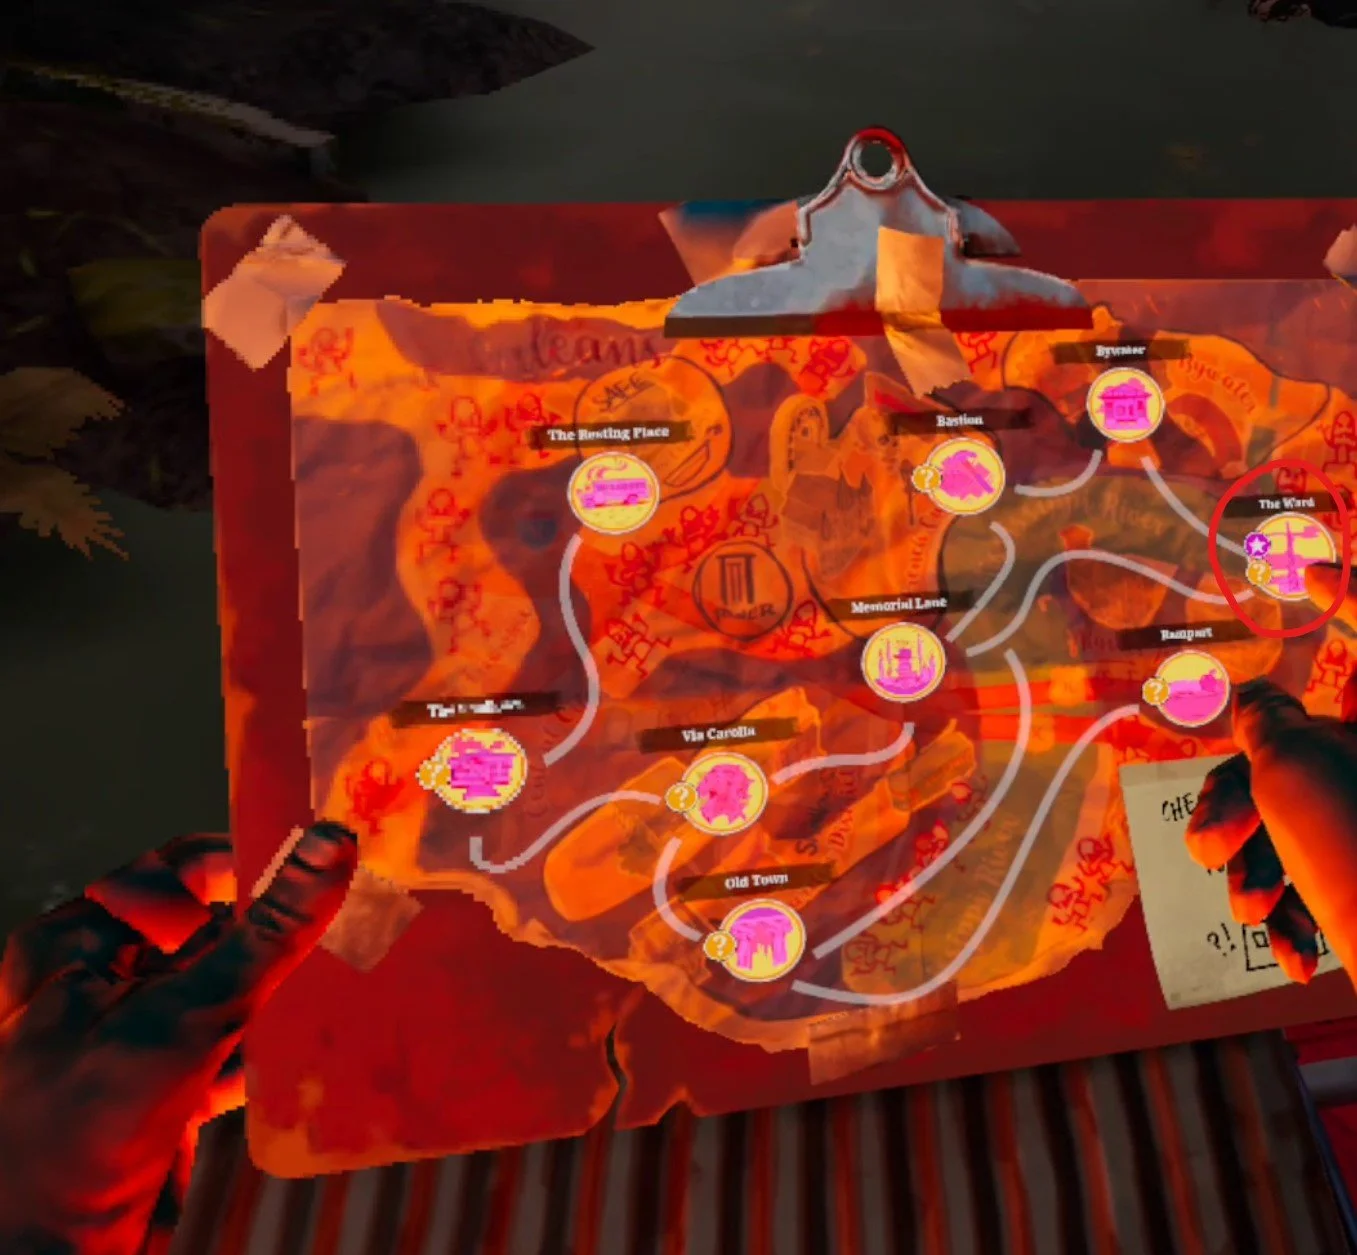
You will arrive in The Ward near the Radio Station, on the top side of the map. Take a look at your map and get your bearings. Your objective is in The big building colored blue in the lower left side of the map.

The most straightforward route to get to the cache.
You will notice that there is a route marked in red on this screenshot. That’s the way you should take to get to Nile shipping and logistics. There won’t be able notable threats along the way, just walkers (unless you have Tower or Reclaimed patrol modifiers from channel 47, those will still spawn).
Squeeze through the fence in the lot that you spawn in, since Madrid street is blocked, then continue through the shipping yard. You can take a right or a left to go to Dennison or Madrid. It doesn’t really matter but Dennison is the more direct path.
Then turn left onto Pious street and stop when you see this overturned truck.

This truck signifies the only way into the shipping office.
You’ll need to climb up the pallet of boxes next to the cab of the truck, then on the truck’s trailer, and then up into the large opening in the side of the building.
This is the only way into the shipping office. The doors leading in and out are all blocked.

This is the only way into the shipping office containing the cache.
Once you’re inside things are still eerily quiet, and you will notice a lot of Reclaimed bodies lying around. Feel free to loot as you go, or don’t bother. Most of your backpack slots will be filled when you get the cache anyway.
Go down the long hallway you’ll come across after entering, but beware the explosive trap in the center of it. You can shoot the trap’s tank or just go around it by using one of the doors in the hallway to go through the offices next to it.
Once you reach the end of the hallway take the stairs down. Head towards the next long hallway, but take the first left. The way you’re supposed to go has several barbed wire traps.

Take this path to the cache on the first floor of Nile shipping and logistics.
Break the barbed wire with your flashlight or a weapon, but be careful there is an explosive trap right after them.
This is probably a trick by the level designers meant to get you to assume that the next tripwire is a barbed wire trap, and get blown up as you touch it. Shoot the propane tank connected to the trap instead. Make sure you’re far enough away that the blast won’t hurt you.
Past the trap there’s a big garage with some various loot and most importantly the national guard cache sitting on top of some boxes. Open it up and take the loot inside. This time it’s a ton of weapon parts and ammunition.

The Ward’s National Guard cache.
Leaving The Ward
You’ve got the goods and now it’s time to leave. So head back out the way you came in on the second floor of the logistics office.
You’ll probably hear some gunshots and human voices outside. That’s right, the Reclaimed have shown up and surrounded the building.
When you make it to the door leading back outside on the second floor make sure to stay low as you open it. If you stick your head out too far outside you might get shot at. The Reclaimed are not here to play.

Fight your way out of here. Take a right down the street.
Stay low and pick your time to pounce. Since you’ve got the advantage of height it will be easy to see and shoot down on the patrolling enemies below you.
So when a patrol passes below wipe them out with an explosive or pick them off with gunfire. You could also wait for the patrols to pass and try to sneak your way out.
The most direct route out, and the one you should take, is with the boat in the purple building marked “Skiff” in the bottom left corner of your map.
To reach it, take a right and go down Pious street as you exit the building. Though unfortunately there will be a group of Reclaimed guards in front of the building containing your way out of The Ward. You will have to fight through them.

These Reclaimed guard the closest way out.
Once you’ve blasted through take the boat inside back to The Resting Place.
The Resting Place
As always scrap your loot and head to sleep. Good job. Another cache secured. You’ve got a practically ridiculous amount of supplies now.

Time for bed.
Need a guide on what comes next? Next time you’re headed over to Bastion to retrieve yet another National Guard cache, but this one will be even better than the one’s you’ve got so far.

Infinite Inside Review - A Surreal VR Puzzle Game With Passthrough
Infinite Inside is a game that the puzzling part of your brain will enjoy greatly, and it makes great use of Virtual Reality, and the passthrough capabilities of the Quest headset to deliver a unique puzzling experience.
That is, combining Mixed Reality and Virtual Reality to create an impression of a tower in whatever room you are playing in, and you teleporting inside and exploring that tower. Deeper and deeper you go, and the game becomes more surreal and draws you into its atmosphere.
All the while there are enjoyable 3D jigsaw puzzles to complete, and always the question of how to get to the next area to get more puzzle pieces to solve. Infinite Inside is unique for its combination of Passthrough Mixed Reality and Virtual Reality, but even more so for how well it uses Virtual Reality to convey the sense of traveling deeper into a different and mysterious world.
There are some fantastic 3D jigsaw puzzles in Infinite Inside.
Before we get any deeper into the Infinite Inside review though, let me tell you how the game actually plays.
What Do You Do In Infinite Inside?
The first order of business is to set up your playspace, which is quick, easy, and done with the Meta Quest’s superb passthrough. That is, assuming you are using a Meta Quest 3 or Pro.
Using the more inferior passthrough on the Meta Quest 2 might make Infinite Inside a far less enjoyable, and visible, experience. Though fortunately you can turn off the use of passthrough and have the game take place entirely in Virtual Reality, though the passthrough Mixed Reality exterior of the tower you explore does make the whole experience more wonderful and interesting.
You tell the game where the center of your playspace should be, and this is another game where having a larger playspace to work with is definitely beneficial, though you’ll be alright as long as you have an area large enough to just walk around the square you place in the center.

Placing the area where the tower appears in Passthrough.
You don’t need a massive room, and the game does feature a stationary mode if you don’t have one. Playing in roomscale mode, and with enough space to walk around the center of your playspace, is much more enjoyable though.
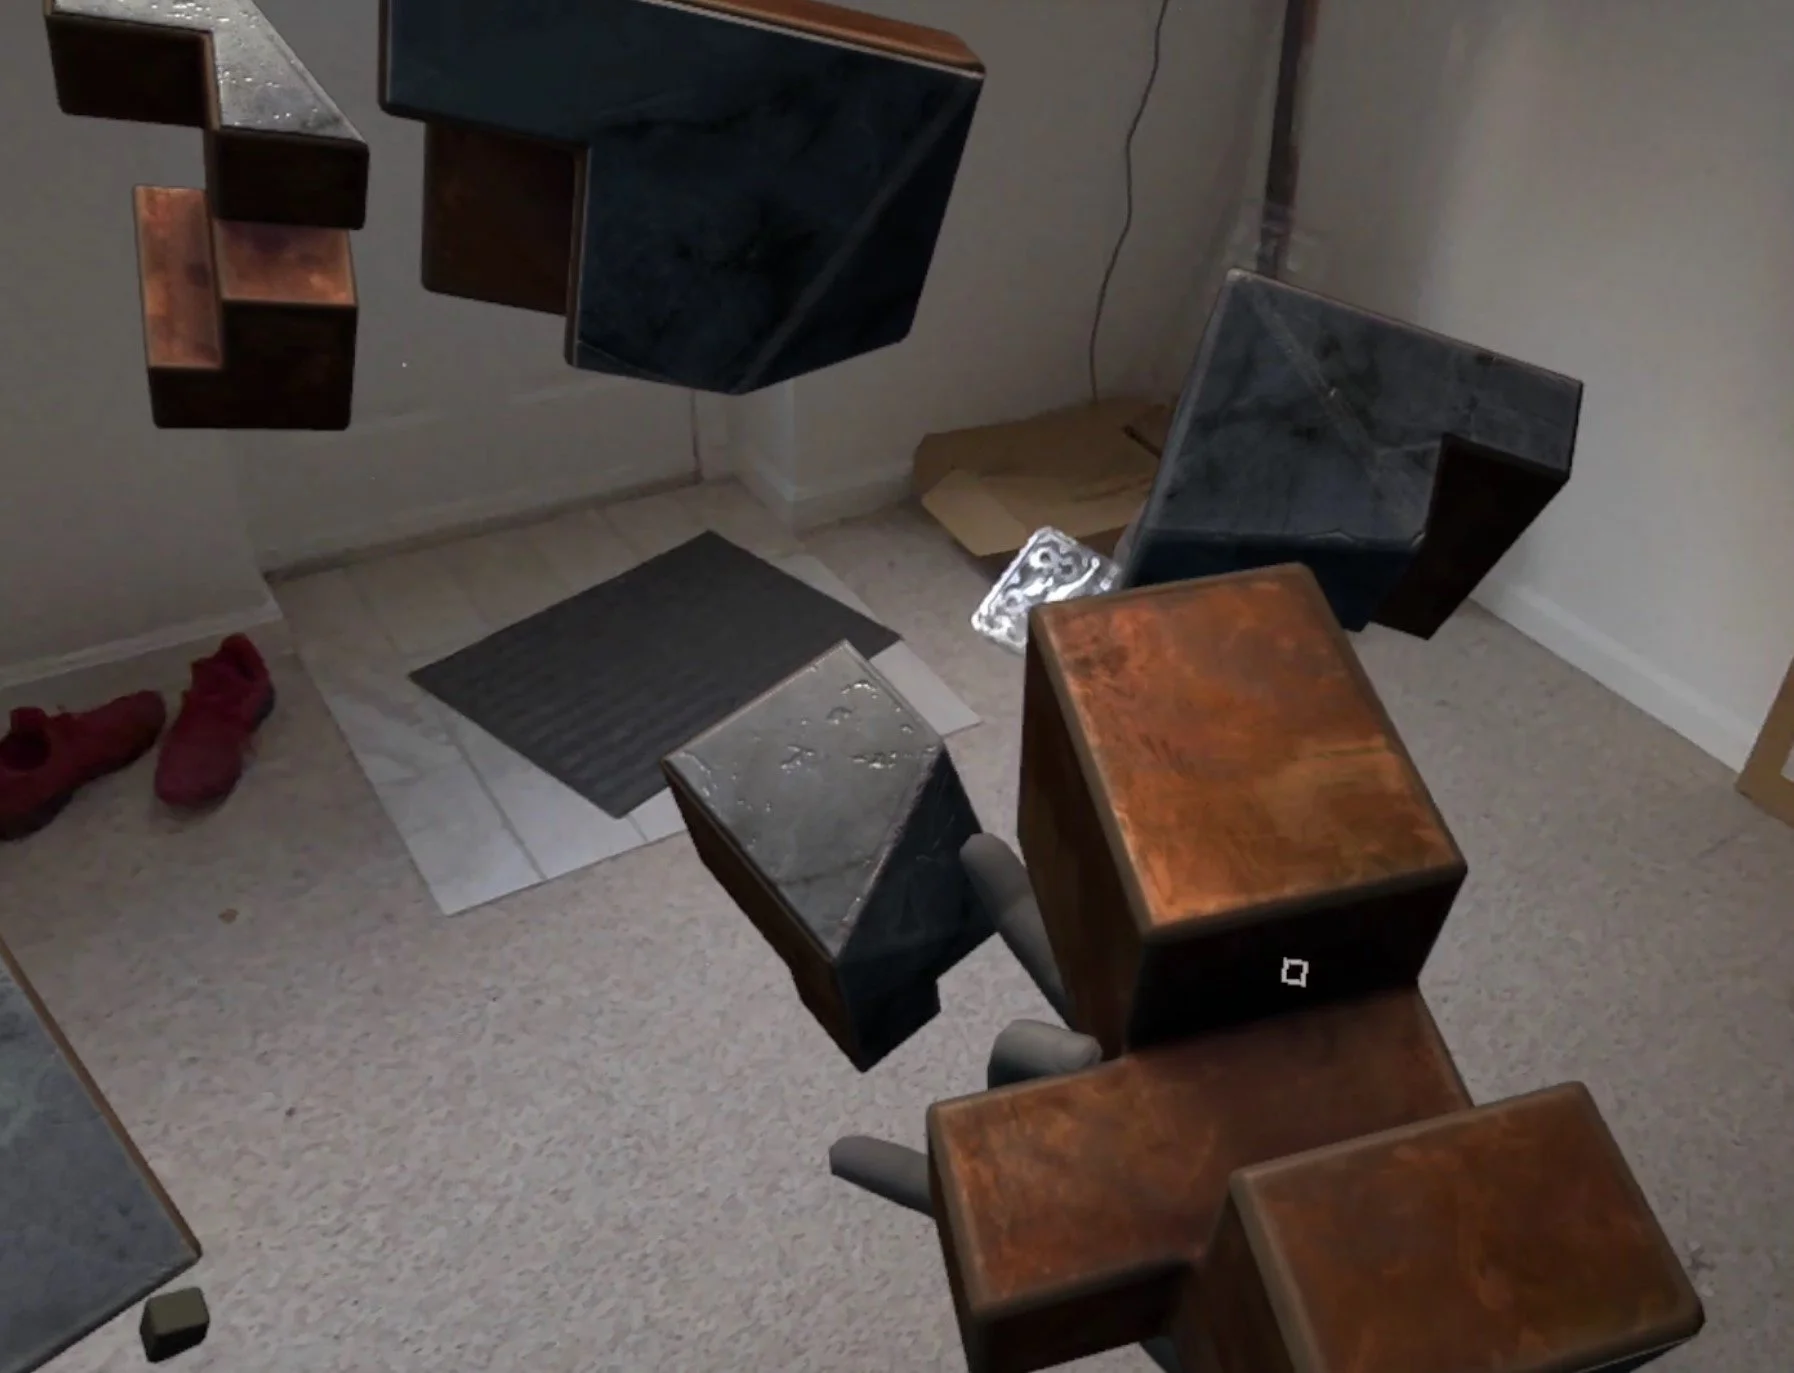
Then you get to the game, which is puzzling and exploring really. Explore to find 3D puzzle pieces, and then do your best to stick them together. That’s the core of Infinite Inside.
The game starts with the Mixed Reality portion, a massive plinth arises in the center of your playspace. Three empty compartments open up in front of it, and you can quickly intuit that something needs to go into these slots.

The first VR puzzle. Assemble the pieces and place them in the slot.
So you search around the monolith and discover some handles on it that you can slide open, revealing puzzle pieces. You put these pieces together so they fit in 3D space, and then place the finished object inside of the plinth.
Soon after some of this we get to the VR section, which caught me completely by surprise.

Exploring inside the tower in VR involves a lot of teleporting around. That’s the biggest negative takeaway from this Infinite Inside review.
Placing a statue of a little man inside the Plinth causes you to go inside as well, and in there you can collect more puzzle pieces to put together and solve outside of it.
Then later on you can move through larger environments by grabbing these geometric objects to teleport around inside. If you’re wondering, yes unfortunately the only way to move and explore is through teleport movement. More on that later on in this review.
You explore these stone rooms, sometimes dotted with vintage objects from our world, and get more puzzle pieces so you can leave and assemble them back in Mixed Reality.

Explore inside the plinth to get all of the 3D puzzle pieces you will need.
Is Infinite Inside Fun?
If you like 3D jigsaw puzzles and are intrigued by the idea of breaking them up with some VR exploration, then Infinite Inside holds up pretty well.
What’s odd about the game is that it doesn’t lean far enough into either the Mixed Reality Passthrough or Virtual Reality elements for them to complement each other greatly. Rather the Mixed Reality beginning to the game is merely just a way to anchor the monolith at the center of the experience in the real world. This is cool, but not necessary. It could just as easily be a VR scene as well, and you can make it that way in the options menu.
Using this small figure of a man to move inside and outside this monolith, or tower, or plinth, or whatever you want to call it, is a great way to make the world feel immersive. The transition between the two modes of play makes traveling inside of the game a significant change in gameplay. The exterior space is for putting puzzle pieces together, and going inside to the interior is for exploring to find puzzle pieces.
That’s mostly what Infinite Inside amounts to, changing gameplay between these two modes of play. Exploring in VR feels much different from poking around the outside of the plinth and putting puzzle pieces together in MR.

Infinite Inside shines when the puzzles combine the inside and outside of the tower.
Where the game really shines is actually more in the VR sections inside of the monolith, and where the exterior of the structure briefly interacts with the interior. As the game progresses there are portions where you can actually move puzzle pieces around the tower that will change the environment as you explore.
This way you can create new pathways and explore new areas in order to find all of the puzzle pieces. Occasionally you need to dip back out of the tower to change a piece of the environment around, and give yourself a new area to access. In this way the exploration becomes a whole new set of puzzles alongside the 3D jigsaw puzzles that you complete once you get all of the puzzle pieces.
It gets even more intense and surreal when you find even smaller areas to teleport into while you’re already inside of the monolith, creating layers upon layers of different exploration and environment puzzles in a single level. It’s fantastic, and provides many moments where you can wonder at the surrealness of it all.

Infinite Inside’s surreal look and mysterious tone are well executed and fitting.
Moreover the reliance on teleportation movement in the VR exploration portions of the game was the biggest disappointment of the whole experience. A Virtual Reality game on the Meta Quest relying completely on teleportation movement feels very pre 2020 and hopelessly outdated today.
Teleporting from place to place feels tedious and unimmersive, and is bad for all of the reasons that developers no longer base their games around it except as an option for the hopelessly motion sick.
In this entire Infinite Inside review I’d have to say the reliance on teleport movement is the one element that was truly disappointing and entirely negative.

Eventually you will uncover layers of worlds to explore. Puzzles within puzzles. Infinite Inside slowly escalates its mechanics.
I’ve had fun with Infinite Inside though, and found it to be a very calming and mysterious experience. The austere visuals of the game look fantastic on the Quest 3. They really shine when the simple geometry at the beginning of the game starts to dip into the more surreal.
The look of this game combined with the simple yet elegant and mysterious music give a feeling of mysterious calm that put you in the mood for solving some puzzles and poking around a digital tower in the middle of your living room. The aesthetic and mood of the game are perfectly executed by the developer.
So Infinite Inside is a surreal puzzler that feels like a journey into a dream, and it’s much more fun for how well it commits and pulls of that theme and feeling. Though beware that the puzzles are pretty difficult, and only get harder as the game goes on. If you’re not prepared to scratch your head for a while while trying to figure things out then don’t test your patience here.
That’s all for this Infinite Inside review. If you like 3D jigsaw puzzles in Mixed Reality or Virtual Reality, and are intrigued by the idea of combining that with a little VR exploration then this is a game that is easy to recommend for its pacing, ambiance, and creativity.

This Massive VR MMORPG Is Dead - Zenith: The Last City
Sad news today for the Virtual Reality community and VR lovers in general.
The Co-Founders of Ramen VR, Andy Tsen and Lauren Frazier, recently announced that they will no longer be developing and deploying new Patches for the Virtual Reality MMORPG Zenith: The Last City.
Despite massive success upon launching the game on both the Meta Quest and Steam stores, Zenith has become increasingly more barren and lifeless throughout the years since its launch.
This hasn’t been due to a lack of effort on the part of the developers. New features such as instanced dungeons, an entirely reworked tutorial and questing experience, a new class, and new tools for exploration and resource gathering did not breathe new life into the game and keep players coming back to it.
That was the core problem with Zenith: The Last City, no matter what the developers over at Ramen VR tried to do, players just didn’t stick around for more than a month.
This lead to an effect where when you logged in to play the game it felt pretty barren, and any MMORPG is only as good as the players that fill it. So it was easier to simply not log back in, since it seemed that not many others were interested in the game.
Even an overhaul and free to play addition in the form of Zenith: Infinite Realms and rebranding the game Zenith: Nexus didn’t reverse this trend, and the game became too expensive to continue developing.
After the final patch in August, Ramen VR will be ceasing active development on Zenith and switching their focus and resources to new projects.
Though the Zenith: Nexus and Zenith: The Last City servers will remain up and running for the time being, and those who bought ingame currency will be receiving rewards in future games released by Ramen VR… whenever that is.
For more check out the FAQ that Ramen VR has posted on their website or the video they posted explaining their story.

Blade And Sorcery Golem Boss Fight Guide And Tips
Having trouble with Blade and Sorcery’s Golem Boss Fight? Well you wouldn’t be the only one.
The golem boss, lovingly named Hector by the community, is an opponent you will have to defeat quite a few times in Blade & Sorcery.
Luckily I’ve got a guide and some tips here on fighting the Blade & Sorcery boss golem so that you can upgrade your crystals and progress further in the game.
Having trouble with Blade and Sorcery’s Golem Boss Fight? Well you wouldn’t be the only one.
The golem boss, lovingly named Hector by the community, is an opponent you will have to defeat quite a few times in Blade & Sorcery.
Why? Because you will need to defeat this Blade and Sorcery boss every time you want to get a new crystal to upgrade your magic. You might as well get good at fighting the golem boss, because you’ll be doing it a lot.
Luckily I’ve got a guide and some tips here on fighting the Blade & Sorcery boss golem so that you can upgrade your crystals and progress further in the game.
How To Defeat The Blade And Sorcery Golem Boss
You need to destroy each of the pink crystals found on the golem’s body to destroy it. They shine pretty brightly, so when you see them you’ll know it.

The Blade & Sorcery Golem Boss. Also known as Hector.
These crystals can be located all over the golem. Some are on his upper legs, while others can be on his torso, upper arms, and even his back.
These crystals can be smashed with anything, even your bare fists if you hit them enough times, but a single hit with a blunt object will do just as fine.
While you can destroy some of the crystals by just jumping up and swinging a weapon overhead, like those on the golem’s legs, you’d have to actually climb up the golem’s arms and back to reach others.
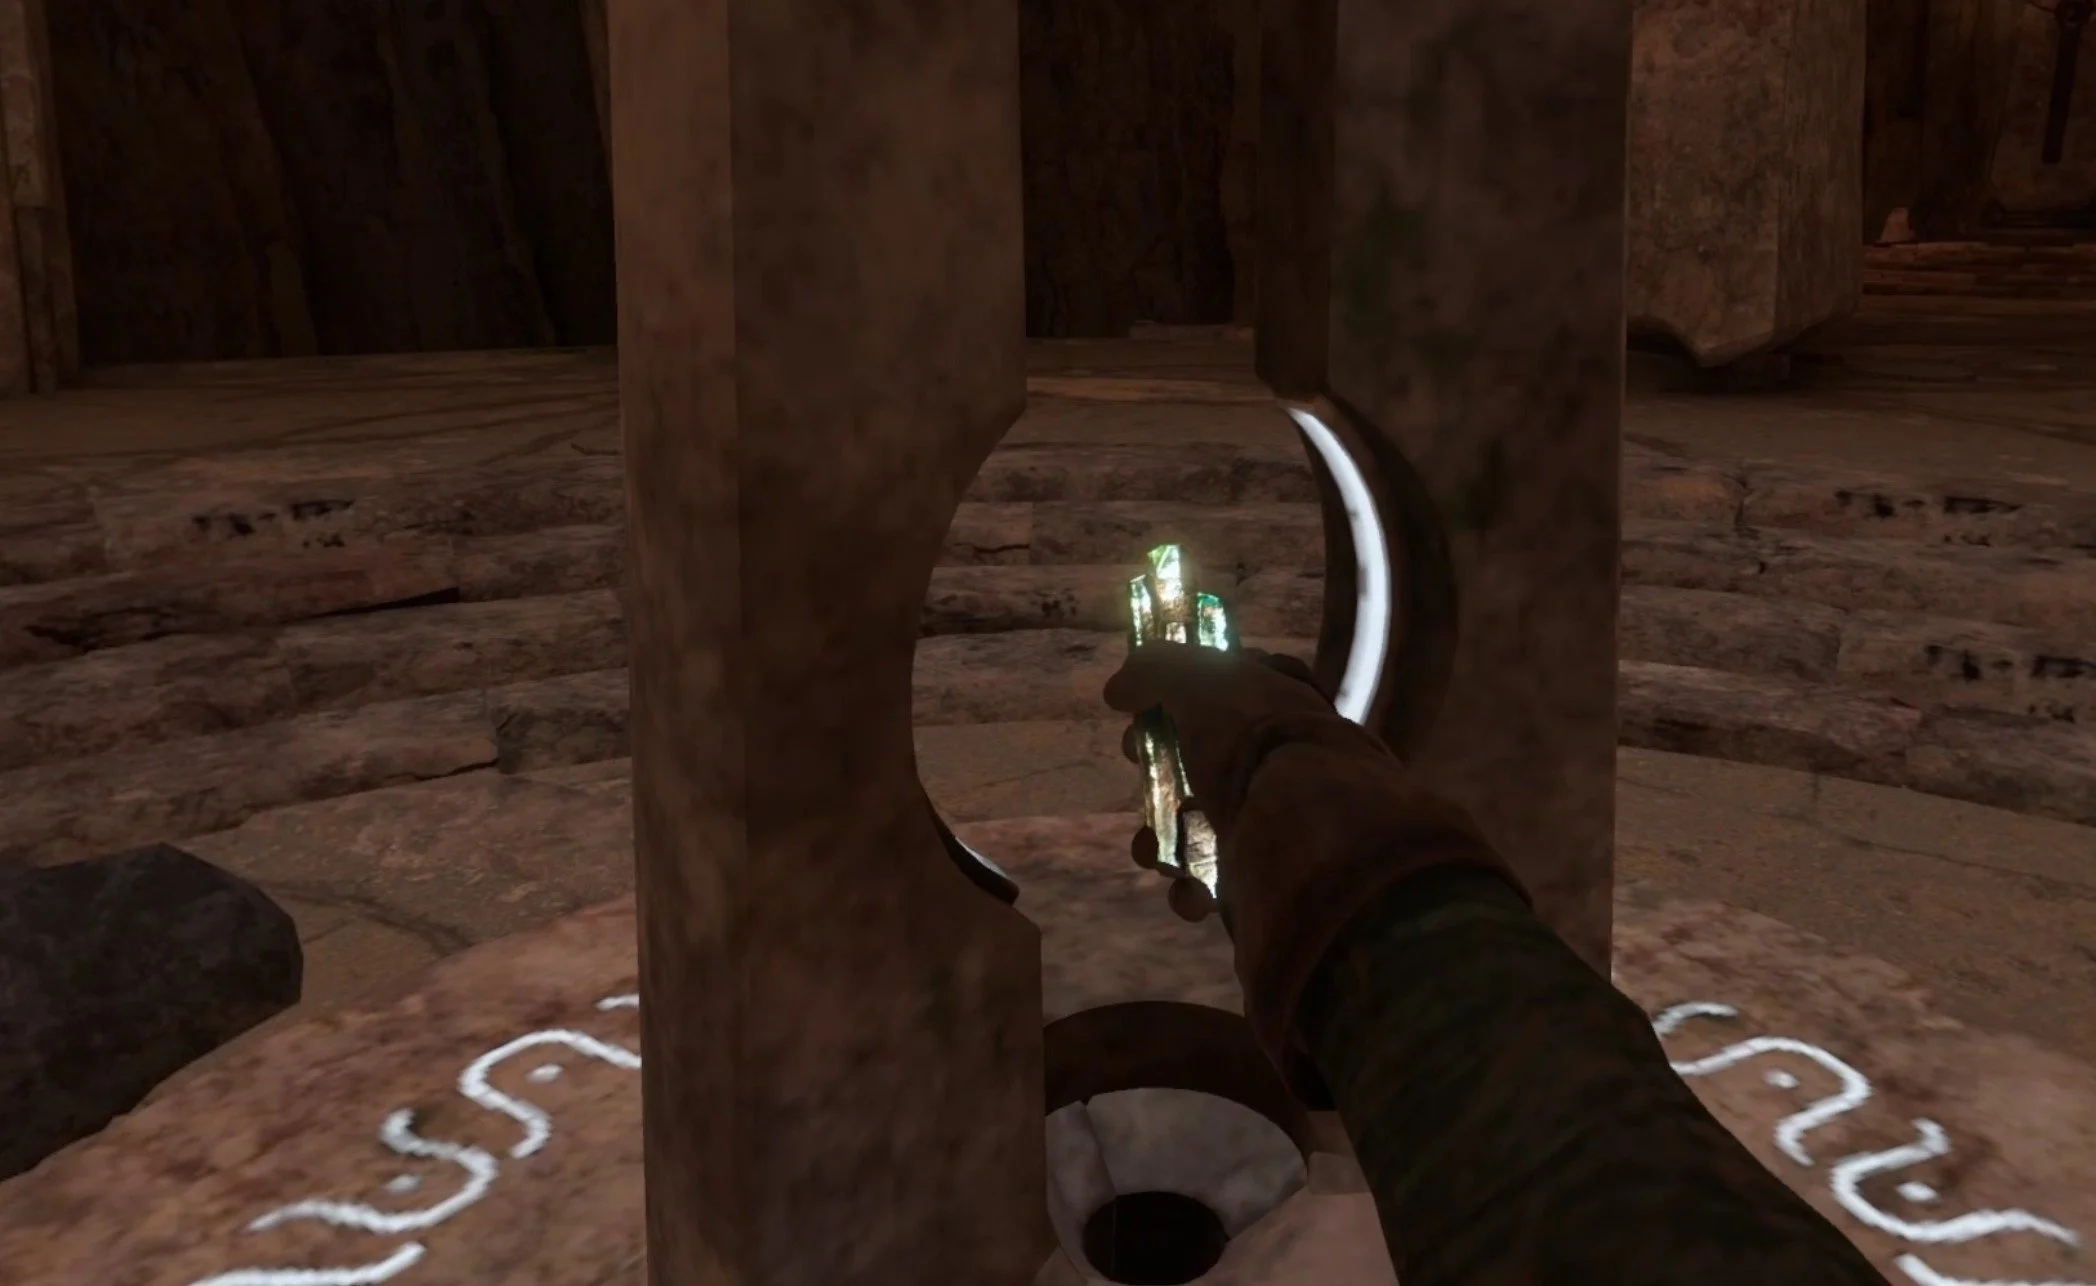
It doesn’t end there though. You’ll notice that some of the crystals are also covered in a strange energy barrier. These barriers can’t be smashed. After you’ve destroyed a few of the crystals on the golem’s body you’ll need to look around the arena and find a big glowing blue crystal.

One of the blue crystals you will have to break to remove the shields from some of the golem’s crystals.
There are several of these throughout the arena, but only one will be revealed at a time. The others will be covered with a magical barrier. Once you find the crystal then smash it.
Some are easy to get to and can be smashed with a fist or melee weapon, while others may force you to climb to get close to them. You can always break those from afar with ranged attacks. If you don’t want to, or can’t, do that, there will always be something climbable that can get you close enough to smash it.
Once the blue crystal is smashed one of the golem’s pink crystals will lose the barrier protecting it, and the golem will also crouch down and be temporarily stunned. Run over to the golem quickly and take this opportunity to smash one of the crystals in a hard to reach area, like on its back.

After you break a blue crystal the boss will be stunned for a few seconds.
Once all of the pink crystals are smashed the golem will kneel down and not get back up. Hit its face to reveal the crystal beneath and pull the crystal out of its head to defeat it.
A once closed door will open in the chamber that you fight the golem in, go through that door and you can place the crystal on a pedestal and choose what kind of crystal you want. Then step on the glowing circle nearby to teleport back home.
Once you defeat the Blade and Sorcery boss you can get a crystal of any kind you like.
Equipment Tips For The Blade And Sorcery Boss Golem Fight
As with any boss fight in any game it’s important to show up prepared not only with knowledge (which is why you’re reading this article) but also with the right ingame equipment to tilt the chances of success in your favor.
Even if you showed up the golem boss fight with no weapons at all you will be relieved to know that there are a few pieces of equipment to be found within the arena itself. Just to the right of the gravity lift that you fall into the arena on you’ll find a spear and shield lying on the ground.

This shield and spear are great free weapons in the boss arena.
The shield isn’t particularly useful the first few times you fight the golem, but the golem does get more dangerous the more times you defeat him.
Later on they will develop a long ranged lighting beam attack that you can reflect with the shield. You can use the reflected beam to destroy the golem’s crystals as well. The shield can also be helpful in deflecting the golem’s other attacks.

You can reflect the golem’s lightning beam with a shield.
The spear isn’t ideal, but it is also useful as a means to smash the boss’s crystals by just hitting them with the shaft of the spear like it’s just a long club.
You’ll also notice that on either side of the arena there are these bowls inlaid into the walls that are full of lightning. Next to each of them is a bow and a quiver of arrows.

There are two free bows and quivers of arrows in the Blade and Sorcery golem boss arena.
Dip the arrow into the lightning to charge it. Then fire it with the bow. The arrow will become a homing arrow that will home in on the nearest crystal. It’s not very smart though, so if another piece of the golem is in the way the homing arrow will just bounce off.
Also keep in mind that the lightning won’t stick to the arrowhead for long, so you have to fire it quickly before it wears off. You can use these arrows to hit the golem’s pink crystals from afar, or destroy the big blue crystals that are in hard to reach places without having to climb to them.
The biggest drawback to relying on using ranged weapons is how limited your ammunition is, with just about forty arrows total being present in the arena. Each crystal also won’t break with just a single hit from an arrow, you will have to hit the crystal multiple times.

These lightning arrows can be very useful to take out the Blade and Sorcery golem boss’s pink crystals from far away.
There is also a big ancient hammer to the found next to the central pillar in the arena. While it isn’t ideal it can also be used to smash crystals. The same goes for the sword found on top of the ridge just to the left of the entrance to the arena (you’ll have to climb up or take the ramp on the other side of it to get up there).
So, naturally, it’s better for you to bring in some more ideal weapons for yourself. I’ve found that the easiest weapons to use to quickly smash crystals are short blunt weapons like the club, trench mace, or flanged mace. A small axe can also be a great choice to quickly smash those crystals.
These can be easily wielded with one hand so that you can grab it from a weapon slot while you’re hanging on to the golem with your other hand. They will also smash a crystal in a single hit.

Smashing the crystals on the golem boss’s lower leg is easy and should be done first.
You could bring additional quiver of arrows if you like to use your bow to fight the golem. Bringing your own shield is unnecessary, but you should also consider your choice of magical crystals when fighting the golem.
For instance, once you have obtained two gravity crystals and combined them you can use gravity magic to launch yourself into the air, which is very useful for quickly getting to high places in the boss arena, or jumping on to the golem’s back.
You can also use gravity magic to deflect the boulders the golem throws at you. So if you want more help against this Blade and Sorcery boss then make sure to get gravity crystals whenever you can. It’s the most helpful magic for fighting the golem.

Using gravity magic to jump on to the Blade and Sorcery golem’s back.
If you can get some armor to prevent you taking as much damage that is also helpful, but not nearly as much as bringing healing items.
Bring as many healing items as you can. The more you bring then the longer you can stay in the fight, just make sure to use them when your health gets low and you see red. If you can’t afford armor or healing items you can always keep doing outposts and arena battles on the map until you can afford as many as you like.
Bringing the right items can make the Blade & Sorcery golem boss fight a lot easier.
Some Golem Boss Fight Tips
So we’ve gone through how to defeat Blade & Sorcery’s Golem Boss Fight (destroy their pink crystals, then destroy the blue crystals to remove the shield from the rest of the pink crystals).
We’ve also gone through what sort of equipment you should bring (a short club, tons of healing items, armor if possible, arrows if you prefer ranged attacks, gravity magic if possible).
Now for some more general tips that will help you stay alive in the boss fight arena and defeat the boss.
First of all, mobility is key in this boss fight. You don’t want to let the golem hit you by swinging his big arms or throwing a rock at you. The key to avoiding these attacks is mobility. Stay moving as much as possible. Remember to swing your arms to run. As long as you don’t stand still and keep your distance you will have an easy time avoiding most of the boss’s attacks.
This also applies when you’re climbing the body of the golem itself. The golem has a lot of handholds for you climb up him, but you can only grab on to him for a very short time before they throw you off. So make sure to climb as quickly as you can with both hands, before grabbing a weapon with just one of your hands to smash a crystal.
Right after you smash a crystal make sure to jump off of the golem and run away, because the golem will throw you off of him with damaging magic, like a blast of gravity or electricity. Though if you’re quick enough you can destroy two crystals at once before jumping off. It’s risky, but if you’re quick you can pull it off.

The golem using a gravity blast after one of its crystals is destroyed.
When you’re far away from the golem make sure to keep moving to avoid their ranged attacks, and when you’re close make sure to carefully pick your opportunity to jump on top of them and get at those crystals.
You can just jump up to hit the crystals on his lower back and legs, but you’ll need to use ranged attacks or climb to reach the upper crystals. If you get hit make sure to heal up at a safe distance before taking another shot.
You can even run to the other side of the big pillar in the center of the arena to buy yourself some time where you won’t have to dodge the golem’s ranged attacks. This can be especially useful when smashing the crystal near the ceiling there, since the boss will take a while to walk around and start attacking you again.
That’s about it! You won’t need to use all of these tactics to defeat the Blade and Sorcery boss fight, so take and use whatever fits your playstyle. Enjoy!