


The Walking Dead Saints and Sinners Walkthrough and Guide - Part 8 - Rampart
Stuck in The Walking Dead Saints and Sinners? Wondering where to go next? Maybe you just like to see what is in store for you before you get there, or want to look back and see if you missed anything in The Walking Dead: Saints & Sinners. Well don’t worry we’ve got you covered with this complete walkthrough. This is the eighth part, where you go to Rampart High School and find out what happened to Casey’s squad.
Stuck in The Walking Dead Saints and Sinners? Wondering where to go next? Maybe you just like to see what is in store for you before you get there, or want to look back and see if you missed anything in The Walking Dead: Saints & Sinners. Well don’t worry we’ve got you covered with this complete walkthrough. This is the eighth part, where you go to Rampart High School and find out what happened to Casey’s squad.
This article will detail how to progress through the main story missions as quickly as possible, with a couple of guiding tips thrown in here and there to make your adventure smoother. Only those recipes that are convenient to get when doing a task for the first time are included. For a full list of all recipes in The Walking Dead: Saints & Sinners, check out our recipe guide article. Spoilers will be as light as possible, but there will be story spoilers by necessity in this walkthrough, but there won’t be any explanation of what is going on in the story beyond what is necessary to make the walkthrough make sense.
All Walkthrough Parts:
The Walking Dead Saints and Sinners Walkthrough and Guide - Part 1 - The Graveyard
The Walking Dead Saints and Sinners Walkthrough and Guide - Part 2 - The Shallows
The Walking Dead Saints and Sinners Walkthrough and Guide - Part 3 - Via Corolla
The Walking Dead Saints and Sinners Walkthrough and Guide - Part 7 - Old Town and Another Stash
The Walking Dead Saints and Sinners Walkthrough and Guide - Part 8 - Rampart
The Walking Dead Saints and Sinners Walkthrough and Guide - Part 9 - The Shallows Again
The Walking Dead Saints and Sinners Walkthrough and Guide - Part 10 - Bastion and The Reserve Key
The Walking Dead Saints and Sinners Walkthrough and Guide - Part 11 - The Reserve and the Ending
Rampart
Today you’re going to be going to Rampart High School to find out what happened to Casey’s squadmates. As always it is recommended to bring some sort of firearm as well as enough melee weaponry to get through the walkers you will run into. You’ll only have to worry about walkers in Rampart. You might also want to bring an explosive like a Nail Bomb in order to take a very minor shortcut at the beginning of the level, more on that soon.
Whenever you’re ready, as always, take the boat to Rampart.
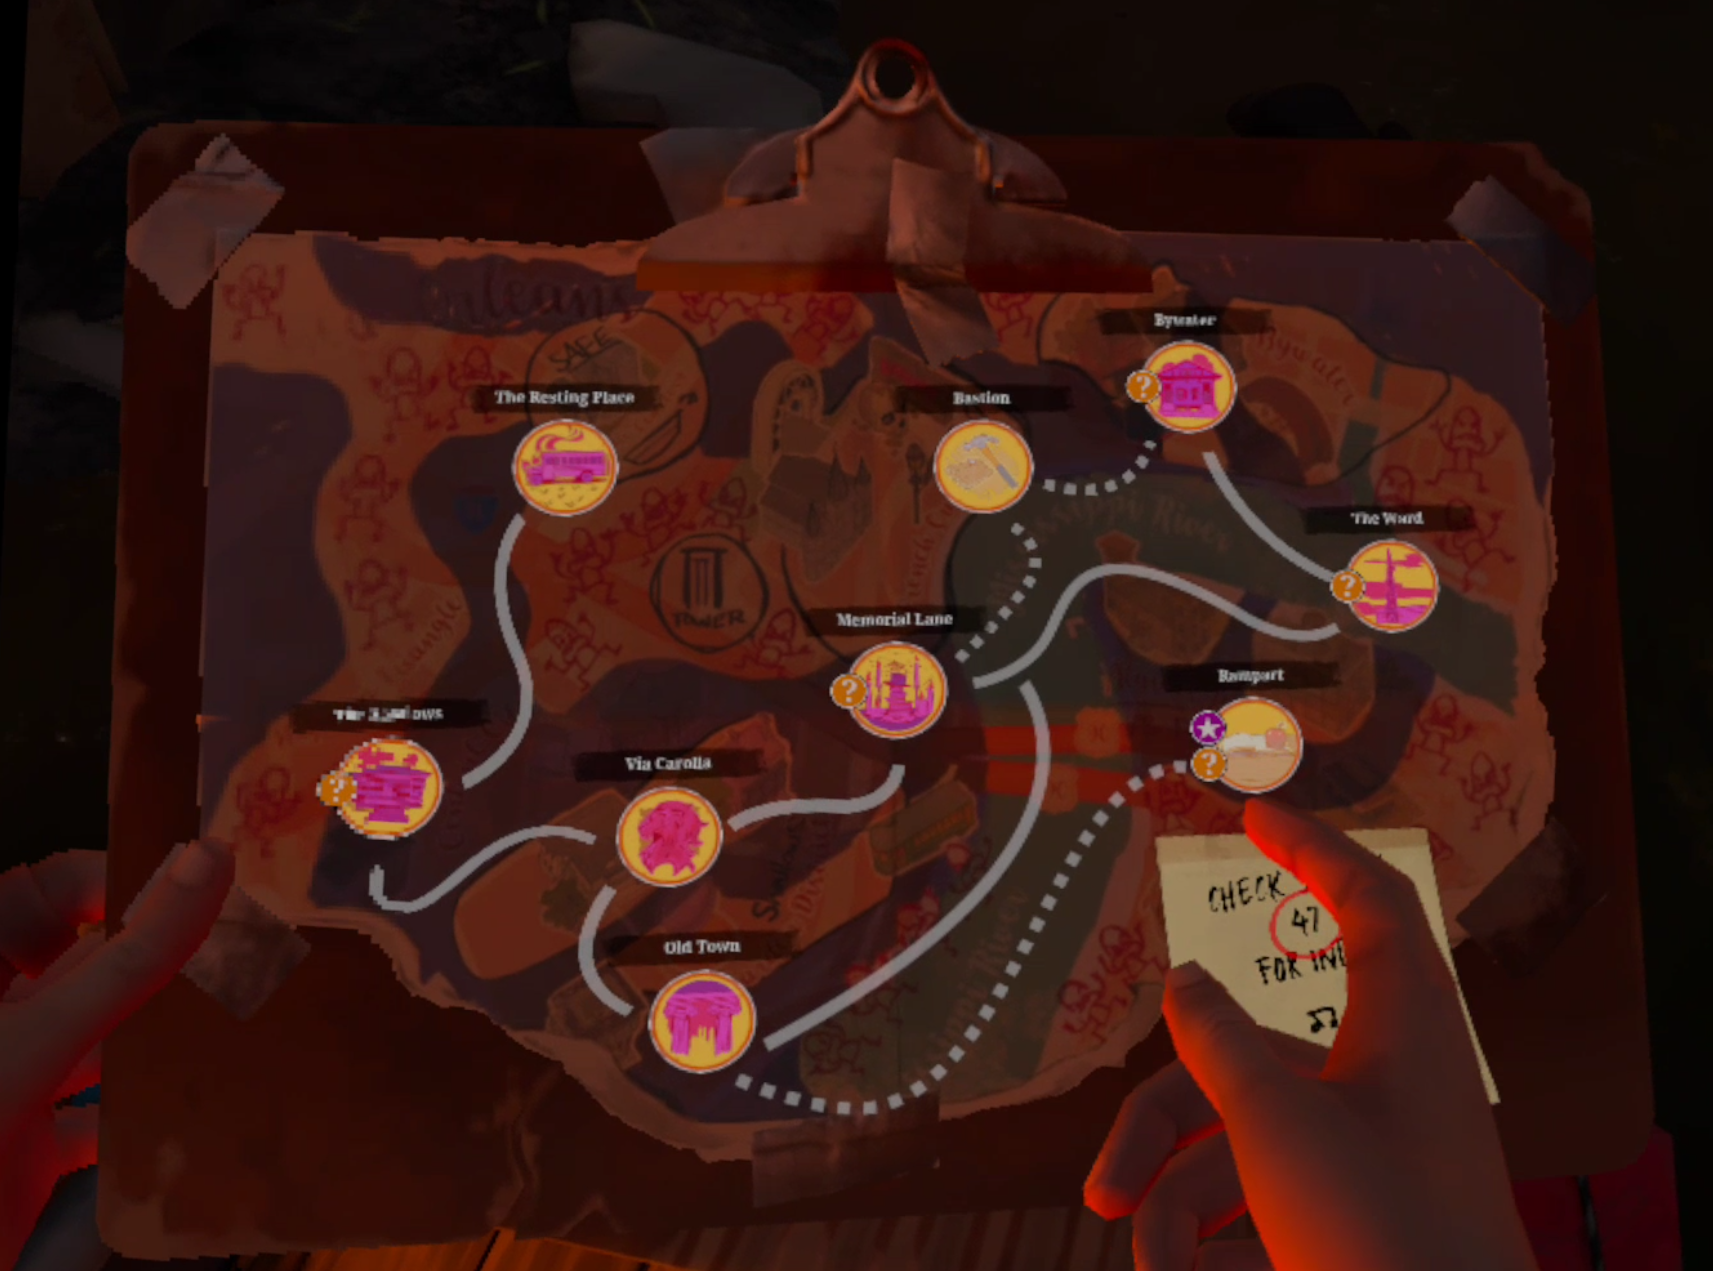
You’ll arrive in the upper left corner of the map, right beside that blue building with the Basketball on it. That’s the basketball court, and the huge building colored a light red is the school itself.

The first place you’ll be going is into the Basketball court itself. When you walk to the nearest door on the left side of the building you’ll notice that it’s locked. Now if you brought some explosives you could always destroy the door with those and waltz in, but it will actually be easier to find all of the squadmates by going the non explosives route. That involves taking a left and going around the upper side of the building.
There you’ll notice a red flag flying from a hole in the side of the building, above a dumpster.

Here is where you can actually climb into the Basketball Court building. All of those ledges with white chalk on them are where you can get a handhold and climb up. So first climb on top of the dumpster, then on the roof, and then use the chalky handholds where the bricks are missing to hoist yourself into the building.

You will find yourself in a dark locker room, and at the end there is an open door leading into an office. Go straight into there and find a corpse decked out in military gear with a broken gun and two notes next to it (if you blew your way through one of the doors on the ground level you’ll have to find the stairs that lead upwards and find this guy). Read the notes, and before you turn around and go downstairs make sure to check the other office room next to the one the corpse is in, you’ll find a free two handed nail bat on the ground.

When you’re done in the office go downstairs. When you reach the bottom you’ll see some double doors, and another single door to your right. The door to your right is a supply room, so if you want some loot give it a look. Rampart High School is big, and there will be opportunities to fill your backpack later as well. When you’re ready go through the double doors and find yourself in the Basketball Gym itself.

The gym was clearly meant to house refugees at some point, and is full of cots and privacy dividers. Now it’s also full of zombies, and is very dark. The zombies will even respawn if you end up backtracking through the gym, so unless you want to fight walkers forever it’s best to move quickly.
There’s some loose items to be found on the cots and floor, but for the most part this is not a great area to look for stuff. What you really want to do is find the corpse of a woman hunched against a cot and lit by a lamp beside her. She is in the first section of the Gym full of cots past the double doors you came in from. You can see her in the picture above. She will also have a note, go ahead and read it.

You’ll also see some bloody footprints leading away from her corpse. It can be easy to lose sight of them when fighting through the many walkers in the gym, but you’ll find that they lead to a little square room in the corner of the gym with locked double doors. Just like the last time you dealt with locked doors, the solution is to climb over them.

To the right of the locked door are some bleachers. Walk up them until you get to the top. When you do look at the side of the locked room, and you’ll see some more handholds marked with white chalk.

Climb up them so you’re at the top of the locked room, and then drop down through a hole in the roof. You’ll find yourself up in the ceiling of the room with a walker. Kill it, and if you'd like there’s an Easter Egg note up there in the ceiling with you.

Once you’re done drop through the hole in the ceiling where one of the ceiling tiles is missing. Now that you’re back on the ground floor you’ll see another body in military gear propped up against a bench. Beside it is a crafting recipe for the Noise Maker Bomb and another note.

When you exit the room you’ll find a pair of double doors on the wall on your right, take them outside and get some fresh air. Then turn immediately to your left, you might notice that you are right back where you started your trip to Rampart High School. Soon you’ll find a gate on your left, swing it open and keep going forward.

Past the ambulance in front of you you’ll see a trail of bloody footprints leading away from the Basketball Gym on your left and over towards the school proper on your right, follow them to a set of double doors. This is the entrance to the school cafeteria.

It’s dark inside, but this time there are no walkers (when you come back in the future there will be zombies in here though). You’ll see a lit figure sitting on the ground on the other end of the cafeteria. Go to him. It’s one of Casey’s squadmates. Talk to him.

He’ll have a message for Casey, and a request for you. He will never leave that cafeteria, whether you let him slowly die and turn into a walker, or mercy kill him right there is up to you. There’s no way to save this man. Whatever you do about this dilemma, make sure to loot the cafeteria. There are a few pretty consistent spawns for items like the voodoo doll and PWNBOT.
Once you’re done in the cafeteria you are free to exit the map. You’ve fulfilled Casey’s request, but there is a fantastic weapon recipe you can pick up easily from here. Just go through the double doors next to the man you just talked to, and at the end of the hall take a left. Keep going past the doors and lockers until you get to the double doors at the end of the hallway that are blocked with a desk. Take the door immediately on the right of it.

That’s the nurse’s office. There’s some loot inside, but most importantly if you go to the bathroom in the back the recipe for the 4th and Pain axe is on the bathroom counter next to the sink. If you like the Cleaver then the 4th and Pain is a direct upgrade to it.

Feel free to explore Rampart High School and fill up your bag, if you have time left. There is a key to a hidden room and a safe code to be found in Rampart as well. If you want to know where to find those check out our article with all recipe locations in The Walking Dead: Saints and Sinners.
The easiest way to leave Rampart is going to be the way you came in in the top left corner of the map. Many of the doors which will be open if you return to Rampart are either locked or barricaded when you come in for the first time.
Back at the Resting Place
When you make it back make sure to talk to Casey on the radio. He’ll have a lot to say about his squadmates and the Reserve. If you pay close attention you might guess where the Reserve is located.

Once you talk to Casey make sure to recycle all your junk items and get ready for the next day. You might have noticed that the lantern is lit again. That means May has another request for you. For now, go to sleep.

Need a guide on what comes next? Want to find out what May wants now, and how to get it? Then head over to Part 9.

5 Best VR Zombie Games on the Oculus Quest 2 and 3
You know what makes Zombies more terrifying? Them being right up in your face. That’s why VR Zombie Games are some of the most intense and scary experiences to be found on the Oculus/Meta Quest 2. Whether you want to gun down hordes of the undead with a machine gun, or chop them to bits with a hatchet, there are some great choices as far as VR Zombie games go on the Quest 2. Here’s 5 of the best.
Do you know what makes Zombies more terrifying? When they’re right in front of your actual, physical eyes and face.
That’s why VR Zombie Games are some of the most intense and scary experiences to be found on the Meta Quest 3 and 2 (not to mention PCVR). The zombies sound and look like they’re right in front of you, and nothing feels more like being under attack by the undead than fighting them off with your actual hands.
Zombies have been a huge part of horror culture since the 60s through their appearance in movies, shows, and games. Now you can experience them even more personally than ever before through the magic of Virtual Reality Zombie Games.
Whether you want to gun down hordes of the undead with a machine gun or chop them to bits with a hatchet, there are some great choices as far as VR Zombie games go on the Oculus Quest 2 and 3.
If you’re eager to fight hordes of the undead, scavenge for supplies, and survive in a ruined world filled with flesh eating creature then here are 5 of the best VR Zombie games on the Meta Quest store for you to try.
The Walking Dead: Saints and Sinners Chapters 1 and 2
The Walking Dead: Saints and Sinners Logo
There is no doubt that The Walking Dead: Saints and Sinners and its sequel The Walking Dead: Saints and Sinners - Chapter 2: Retribution is the finest example of a VR Zombie Game that you will find on the Oculus Quest 2, or anywhere.
Set in the universe of The Walking Dead, these games bring you to the flooded and zombie infested streets of a post-apocalyptic New Orleans.
You play as the Tourist, who comes to New Orleans in search of a government bunker called “The Reserve.” This game is part survival horror and part zombie shooter. You will have to fight your way through zombies (or rather “walkers”) and the human factions vying for power over New Orleans in order to find and open The Reserve.

Sneaking away from a group of zombies in the VR Zombie Game The Walking Dead: Saints and Sinners
You will also have to gather weapons and supplies, as well as the raw materials from junk items you scavenge in the ruins of the city. These can be used to upgrade your crafting tables and create new tools to help you survive and thrive in zombie infested New Orleans.
In this way The Walking Dead: Saints and Sinners is also a VR Survival Game. You’ll have to worry about more than just fighting the zombies and hostile humans using the game’s superb melee and shooting systems. In this Zombie Virtual Reality game you will also have to scavenge for supplies and decide what to make with them so that you can continue surviving and completing objectives to advance the story.
As mentioned, the combat is also superb. Instead of waving your arms around to attack in melee as a more subpar zombie game would, you need to be very careful to apply your blade or bludgeon of choice to a walker’s head in order to take it down. Sharper weapons slide in more easily, and duller ones that are more plentiful require more strength to use. It’s the best zombie destroying melee system in VR.

Punching a zombie in the face in the sequel The Walking Dead: Saints and Sinners Chapter 2 - Retribution
The sequel, Chapter 2: Retribution, gives you more weapons and tools while also giving you greater enemies to fight. Overall The Walking Dead: Saints and Sinners is a fantastic combination of melee combat, shooting, and survival in a zombie post apocalypse.
Resident Evil 4 VR
The Resident Evil 4 VR Logo
Resident Evil 4 VR is a fantastic remake of the classic Resident Evil 4, which defined a whole new genre of adventure shooters back in its hey-day. What makes it even better than the original is just how much freedom VR gives you to shoot and fight any way that you want. The Virtual Reality controls give you much more freedom of movement than the old tank controls of the original did.
In this game you are Leon Kennedy, who is sent to a remote village in Spain to rescue the president’s daughter, who has been kidnapped by a cult known as Los Ganados. What you don’t know going in is that the Ganados have a parasite that can take control of a person’s body and will, and the entire area is full of cultists possessed by this parasite.

Fighting off the Los Ganados villagers in Resident Evil 4 VR
While they aren’t exactly zombies, they certainly act like zombies do. The Ganados will come at you in waves, and keeping them from hitting you while also doing your best to take them down is certainly an experience that feels like fighting any other sort of zombie.
Resident Evil 4 VR combines the puzzling, exploration, and shooting of the original game and makes it look and feel fantastic to play in VR. If you’re a fan of the original, or want a fun linear adventure experience with lots of zombie like enemies and creatures to fight then this game is for you.
Arizona Sunshine

The Arizona Sunshine Logo
Arizona Sunshine is a short but very fast paced and fun zombie shooting experience on the Oculus Quest 2. If you want a Singleplayer or Multiplayer experience where you mow down hordes of zombies that are all running at you, then this is the game it do that in.
In this game you are a survivor who finds themself in Arizona shortly after zombies take over the world. In search of a safe place to live, you fight your way through hordes of zombies in a number of areas. The game gives you a ton of weapons to have fun with, from the 1911 pistol to MP5 submachine guns, to assault rifles, to sniper rifles, and even a minigun.
There’s not much to Arizona Sunshine other than killing zombies, going to the next area, and killing some more. If you want a zombie shooter experience with a lot of bullets and not a whole lot of frills, then this is your game. It’s straightforward and it’s a blast. It’s also got three person coop multiplayer if you’ve got some friends who want to blast the undead as well.
After The Fall

The After The Fall Logo
Remember Left 4 Dead? Well unless you’re playing the Left 4 Dead VR Mod, which is honestly pretty janky right now, then the closest thing you’ll get to it in VR is After The Fall. This game combines Left 4 Dead’s four player zombie coop multiplayer adventures, complete with all the hordes and special zombie types you could ask for, with VR Controls and a progression system that has you unlocking better guns and equipment as you play more and more.
In After The Fall you are an unnamed survivor of a peculiar apocalypse that has not only turned most of the world’s population into pale walking corpses intent on killing, but also frozen practically everything. Through defeating these zombies (called the “Snowbreed” by the survivors) you not only keep your small underground community running, but collect more of their essence to upgrade your equipment.
If you want the intense 4 player coop zombie fights of Left 4 Dead in VR, then After The Fall is the way to go. The missions are very repeatable and the undead are never ending.
Lies Beneath

The Lies Beneath Logo
Another Singleplayer VR experience, Lies Beneath is a standout example of a Singleplayer VR game with both great length, story, and great action that not only intrigues but makes you want to keep coming back for more. It’s another linear shooter, and the enemies in it are not exactly zombies. Most are zombie like, and they come at you in big groups like zombies do, but there are also other strange nightmare creatures for you to contend with.
Still, Lies Beneath very much has the zombie vibe to it. You crawl through abandoned forests and villages, trying to shoot and chop your way through the hordes of enemies to reach your next destination. It’s one hell of an experience, and the sort that VR could really use more of.
In this game you play as Mae, a college student coming back home, when a terrible car crash leaves you separated from your father. As you look for him you discover that everywhere you go things are twisted and evil, with aggressive creatures roaming the landscape. Most of which… look human but dead, zombies you might call them.
The shooting is a ton of tense fun in this game, and you really feel like you’re alone up against a huge horde of zombie like creatures. I couldn’t recommend this game enough if you want a Singleplayer VR zombie shooting experience in VR.
There you have it, the 5 best VR Zombie Games on the Oculus Quest 2. While none of these are free, they’re all very much worth your money and a ton of fun.

The Walking Dead Saints and Sinners Walkthrough and Guide - Part 7 - Old Town and Another Stash
Stuck in The Walking Dead Saints and Sinners? Wondering where to go next? Maybe you just like to see what is in store for you before you get there, or want to look back and see if you missed anything in The Walking Dead: Saints & Sinners. Well don’t worry we’ve got you covered with this complete walkthrough. This is the seventh part, where you go to Old Town and sneak or fight your way past a bunch of Tower grunts to get another stash for May.
Stuck in The Walking Dead Saints and Sinners? Wondering where to go next? Maybe you just like to see what is in store for you before you get there, or want to look back and see if you missed anything in The Walking Dead: Saints & Sinners. Well don’t worry we’ve got you covered with this complete walkthrough. This is the seventh part, where you go to Old Town and sneak or fight your way past a bunch of Tower grunts to get another stash for May.
This article will detail how to progress through the main story missions as quickly as possible, with a couple of guiding tips thrown in here and there to make your adventure smoother. Only those recipes that are convenient to get when doing a task for the first time are included. For a full list of all recipes in The Walking Dead: Saints & Sinners, check out our recipe guide article. Spoilers will be as light as possible, but there will be story spoilers by necessity in this walkthrough, but there won’t be any explanation of what is going on in the story beyond what is necessary to make the walkthrough make sense.
All Walkthrough Parts:
The Walking Dead Saints and Sinners Walkthrough and Guide - Part 1 - The Graveyard
The Walking Dead Saints and Sinners Walkthrough and Guide - Part 2 - The Shallows
The Walking Dead Saints and Sinners Walkthrough and Guide - Part 3 - Via Corolla
The Walking Dead Saints and Sinners Walkthrough and Guide - Part 7 - Old Town and Another Stash
The Walking Dead Saints and Sinners Walkthrough and Guide - Part 8 - Rampart
The Walking Dead Saints and Sinners Walkthrough and Guide - Part 9 - The Shallows Again
The Walking Dead Saints and Sinners Walkthrough and Guide - Part 10 - Bastion and The Reserve Key
The Walking Dead Saints and Sinners Walkthrough and Guide - Part 11 - The Reserve and the Ending
Old Town
Welcome back to another day in The Walking Dead’s New Orleans. Wake up and go back to the coffin underneath the lit lantern that you put the last piece of intel in earlier. There will be another note from May and a picture of the next Tower stash to raid, in Old Town.
Get yourself ready and make sure to bring a gun that’s good for fighting people. At this point you might have a preference. Shotguns are easy to aim but only work up close. The Hunting and Lever Action Rifles are great ranged options., but require precision aiming As long as whatever you bring is good for fighting Tower soldiers, you’ll be well off.

Once you arrive take a look at your map. The stash is located in a little shed at the side of the house next to the green house in the bottom right corner of your map. You’ll also recognize the shed because the house it is attached to has a ton of vines running down its sides.

If you want to get a recipe easily, however, you could take a detour on your way across the map to the house colored a light red in the upper left side of the map, right in front of where you spawn in. Inside the kitchen in this little house is the recipe for Gumbo inside of the fridge. The only problem is there’s two people inside who won’t take kindly to your intrusion.

Take them out however you wish, an explosive is a great way to get rid of them, and get the recipe. Either way when you’re through there take the alley around the side of the house, or keep going down the main street. You will inevitably end up travelling past the big Blue House on your map, which is in the center of the area.
The street in front of the house and the interior are full of Tower grunts, but they won’t give you any trouble unless you go inside and trespass, or pull a gun on them. There are a number of entrances, you can walk through the front, though the soldiers outside won’t take kindly to that, and there’s a boarded up hole in the back you can bash open and sneak through. There’s a recipe inside the house, but unless you’ve already been to Rampart and gotten the code to the safe it is sitting in, then there’s no reason to go inside unless you just want to fight and loot the place.
The real prize is past the Blue House and down the street.

You’ll see a big fence at the intersection of Bordeaux and Prytanya. A little ways up Bordeaux street, right beside the Blue House, is a gate leading through the fence. The first house inside the gate is the grey one mentioned earlier, and on the side facing Bordeaux street is the little white shed that contains the stash. There will be quite a few well armored Tower guards right in front of it though.
It is possible to get into the shed by stealth, though you might have to kill the closest guard with melee to get in. By now you should have plenty of offensive tools in your arsenal, and it is far easier to just shoot your way through. What makes this difficult is that the guards in front of the Blue house will also respond to any aggression on your part, so you might want to take them out before tackling the stash, if you want to do it by force.
Inside the shed is a fancy bow and some special arrows, as well as the documents that May wants.

There’s not too much to be said for the green house on your map, loot it if you want. There’s nothing special to be had, but if your bag is light you might as well.
Once your bag is full and the documents are in it, nothing left to do but leave. This trip to Old Town is pretty straightforward, as most of May’s tasks are. Get in, blast or sneak your way through to grab the goods, and get out.

The Resting Place
Once you’re back at the bus do the usual, scrap all of your items and get ready for the next day, but do be sure to remember to put the intel you picked up into the coffin.

With that done also make sure to go back to your radio and tune back into Channel 61. As you might have guessed, Casey has another mission for you to go on, and this time it’s not to grab another Pump Regulator. He wants you to go to the Rampart High School and look for his squad that used to be in the bunker with him.

That’s your destination for the next day. For now, go to sleep.

Need a guide on what comes next? Want to find out what you’ll find at Rampart High School? Want to know what happened to Casey’s squadmates? Then head over to Part 8.
The Walking Dead Saints and Sinners Walkthrough and Guide - Part 6 - Bywater and the Second Pump Regulator
Stuck in The Walking Dead Saints and Sinners? Wondering where to go next? Maybe you just like to see what is in store for you before you get there, or want to look back and see if you missed anything in The Walking Dead: Saints & Sinners. Well don’t worry we’ve got you covered with this complete walkthrough. This is the sixth part, where you acquire the second pump regulator from Bywater and install it back by the church.
Stuck in The Walking Dead Saints and Sinners? Wondering where to go next? Maybe you just like to see what is in store for you before you get there, or want to look back and see if you missed anything in The Walking Dead: Saints & Sinners. Well don’t worry we’ve got you covered with this complete walkthrough. This is the sixth part, where you acquire the second pump regulator from Bywater and install it back by the church.
This article will detail how to progress through the main story missions as quickly as possible, with a couple of guiding tips thrown in here and there to make your adventure smoother. Only those recipes that are convenient to get when doing a task for the first time are included. For a full list of all recipes in The Walking Dead: Saints & Sinners, check out our recipe guide article. Spoilers will be as light as possible, but there will be story spoilers by necessity in this walkthrough, but there won’t be any explanation of what is going on in the story beyond what is necessary to make the walkthrough make sense.
All Walkthrough Parts:
The Walking Dead Saints and Sinners Walkthrough and Guide - Part 1 - The Graveyard
The Walking Dead Saints and Sinners Walkthrough and Guide - Part 2 - The Shallows
The Walking Dead Saints and Sinners Walkthrough and Guide - Part 3 - Via Corolla
The Walking Dead Saints and Sinners Walkthrough and Guide - Part 6 - Bywater and the Second Pump Regulator
The Walking Dead Saints and Sinners Walkthrough and Guide - Part 7 - Old Town and Another Stash
The Walking Dead Saints and Sinners Walkthrough and Guide - Part 8 - Rampart
The Walking Dead Saints and Sinners Walkthrough and Guide - Part 9 - The Shallows Again
The Walking Dead Saints and Sinners Walkthrough and Guide - Part 10 - Bastion and The Reserve Key
The Walking Dead Saints and Sinners Walkthrough and Guide - Part 11 - The Reserve and the Ending
Bywater
When you wake up change the radio channel to 61 (but do be sure to listen to channel 47 every morning too) and have a chat with Casey. He will tell you that the next pump regulator is in Bywater.

Against the trend you might see forming with the missions here, you actually won’t need to get into a big gunfight with The Tower in Bywater. You could if you wanted to, of course, but you can easily get the Pump Regulator without antagonizing anyone, at least not physically, emotionally maybe.
So you won’t need a big shotgun or anything this time around. You will be fighting walkers though, possibly a big group of them, so an explosive like the Nail Bomb might be a good idea, but that’s up to you. The combat can be very minimal if you’re willing to do a bit of errand running.

As always, take a look at your map when you arrive at Bywater. Your overall goal is the building colored blue with the fish on it. That’s the cannery, and the part is on the second floor. You could just go straight there and enter through the half open loading dock around the back, but there’s a problem with that.

There’s some walkers there. If you brought that nail bomb you could just throw it at the base of the door and take out most of them, then waltz in, climb over the machinery on your left, find your way to the staircase, and climb up to get the pump regulator sitting on the folding table with the tarp over it on the catwalk above. Once you have the regulator you can leave and skip ahead to installing it. Of course that would mean missing the entire story of this area, and it’s a fun and heartwarming bit of drama.
So if it’s your first time you’re better off going to the front of the big orange building on your map. That’s the car repair shop. Out front there’ll be a bald guy in a red Reclaimed jacket calling you over. Talk to him.

He’ll tell you to meet him around the back of the building, so go around the big orange building and meet up with him around back. He’ll be on the street that runs along the top of the Autorepair shop. On your map he will be directly North of the building. You can always restart the level and follow him if you’re having trouble finding him. On your way there you should take a little time to go through the Autorepair shop and loot it. There’s some Reclaimed inside, but they won’t stop you.

Talk to the Bald Guy again and he’ll tell you to deliver a letter (in exchange for help getting the pump parts) to his lover Justin, who happens to be part of the Tower garrison in the nearby Sawmill. The Sawmill is the building marked orange with a drawing of planks on it on your map. Head over there with the letter.
Oh, and be sure to loot the Sawmill while you’re there. The Tower soldiers won’t bother you. There is a spot that is consistently great throughout The Walking Dead: Saints and Sinners and the Chapter 2: Retribution sequel here. In the back of the warehouse, behind some pallets of wood, is a gross looking bed with some pillows on it. You’ll always find at least one box of loot there, so check it every time you visit Bywater.

The guy you’re looking for is in the elevated trailer with the Lumber sign on the side, beside the main warehouse of the sawmill. There’s a woman standing next to a shipping container in front of it as well.

You can extort an item out of Justin by demanding that he hand something over in return for the delivery. Either way when you give him the letter he will be overjoyed. He will give you a letter to deliver back to Davon. Here is where your options expand a little. When you leave the woman outside will stop you and ask you to deliver a fake letter saying that Justin is unwilling to leave the Tower and risk his life. So now you can either deliver the real letter so the two can reunite, or deliver the fake letter so they stay where they are. There’s also a third option. Going to the Reclaimed leader inside the Autorepair Shop.

You can tell the local Reclaimed leader that your bald friend is making contact with the enemy. Just be sure to not demand payment for the information or he will tell you to go away. In response the leader will run over to Davon and immediately shoot him. It’s an interesting option, but it is easier to just give Davon a letter and let him hand the key over to you. Either way, if you talk to Justin and get his reply then killing Davon will cause the Poseidon Cannery Key to drop from his corpse. If you kill Davon before getting Justin’s reply, then he won’t drop the key and you can’t get it.

Giving either letter to Davon will net you one Poseidon Cannery Key, which you can use to go through the door leading directly to the warehouse, bypassing the big group of zombies in front of the loading bay door. Let the lovers unite, or force them apart, the choice is yours. Either way make your way to the cannery and use the key on the double door leading inside.

Make your way through the stacks of boxes, and be sure to keep a lookout for cans of Poseidon Tuna, which contain a good amount of protein that you can use for making food items like the Jambalaya (which you’ll get soon). Find your way to the staircase leading upstairs and take it up. Take a sharp right turn at the top of the stairs to find the Pump Parts and a bunch of other items arrayed on a table.

With the parts in hand, head back to the Resting Place.
Installing the Second Pump
Back at the Resting Place, make sure to scrap your loot and then hop back on the radio to talk with Casey. He’ll run you through how to set up the second pump regulator just like last time. Once all the numbers are green and the button is too, say goodbye to Casey, make sure to grab a big gun like a shotgun or rifle, and head back to the church.

Once you’re there you can see the location of the second pump on your map, it is the pump icon that is closer to the top. Otherwise you can find it by going straight down the central road and take a left as soon as the road gives way to the churchyard. You will see the blinking red light of the pump around the corner, but you will also hear voices.
Crouch and sneak closer around the corner. Three armed people will be crowded around the pump regulator, talking to each other. If they see you they will fire, so take the first shot. Also you can use a nail bomb or sticky bomb to take out several at once.

Once they’re dealt with, pop the pump regulator into the appropriate slot. Once the light is green you’re good to head back to the bus and sleep before taking on another day.

Need a guide on what comes next? Then head over to Part 7.
Unlock All Safe Codes in The Walking Dead Saints and Sinners | Unlock All Safes
Found a Safe in The Walking Dead: Saints & Sinners and wondering how to unlock it? Every safe in the game has a new code generated for it when you begin your playthrough, so there’s no use looking up a safe code that somebody else used. You’ll have to find them for yourself. Don’t worry about how to do that though, because here is the complete list of all safes and how to get their codes here.
Found a Safe in The Walking Dead: Saints & Sinners and wondering how to unlock it? Every safe in the game has a new code generated for it when you begin your playthrough, so there’s no use looking up a safe code that somebody else used. You’ll have to find them for yourself. Don’t worry about how to do that though, because here is the complete list of all safes and how to get their codes here.
This article is an extension of our already existing list of all recipes in The Walking Dead: Saints & Sinners. Wondering where the other recipes are too? Then check out that article here. You can also find all of the recipes in the sequel The Walking Dead: Saints and Sinners - Chapter 2: Retribution here.
Table of Contents:
The Blue Palace Safe - The Shallows
Arguably the most straightforward recipes to get your hands on, the .45 revolver and .45 ammunition schematics are found in a safe in the Blue Palace mansion in The Shallows. The Blue Palace is the only building you can enter on this map, and is also the location containing the item you need for your very first mission in the game, a microphone for your radio.
The first time you enter The Shallows a woman will greet you, saying that her husband took off with their children into the Blue Palace, and that she will reward you for finding him. Your reward will be the code to the safe, which is located in the first room to the left of the main entrance to the Blue Palace. The room also contains a portrait and many books, and the safe itself is set in the wall next to some bookcases. There is also an entrance to this room through the crawlspace beneath the house, through some broken floorboards.

To access the safe and get the schematics you can go to the attic of the Blue Palace, get the dead man’s wedding ring, and return it to her for the code. Or if you prefer to not have to walk between her, the mansion, and back again, you could just kill the woman and take the code off of her corpse.
The Lion House - Via Corolla
Finding some of the recipes is a little more complicated than just knowing where it is located. Samedi’s Hand is a clawed melee weapon that looks extremely cool.

While the safe containing the recipe is in Via Corolla, the code to open the safe is found in The Ward. There is a large shipping office you can explore in The Ward, and you can find the code on top of one of the desks inside, in an office about half way down one of the long hallways on the lower floor. You’ll find it if you just search the top of every desk while you’re inside. Also this is a great opportunity to get some of those juicy keyboards while you’re at it.

Once you have the code the safe is back in Via Corolla. Go to the house that has a front door with lions on either side. Go around the right side of the house and pay attention to the wall. You’ll notice some hand holds in the wall of the house that you can climb up into a little room, which contains the safe with the Samedi’s Hand recipe inside.
Ruined House - Old Town
The Esteemed Mortal is a weird name for what is basically a giant axe made of saw blades. It’s a little cumbersome… but it’s pretty sick.
Before going to the safe you’ll need the code for it, which is located at The Rampart High School. It is on a music stand in the school’s band room. There are a ton of stands and instrument cases in the room, centered around a little podium for the conductor. If you’ve ever seen a band room you will know it when you see it, though it will be pretty dark in there. Make sure to check the music stands thoroughly for the code. (It may be on the ground in the quest version, instead of on a music stand)

Once you have the code the safe containing the recipe is in Old Town in the huge house in the center of the map that is blue on the map. This house is full of Tower soldiers the first time you enter the map, so coming back another time if they are there can be advisable. Once you make your way past any threats the safe itself is on the second floor in the room with a missing wall. There are also good ammunition spawns in the dressers next to it.
By The Jazz Men - The Graveyard/Resting place
You’ll find the safe containing this recipe really early on in the Jazz Park, which you can get to through the catacombs in the Cemetery. Getting the code to the safe requires you to get much further on into the game.
Eventually one of Casey’s missions will take you to The Bastion, a map centered around a fortified apartment block in the middle of the map. There is one other building in next to The Bastion though, a little house with a car crashed into it. Around the back of that house you can break through some boards blocking the back door and get inside. The code will be on a little table against one of the walls of the Living Room with the crashed car in it.
Once you have the code you can go back to the Jazz Man park any time of night. If you don’t remember where that is just go down into the catacombs from the Cemetery with your base in it, and take the route that does not go to the church. The safe will be next to the delivery truck on the road just in front of the hole in the ground you enter from.
There you have it, each safe and safe code in The Walking Dead: Saints & Sinners. Happy surviving in New Orleans!