The Easiest Way To Install Skyrim VR Mods
So you want to play modded Skyrim VR, awesome! Unfortunately downloading and installing enough Skyrim VR Mods to create a completely new Skyrim VR experience is a pretty hard task. You’ve got to worry about what mods you want, which ones work, which ones don’t, dependencies, and a ton of other problems that can cause bugs, make your game crash, or make it just not start at all.
Luckily there’s a way, the easiest way, to install a ton of Skyrim VR mods at once that are built to change the game to enhance functionality, graphics, and gameplay. They’ll also all work together, and you don’t have to browse nexusmods.com for hours and hours figuring out what you do and don’t need.
So here’s the easiest way to install Skyrim VR mods using a fantastic tool called Wabbajack.
Wabbajack - Easily Install Skyrim VR Mods
Wabbajack is a community made tool that is used for both Skyrim VR Mods and flatscreen Skyrim Special Edition Mods. Here, of course, we’re going to be downloading and installing Skyrim VR Mods with Wabbajack.
Some warning though, the actual downloading process will still take a while and require some input on your part. While Wabbajack is the easiest way to download and install Skyrim VR mods quickly, there’s still going to be some legwork on your part.
Not only can we download mods through a predefined list of mods that are made to provide a complete modded experience and work together, but Wabbajack also manages the downloads and files so we don’t have to do a ton of boring dragging and dropping ourselves. So let’s get started.
First go to wabbajack.org and download Wabbajack.
Downloading Wabbajack from wabbajack.org
A Wabbajack application file will download to your browser’s usual downloads folder. Don’t run it quite yet though. We want to run Wabbajack in its own folder, not your Downloads folder. Wabbajack will make some extra files, and so won’t run in certain places.
The easiest way to run Wabbajack is just to create a new folder directly on your C:/ drive or any other drive you might have on your PC and name it something like “Wabbajack.” Once you’ve created this C:/Wabbajack folder, move your newly downloaded Wabbajack application into it and run it.
The Wabbajack Start Screen
Using Modlists - Easily Install Skyrim VR Mods
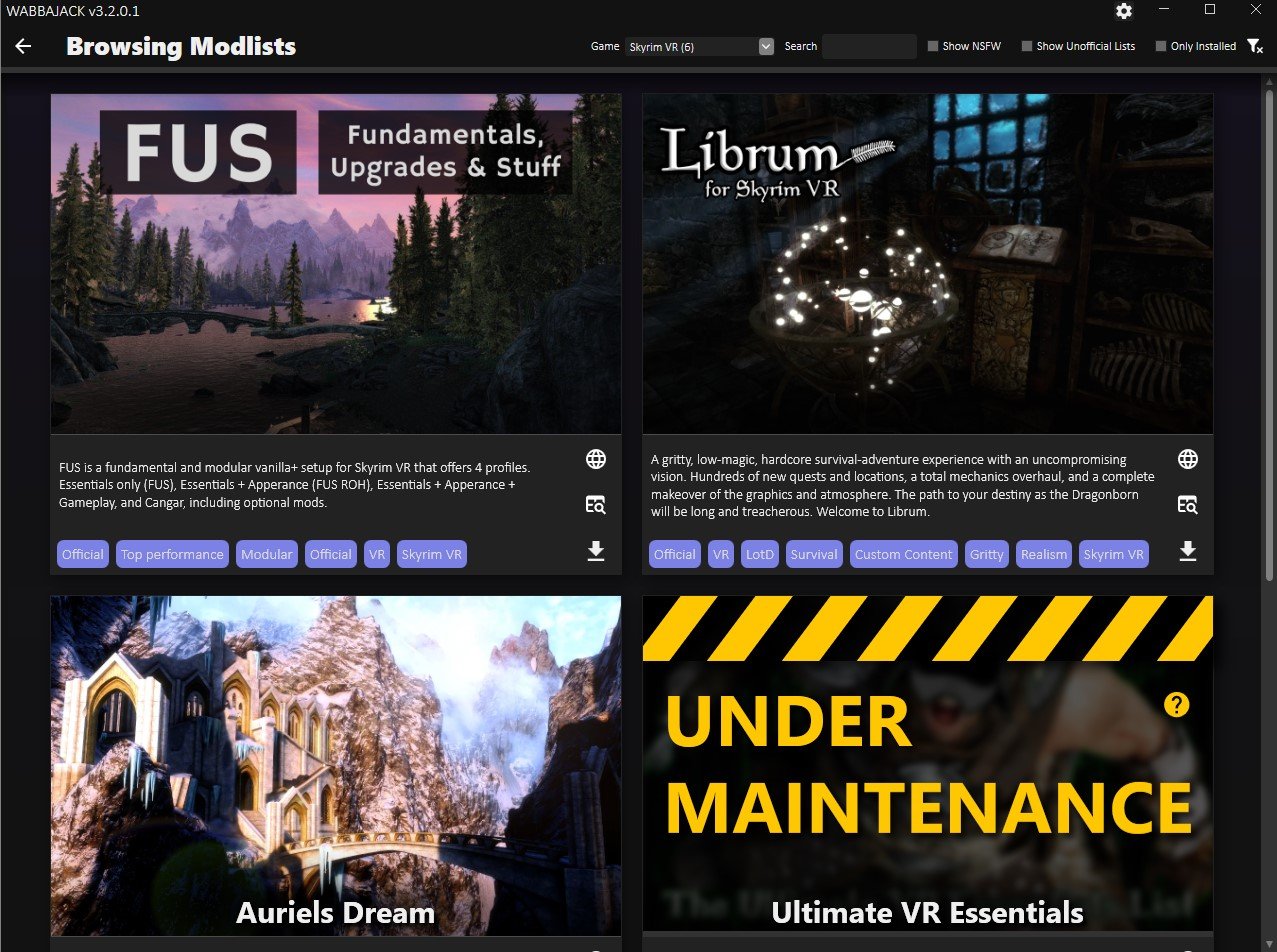
Now that you’re running Wabbajack, hit the “Browse Modlists” button on the main page, and filter for Skyrim VR Modlists at the top. You’ll see there are a few options for you to pick from here. These are your options for predefined modlists that you can use through Wabbajack.
Browsing Skyrim VR Modlists in Wabbajack
There are some great options here, and if you want an improved but still recognizeable modded Skyrim VR experience that doesn’t stray too far from the base game, then you’ll want to go with FUS, which is short for “Fundamentals, Upgrades, and Stuff.”
While the rest of this article is applicable when installing all modlists through Wabbajack, the specifics will revolve around installing FUS. If you want Skyrim VR but better, then FUS will give you that with a ton of improvements. It’s also modular, so you can decide what Skyrim VR mods you want to keep in the modlist.
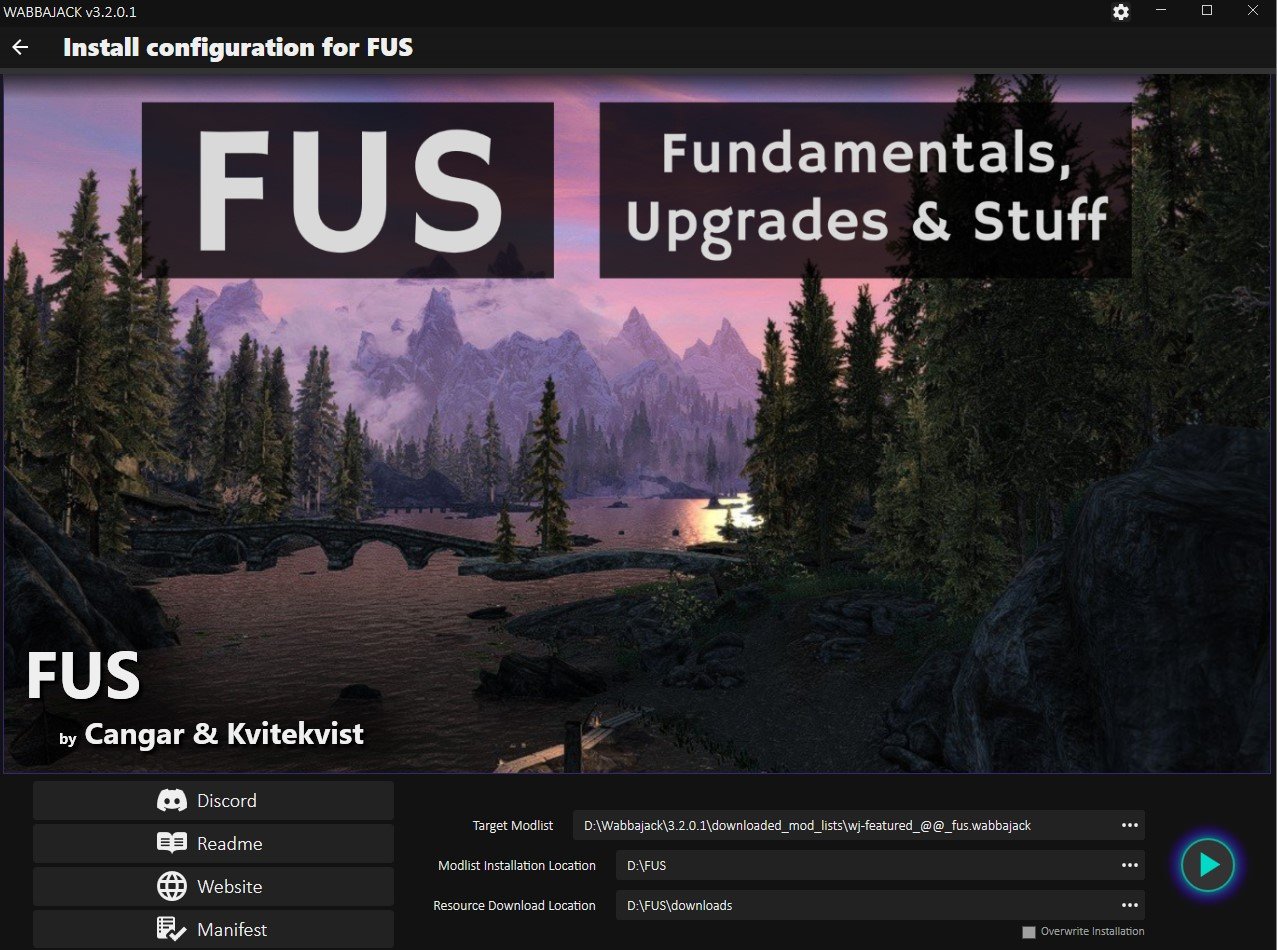
Anyway, since we’re installing FUS, hit the little arrow button in the bottom right of the FUS modlist icon. After a wait it will turn into a play button, hit that. You should see a screen like the one below.
Ready to download the FUS mods
The only difference between this screen and yours will be that the “Modlist Installation Location” and “Resource Download Location” sections will be empty. You’ll want to create another folder in the same location you made your Wabbajack folder earlier, and then add that folder location to both of these paths, except the “Resource Download Location” should have \downloads at the end.
As you can see in this example, the name of the folder here is FUS. So you might think it will be time to hit the play button, not yet though. You might have noticed that a github page appeared right when you got to this screen. Well it will have a long list of instructions and other stuff. It seems complicated, and sure it is, but we’ll distill some of it down for you here to a few simple steps to do before you start.
If you run into issues at any point and can’t figure out why, then check out the “Troubleshooting” section at the bottom of this article.
FUS Preinstallation Steps - Easily Install Skyrim VR Mods
Alright so you’ve got Wabbajack ready to start downloading mods, but haven’t hit that final play button quite yet, time to get your PC ready for FUS. First you’re going to need to install some extra software to support some of the mods in FUS.
You’ll need to make sure you have some Microsoft Visual C++ Redistributable Packages installed. Here is a direct link to them, download the x64 version. Once the installer downloads, run it, though you might get this error.
If you see this you’ve already got the right Microsoft Visual C++ packages installed
If you do, no big deal, you’ve already got the right things installed, and can move on. Otherwise the installer is straightforward so just follow along it.
Next you’ll need to install some old versions of the .NET 5.0 Runtime. Go to this webpage from microsoft and download and install both the console and desktop app versions. This means you’ll end up running two installers, one for each.
Where to download the .NET 5.0 Runtime installers
With that out of the way you’ll want to uninstall Skyrim VR and then reinstall it. You want as clean a version as possible. If you’ve already got some Skyrim VR mods installed, then you’ll want to follow these steps to make sure your installed version is as clean as possible. We’ll want nothing to interfere with the FUS mods.
Advanced steps to clean your Skyrim VR installation
If you run into problems later on you might want to double check this github page for any other things that might interfere. Additionally make sure your language in Skyrim VR is set to English, and if you ever changed your Render Resolution in Steam VR, change it back to 100%.
Now you’re ready to download and install FUS! Oh, and if you run into issues at any point and can’t figure out why, then check out the “Troubleshooting” section at the bottom of this article.
Downloading And Installing the Skyrim VR Mods - Easily Install Skyrim VR Mods
Now you should go back to Wabbajack and hit the play button in the bottom right corner to start downloading your shiny new Skyrim VR mods.
The FUS download screen, time to hit that play button
Once you do the modlist installer will run, and very quickly it will hit a point where you have to start downloading mods. A browser window will appear and ask you to log into a nexusmods.com account. If you don’t have one already then make one, they’re free.
Once you log in the page will automatically redirect to the download page for the first mod in the list. It will look like this.
Downloading a Skyrim VR mod from nexusmods.com
Here’s the boring and lengthy part we mentioned earlier. If you don’t have a premium nexusmods.com account then you’ll have to manually click the “Slow Download” button for each mod that comes up. A premium account will automatically download the mods.
This will take a while, there are over 300 mods to download for FUS, but Wabbajack makes it as fast as possible. Once a mod is ready to be downloaded the page will appear automatically, all you have to do is hit the download button for each one.
You see normally you’d have to go to the Skyrim VR mod page, go to the files page for that Skyrim VR mod page, then download it through this screen, and then move the downloaded Skyrim VR mods folder to the right location.
With Wabbajack all you have to do is hit the “Slow Download” button, wait a bit, and then when another appears click the “Slow Download” button again. Some of these mods also take a while to download, and if that happens another download page won’t appear until there’s a space in the queue for a new download. So you’ll be waiting for a while.
Downloading the FUS Skyrim VR mods with Wabbajack
So kick back, relax, maybe watch a youtube video or five, and hit that download button when it shows up. You can see the Skyrim VR mods that are downloading in the bottom right section of the Wabbajack screen.
Oh, and if a mod seems to never finish downloading and the bar doesn’t move for a long time, you might need to restart Wabbajack and reopen the FUS modlist installer. Just follow the steps we’ve done to get to this point in Wabbajack and it will pick up right where it left off. Do the same if Wabbajack crashes.
Once all of the mods are downloaded the installer will automatically unpack and install them, this will also take a while. Still, all of this is way easier than downloading and installing all of these mods yourself.
If you run into issues at any point and can’t figure out why, then check out the “Troubleshooting” section at the bottom of this article.
Playing Modded Skyrim VR - Easily Install Skyrim VR Mods
So the Wabbajack installer is complete. All your Skyrim VR mods are ready to go. So you might be wondering how to actually run them. Well for FUS you don’t just run Skyrim VR from Steam like you normally would. No, instead you need to go to the FUS folder that you made previously before downloading all of the mods (in this example it was D:/FUS, yours is likely C:/FUS if you don’t remember.)
From this folder scroll around until you find ModOrganizer.exe, and run it.
The ModOrganizer.exe file in the FUS folder
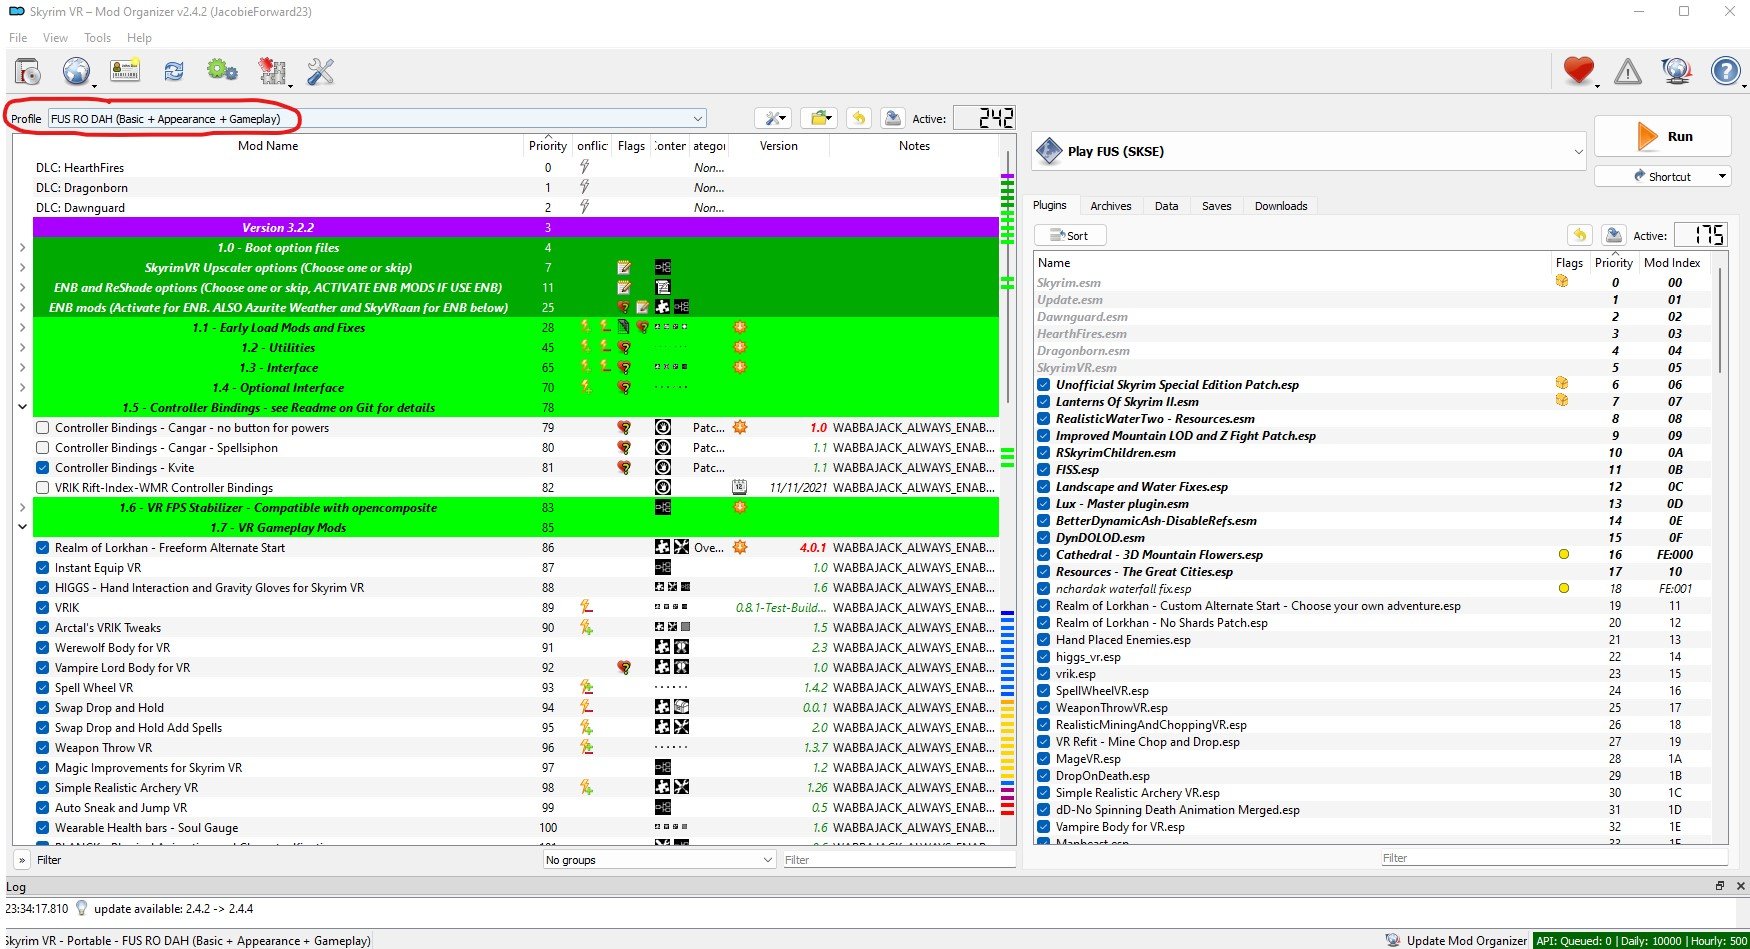
This handy application lets you view, manage, and select which FUS mods you want to use. You’ll see a little dropdown bar with several profiles near the top. There are four, each with a differing amount of mods applied to Skyrim VR.
ModOrganizer.exe for your Skyrim VR mods with the profiles section circles
Here we recommend the “FUS RO DAH (Basic + Appearance + Gameplay) mod selection, which not only improves the normal Skyrim VR experience, but also adds some important gameplay improvements as well. There are other profiles that change the game to lesser extent, but after going through all that waiting to download these mods you might as well use them.
Later on you can scroll through the list of mods and activate or deactivate whichever you like, but first you should run your freshly modded Skyrim VR without changing anything to make sure it runs without crashing and to allow important mods to load ingame.
To run your modded Skyrim VR you hit the run button in the top right corner of ModOrganizer.exe, but before you do that make sure your headset is on and connected to your PC, and that your controllers are also on and working. Then run Steam VR so that you’re in Steam VR home in your headset, then click the run button.
You’ll find yourself in FUS’s new starting location and ready to make a character. Congratulations! You’ve successfully downloaded and installed a whole modlist of Skyrim VR mods.
If your game crashes or doesn’t start then retrace your steps to this point and make sure you didn’t miss anything. If all else fails or you get an error you didn’t expect, check out these troubleshooting tips.
Troubleshooting - Easily Install Skyrim VR Mods
Unfortunately even with Wabbajack the process of downloading and installing Skyrim VR mods can be difficult, and some problems might show up on your PC that might not on others.
So here are a list of places you can look if you’ve had problems at any point in this article. Before you look here check back and make sure you didn’t accidentally skip any steps. You may also want to more thoroughly clean your Skyrim VR installation before reattempting to install the modlist through Wabbajack.
Hopefully your journey in installing Skyrim VR mods is as painless as possible. Once you reach the end, enjoy!
Fighting a giant in modded Skyrim VR


