


Mario Kart VR Is Amazing On the Meta Quest - Here’s How To Play It
If you want to play Mario Kart in Virtual Reality then you don’t have to go all the way to an arcade in Japan to do that.
In this article, we’ll be going through how to set up Mario Kart VR on the Meta Quest, some settings to get it looking good, and how it plays. Spoiler alert. It’s pretty awesome.
If you want to play Mario Kart in Virtual Reality then you don’t have to go all the way to an arcade in Japan to do that.
Now with a Meta Quest 3 or 2 and the Citra VR emulator, you can now enjoy a fully 3D and immersive Mario Kart VR experience at home on your Quest headset. The experience of playing this classic racing game in VR is amazing, especially considering that there really aren’t a whole lot of racing games available in VR, and those don’t play half as well as Mario Kart does.
While Mario Kart wasn’t made for VR it is definitely enjoyable when playing it in Virtual Reality. You can even zoom in your view to the first person so that all of the action is as immersive and in your face as possible. Once you try Mario Kart in VR you won’t ever want to go back to playing it on the flat screen. This isn’t just a great VR Mario Kart experience, but also just a great VR racing game in general if you’re hungry for a new one.
In this article, we’ll be going through how to set up Mario Kart VR, some settings to get it looking good, and how it plays. Spoiler alert. It’s pretty awesome.
How To Play Mario Kart In VR
Playing Mario Kart in VR does involve a bit of setup, I’ll warn you right now.
You’re going to need a few things since while you can play the 3DS version of Mario Kart 7 entirely with just your headset once you get it set up, you will need a PC and a cable to connect your Oculus Quest to your PC in order to start.
Other than the computer and the cable, also keep in mind that you have to get your hands on a .cci, .3ds, or .rom file of the Mario Kart 7 game. So to get started here are the things that you will need.
A PC.
A cable capable of connecting your computer to your Meta Quest: If you don’t have a cable already there’s always the official Oculus LInk Cables. However, there are also cheaper third party cables available from amazon.
A game file of Mario Kart 7 on your PC. This will only work if the file is one of these filetypes: .rom, .cci, .3ds (.cia files do not work)
Enough storage space on your Quest. (Even 1 GB is enough)
With all of these things, you can start by setting up SideQuest on your Meta Quest 2 or 3. SideQuest is vital because you’ll use it to install the actual application, CitraVR, that you have to use to get Mario Kart for VR running. If you don’t know how it’s not difficult to, but it will take a little time and effort.
Once you have SideQuest installed on your Quest device, go ahead and use SideQuest to install CitraVR. You’ll have to use your computer and cable during this setup as well. Not only do you need to install the Citra VR application, but you’ll also want to use your link cable to move over your Mario Kart 7 3DS game file while you’re at it. Setting up CitraVR is also very straightforward if you know how to do it.
Once you’re done setting up Citra VR make sure that your Mario Kart 7 game file is in your Citra games folder. If it is it should appear in the CitraVR games menu.
Keep in mind that the first time you run VR Mario Kart it will stutter and lag. This is due to caching shaders and other data in the background and should fade completely in thirty minutes or less.

Mario Kart VR can be run from the Games menu in Citra VR.
Making Mario Kart VR Look Great
Once you’re through with the setup you can play VR Mario Kart already, but it won’t look as good or be as immersive as it could be.
By default, the 3DS upper and lower windows will show up in your headset in a Mixed Reality mode, kind of like a gigantic version of a handheld 3DS. You can play the game entirely this way if you like. The controls are all mapped to your Quest controllers (more on that in the section below) and after the stutters wear off it should play just fine.

Mario Kart VR will run in this large screen Mixed Reality mode unless we change some settings.
Still, you may be able to get it looking better than the old low resolution 3DS graphics can. They were intended to be seen on a much smaller screen after all. So if you want a bigger version of Mario Kart for the 3DS in VR, then here you have it. If you want a truly more immersive Mario Kart VR experience, then keep reading.
The first thing we’ll do is replace those floating 3DS screens with a more in your face and first person view of the game. This is done by clicking the gear icon in the top left of the CitraVR menu and then clicking on the “VR” menu.
Then scroll to the bottom and enable the slider for Immersive Mode. This will wrap the 3DS screen directly around your face when you’re playing a 3DS game in VR, and will add a lot of additional immersion to Mario Kart by putting you into the seat of your kart.

Enabling Immersive Mode will wrap the 3DS screen around your face.
While you’re here you can also improve how well 3DS games will run by setting your CPU level as high as it will go. This is recommended at least the first few times you try Mario Kart for VR.
We can also improve how the game will look while we’re in the settings. Do this by going to the “Graphics” section in the settings menu.
There are an absolute ton of settings here, but those that make the most difference have to be “Internal Resolution” and “Depth.” Set the depth slider as high as it will go, and set Internal Resolution as high as you dare.
Keep in mind that a higher resolution means more demand on your headset. If you’re using a Meta Quest 3 or Meta Quest Pro you should be fine increasing it quite a bit, but a Quest 2 might struggle a little more. If the game doesn’t run well then come back and lower this setting.

Setting the Depth and Resolution higher will make Mario Kart in VR look much better.
Once you’re in the game here are the controls:
A - Drive
B -Reverse
Right grip - Hop
X - Item
Y - Drive
Thumbsticks - Toggle first or third person by pushing forward or backwards when your opposite thumb is resting on the thumb rest next to the buttons
Triggers - Select things in menus
How Does Mario Kart 7 Play In VR?
Once you’re back in the Mario Kart VR and have a race started, rest one of your thumbs on the thumb rest of its controller.
The “thumb rest” is the empty space right next to the two buttons on the controller, away from the joystick. Once one thumb is rested there press forward with the joystick on your other controller using your opposite thumb.
This will bring your view forward and put you right inside of your kart like you are the Mario Kart character you’re playing as. Completely first person, completely immersive. Now that’s Virtual Reality.
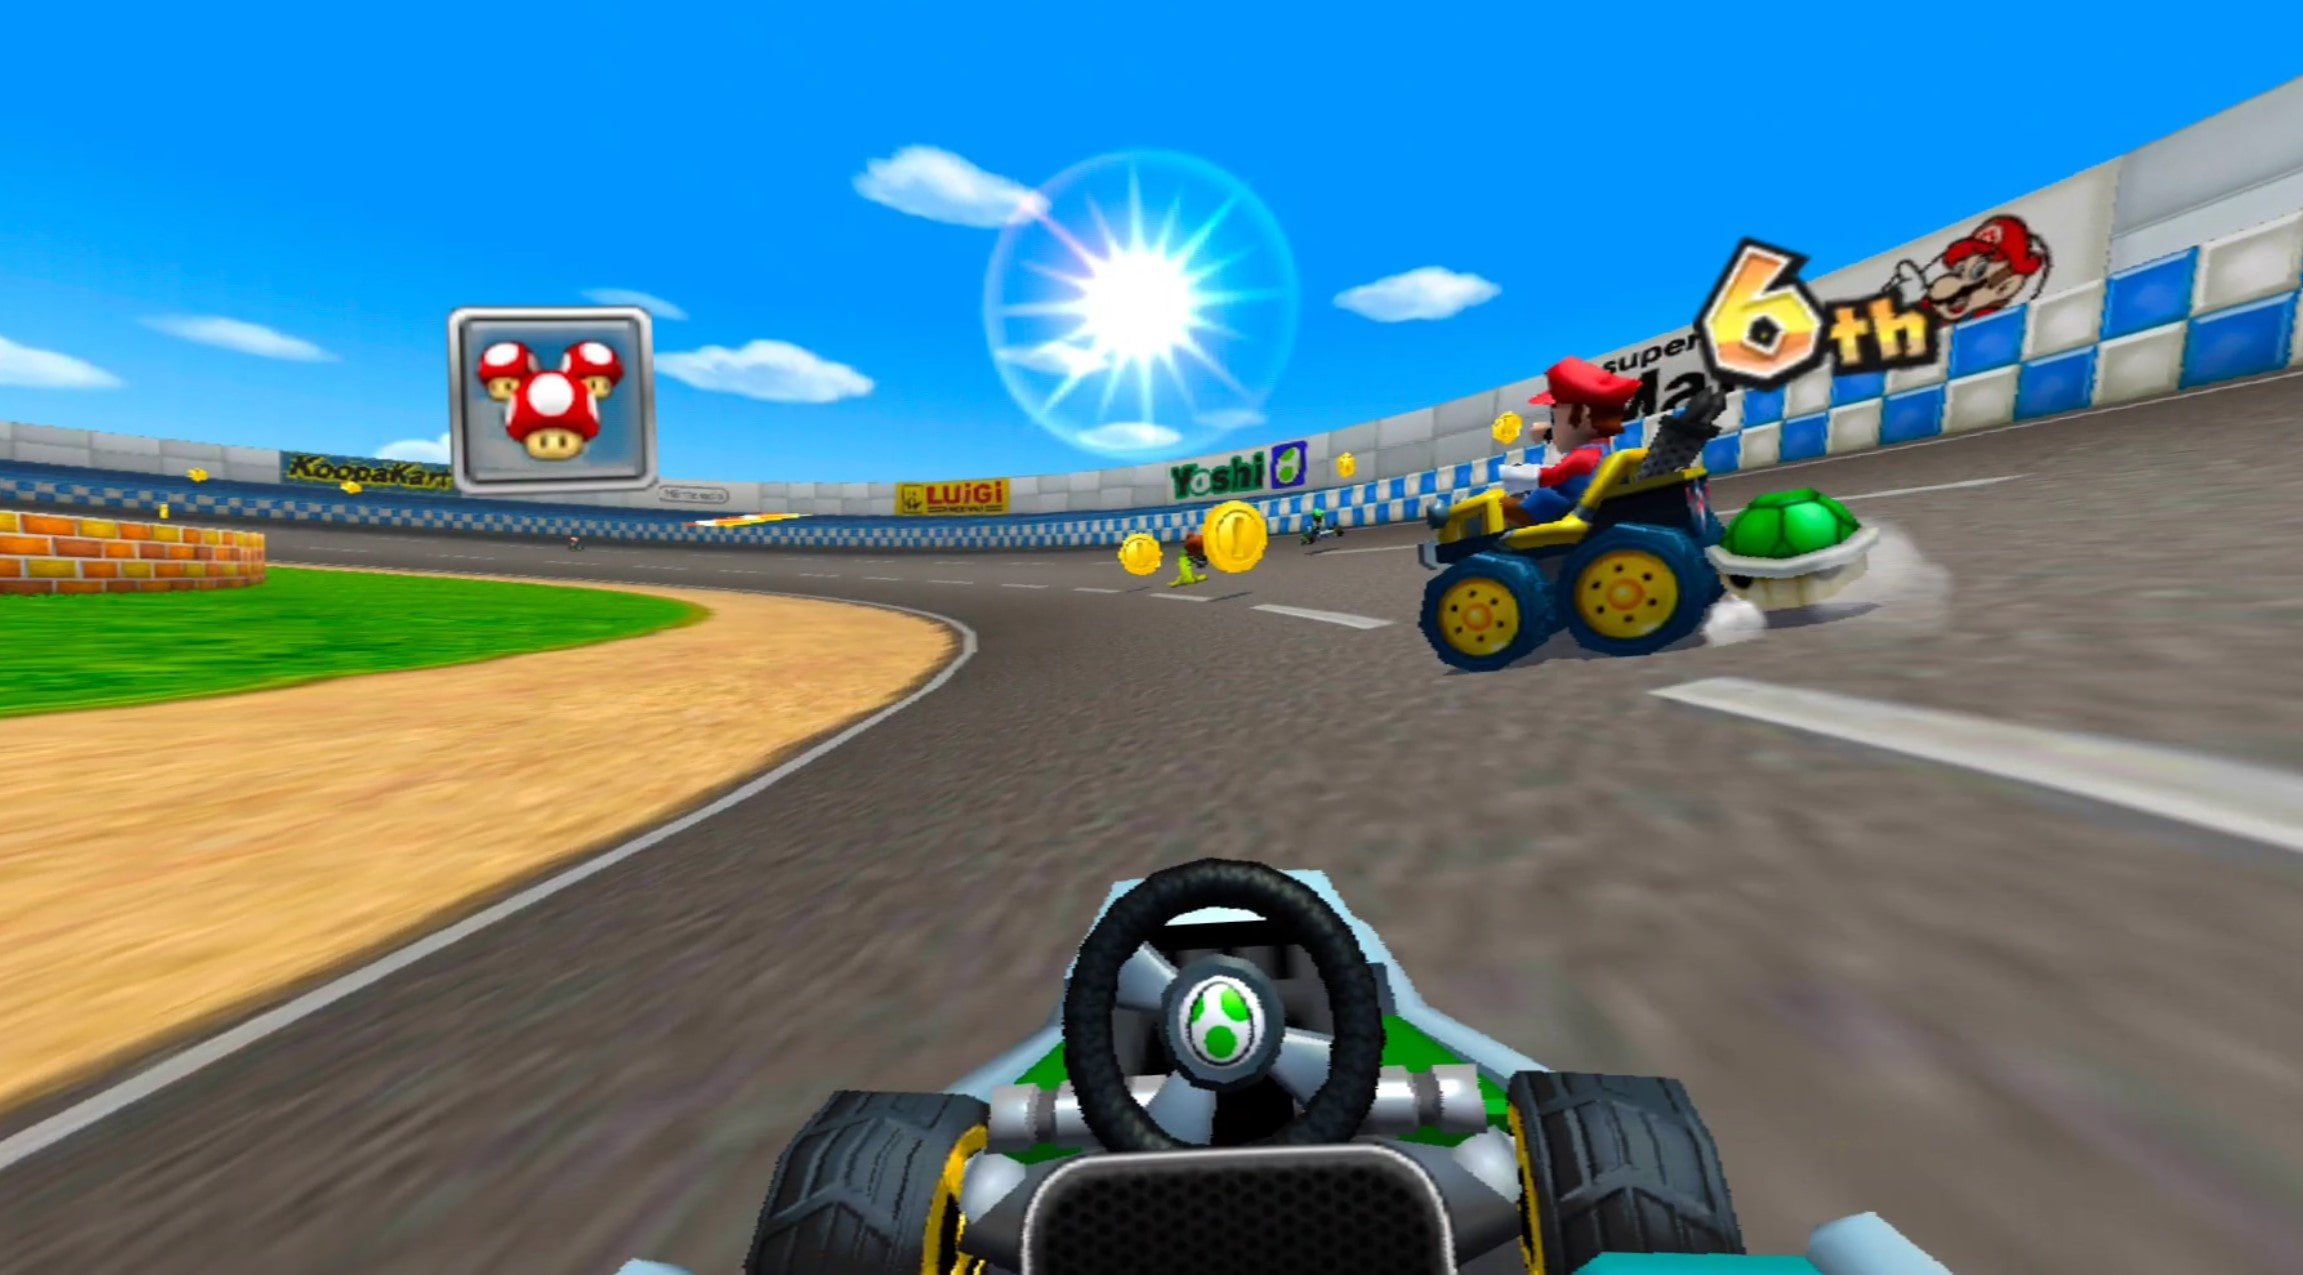
Make sure to set the view to first person as it’s much better for Virtual Reality.
Playing in the third person as you would normally on a flat screen is great and all, but Mario Kart in VR is a completely different experience when you experience it in first person.
You can really feel every turn as you take it, and running over a banana is a lot more startling when you see it right up in your face just before you hit it.
The game still plays like Mario Kart, there’s no denying that, and Mario Kart 7 is already a fantastic game on its own, but there is a quality added by playing it in Virtual Reality that brings it to the next level. You get the benefit of a giant virtual screen already, but using CitraVR’s immersive mode and wrapping that screen around your face makes you feel like you’re in the seat of your Kart.

This picture doesn’t do VR Mario Kart justice.
That’s really how Mario Kart in VR feels and plays, a lot like Mario Kart with different controllers, but also elevated and more intense.
It’s enjoyable, and a really fun experience even if you’re just looking for a good VR racing game in general. The only downside is that you can’t turn around and look behind you as you can in so many other VR games, but this is still a long way in terms of VR immersion. Enjoy!

Easily Install CitraVR To Play VR 3DS Games on Meta Quest
If you’ve ever wanted to play VR 3DS games on your Meta Quest 3 or 2 then you might have heard of the app CitraVR. It’s a version of the popular emulation application Citra built specifically to run on Oculus Quest devices.
Once you have CitraVR installed on your Quest then you can play Nintendo 3DS games on your Quest headset without having to keep it connected to a PC. All for free!
Citra VR even has special settings that make 3DS games even more immersive in VR by wrapping the view of the game around your Virtual Reality 3D perspective. Essentially putting you inside of your favorite 3DS games using the magic of Virtual Reality.
So in this article, we’ll get into how to set up and install CitraVR so that you can play 3DS games on your Oculus Quest 2 or 3 device. Here’s how.
How To Install CitraVR On Your Meta Quest Device - Prerequisites
Before we get into the installation process here are a few things that you will need before you get started. There’s no point wasting your time attempting to install CitraVR before you meet these prerequisites:
A PC.
A cable that can connect your PC to your Quest, aka a “Link cable”: If you don’t have one there are official Oculus LInk Cables. Though if you don’t want to spend as much money there are third party cables available from amazon.
Emulation game files for the games you want to play in VR on your PC. CitraVR will only work with these filetypes: .rom, .cci, .3ds (.cia files did not work with this method). Some games may not work well and unfortunately, there is no reliable compatability list to check before you try.
Enough storage space on your Oculus Quest device to fit all of the game files you will be moving to it.
SideQuest, the popular sideloading application for the Quest. Installing it is very straightforward, but will not be covered in this article. Luckily there is a complete guide already.
If you have all of these things then you have everything that you need to install CitraVR on your Oculus Quest 3 or 2. Here’s how to download and install CitraVR.
How To Install Citra VR On Your Oculus Quest Device - Add Your 3DS Game Files
You’ve got all of the prerequisites and are ready to install CitraVR, so let’s get started.
First, you’ll need to connect your headset to your PC with your link cable. Once one end of the cable is connected to your computer then put the other into the charging port on the side of your headset.
Make sure you have your headset on, or put it on quickly, after you connect the cable. There may be some popups asking you to allow USB debugging, but most importantly a little prompt that asks you whether you want to allow access to files on the newly connected device.
This prompt will appear just above your home menu bar, so make sure that you are looking at your home menu and click it in time.

Unfortunately the popup text did not show up in recording, but it will appear here.
If you miss this popup then you’ll have to disconnect the cable from your headset and reconnect it again so that it will appear once more.
When you click it successfully a new file explorer window will appear on your PC. It contains all of the files in your Quest. Open in up and you’ll see every folder inside of your Meta Quest.
Create a new folder on your PC. Name it whatever you like. In the example, it’s named “ROMs.” Move all of your 3DS game files into the ROMs folder.

Add a folder to here, like the “ROMs” folder you see here.
This is the folder where Citra VR will both be set up and access your game files. Once all of your 3DS games are moved over to your Quest disconnect the cable. You won’t need it or your PC for the rest of this guide.
How To Install CitraVR On Your Oculus Quest Device - Installing Citra VR
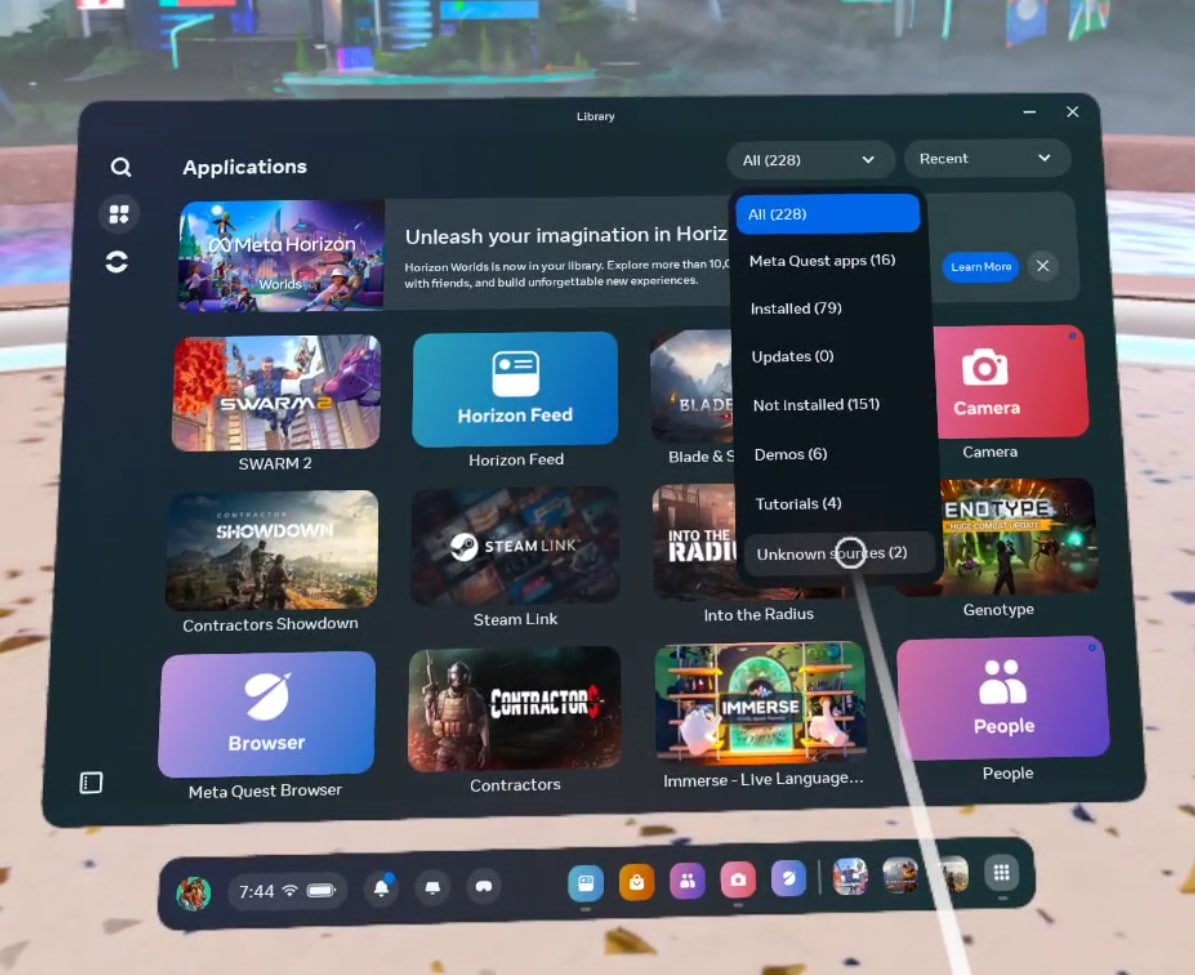
Put your Oculus Quest on and go to the “Unknown Sources” section of your app library.
To do this open your app library like you normally would to play a game on your Quest and then click on the “Applications” button in the top left to open your applications page. Once this menu is open click the dropdown button in the top right that is set to “All” by default. A dropdown menu will appear, click on it and then click on “Unknown Sources”.

SideQuest will download and install CitraVR for you, easy peasy.
From thee “Unknown Sources” menu launch SideQuest. As mentioned in the prerequisites you’ll need SideQuest installed to follow this guide.
Once SideQuest loads go to the search bar and search for “citra” or “citravr” and the CitraVR application will pop right up. Click on it to open the CitraVR SideQuest page and press the download button.
Just as with downloading any other SideQuest app you’ll soon see a popup in the bottom right of the SideQuest window stating that CitraVR has been installed successfully. Exit SideQuest once Citra VR is installed.
How To Install CitraVR On Your Meta Quest Device - Setting Up CitraVR
Go back to the “Unknown Sources” page in your app library and launch new the CitraVR app.
Click the dropdown in the top right to go to the Unknown Sources menu.
When you first launch CitraVR you’ll get a menu asking you to set up the application. When you see this hit the big green “Get Started” button.
Then it will prompt you to grant Citra VR permission to use your microphone and camera. Give CitraVR every permission that it asks for and once each step is completed hit the “Next” button in the bottom right corner of the app.
After granting permissions, you’ll get a new prompt asking you to select your User folder. Luckily you already have a folder ready to go, the one you created in the first step of this guide.
Just hit the big green “Select” button and in the following menu select the folder you created earlier. After selecting the folder hit the blue “Use This Folder” button at the bottom of the page, hit “Allow” when asked to confirm, and hit “OK” on the final popup.

Use the folder you created earlier as the User and Game folders.
Next, you will be prompted to select your Games folder, which is done in exactly the same way as selecting your User folder. We’ll also be using the exact same folder, so just repeat what you just did for the User folder.
Once that’s done you have successfully installed, configured, and run CitraVR! Congratulations.
Using Citra VR
Once you’re presented with the Citra VR main menu you’ll get a few popups telling you that games may experience stutters and that all games may not work well. Keep this in mind. Not all VR 3DS games will work as well as you might hope, but many do.

CitraVR will run with some stutters at first, but they get better.
Once you’re done with these popups you’ll be presented with your games folder, which should have all of the games that you previously moved over to your CitraVR folder.
If some or all of your 3DS games do NOT appear:
Check the file types of the game files. These are the compatible filetypes: .rom, .cci, .3ds (.cia files did not work with this method)
Go to the Settings menu by pressing the gear icon in the top left and check that your Game folder directory is set correctly to the folder containing your game files
Restart CitraVR
Restart your Quest headset
Keep in mind that not all 3DS games will work well, or at all, with Citra VR. This is third party software and so they can’t guarantee full compatibility with all 3DS Nintendo games.
Once you launch a 3DS game in VR successfully it will appear in front of you as two large mixed reality screens, one for the top screen and one for the bottom. You can interact with the bottom 3DS screen by clicking it with one of your controller pointers, and the top screen by using your touch controller’s buttons and joysticks.
In the settings menu, you’ll also find an “Immersive Mode” which will wrap the upper screen around your view when you play a game. It might not look fantastic on all 3DS games but it is definitely worth a try to get the most out of Virtual Reality 3DS gaming. There are also a ton of options to increase the graphical fidelity of your Virtual Reality 3DS games, but these may cause performance issues.
Well, hopefully, this guide helped you to get started in the wonderful world of 3DS VR games with the CitraVR emulator. Enjoy!